3D printing a model that is huge or has many pieces is a challenge, especially if you have a 3D printer with a smaller build volume. To solve this, you need to split the model into smaller parts using a 3D slicing software tool and then print each piece differently and later attach them.
Many 3D slicer programs are available for performing the task, but the most popular is Cura, and we will look at how you can use it to split your object into printable parts.
Cura Slicer in Detail

Cura is a free, open-source 3D slicing software package that enables users to convert STL files into G-code. A G-code file is a contains the instructions for the 3D printer. In addition to being one of the best 3D printer slicers, Cura is helpful in modifying and fixing meshes before the 3D printing process. It is also compatible with most 3D printers, and you can learn how to use it easily.
Reasons You Might Need to Split Your Object
Many scenarios can force you to split the object before 3D printing, such as:
- Your object is too big to fit on your 3D printer's build plate: If the design is too large compared to the area supported by your 3D printer, you will need to split it.
- The object has too many intricate details: If your design has many complicated parts, you will need to split it to get a high-quality print. This will allow you to print each piece with greater detail and accuracy.
- You want to print your object in multiple colors or materials: If you're going to add a splash of color to a section of your design, you can split it and print using a different filament.
- If you want to avoid supports: 3D printing supports are required in specific designs, especially those with overhangs. Without these supports, the model can easily collapse. Splitting the object will not only help prevent supports, but it will also help save on material and time.
You can follow the steps below to split your object into multiple parts in Cura.
Step 1: Download and Install Cura

Go to the Ultimaker Cura website and select Download for free. A window asking you to choose your operating system will pop up. Cura supports Windows, macOS, and Linux. When you finish downloading, install and launch the software.
To split the model, we will use two methods:
- Using the Mesh Tools plugin
- Using the Scale and Move tools
The Mesh Tools plugin works well if the model is created with different parts but exported as one piece. The plugin can detect the parts that were different and separate them. However, if the model is a single design with no separate pieces, you can use the Scale and Move tools.
Step 2: Install the Mesh Tools Plugin and Import Your Design
The Mesh Tools plugin is one of the top Cura plugins that help improve the 3D printing workflow. To install it, go to Marketplace > Mesh Tools, then select Install.

A pop-up window will appear, asking you to accept the plugin license. Click Agree and restart the software and proceed to import your design. To import your model, go to File > Open File(s), locate where you have saved it, and import it into the software.

Once the file is loaded, you will be ready to start splitting.
Step 4: Splitting the Object
To start splitting the object, right-click on it, then go to Mesh Tools > Split model into parts. Wait a few seconds, and Cura will split the object into multiple parts.

You can modify each part based on your requirements, export each as a G-code file, and print them individually. If the object you want to split is a single piece with no extra parts, you will need to use the Scale and Move tools. To use these tools, you will begin by importing the file using the method we used above.
In our case, we are using the design shown below to show the process. Once you import your 3D model, proceed to the next step.

Step 5: Splitting the Object Using Scale and Move Tools
If you try slicing an object that is bigger than the size of your 3D printer, you will get an error, as shown below.

To make it easier to slice, you will need to split it into two parts. To do this, select the Scale tool, found in the middle left of the workspace, and check the current dimensions of your design.

In our case, X is 161.64mm, Y is 161.64mm, and Z is 364.916mm. Because we would like to split the object in half from the top, we will divide 364.916 by two, which is 182.458.
Next, we shall go to the Move (“T”) tool option and set Z to the negative (-) of half the value we got earlier: -182.458.

The model will be split into two parts—half on top and half below the build plate.

When you select Slice, you will not see an error like before because the design fits the build plate now, unlike before.

The next step will be saving your model and sending it to the 3D printer.
Step 6: Exporting the Object
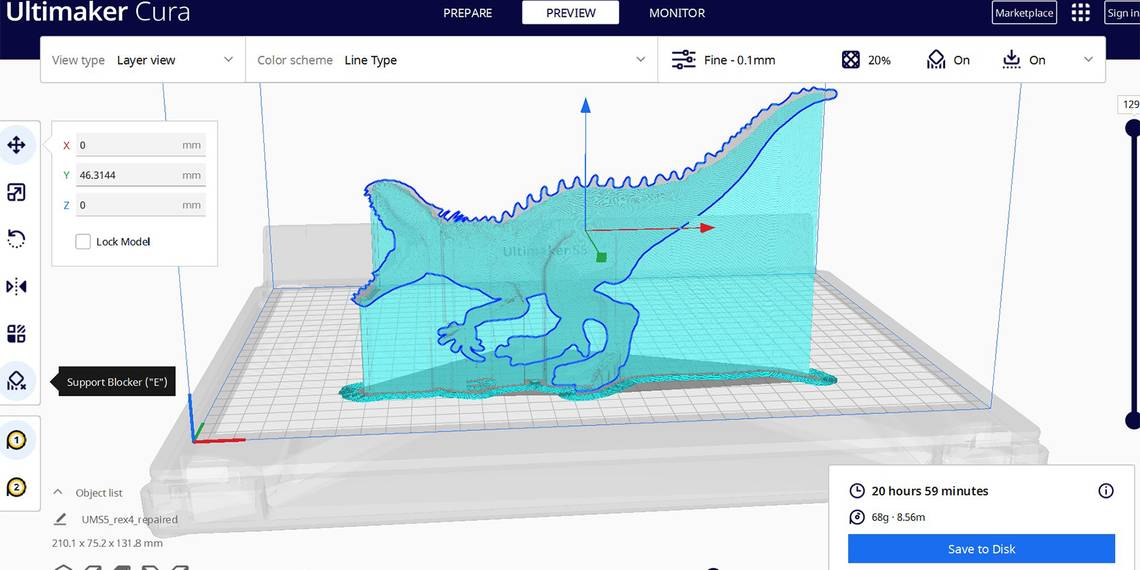
Once you finish 3D slicing, you can preview the result by going to the Preview section.

You will see how your object will be 3D printed, the time it will take, and the size of the material used. For our example, the part that we are previewing is the top half only. Once you finish previewing and are satisfied with the results, click Save to Disk and choose the folder where you want to store it.
Step 7: Slicing and Exporting the Bottom Half of the Object
To prepare the other half for 3D printing, click on the Rotate (“R”) tool.

You will see rotation points appearing on the object. Rotate by 180 degrees so the bottom part may come on top, as shown below.

Next, click Slice, save your file, and you will have successfully split your object.

You can now send it now to your 3D printer. After 3D printing both parts, you can connect them.
Split Large and Complex Objects Easily in Cura
Cura is a great slicing software tool that can help you easily split large and complex objects. The good thing is that it is free and has a user-friendly interface. By following the above steps, you should be able to 3D print even objects whose dimensions are larger than your build volume, or those with detailed or complex structures, by splitting them into several parts before 3D printing.