Perhaps you’re in a position where you need to ask your coworkers for help or send them assignments, but you’re feeling a bit awkward about it—or you just don’t care about all the calls and emails back and forth. Why not create a project request board?
While you could sign up for a project management tool like ClickUp or Asana and get your coworkers to join you, you may already have access to a simple, no-cost solution—Google Sheets. Follow along with this article to learn how you can build a project request board using this common spreadsheet tool.
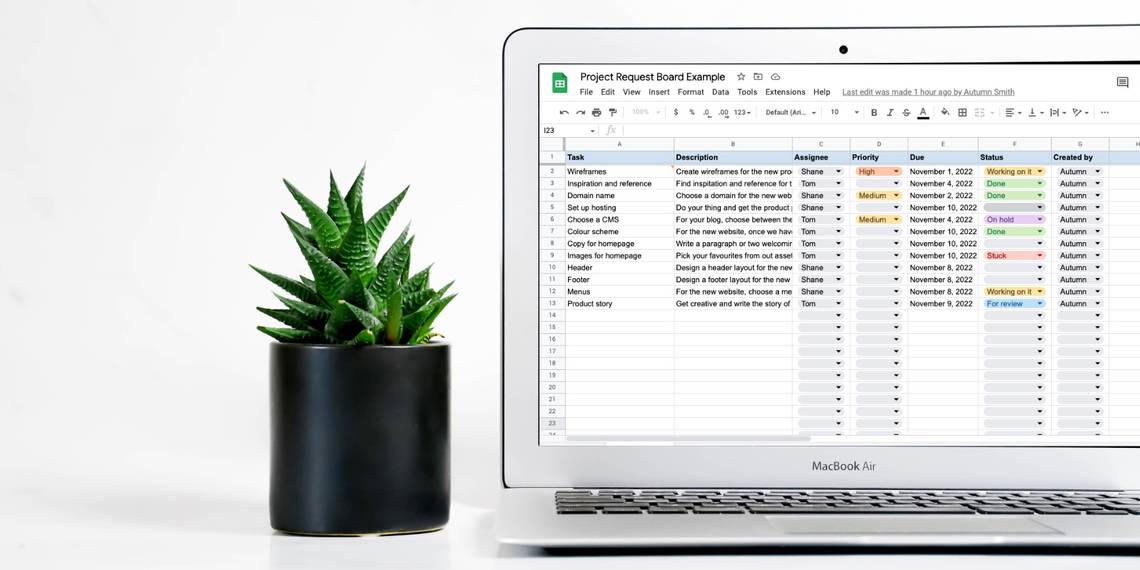
Creating a Project Request Board Layout in Google Sheets
The goal of creating a project request board is twofold. It serves as a way for you to overcome the friction caused by delegating tasks. Plus, it reduces back-and-forth communication, saving you time.
Essentially, with each assignment you add to the board, you’ll map out everything your coworker needs to know to complete it. So you’ll want to be consistent and create a layout that prompts you to add vital details each time. Details like:
- Due dates.
- Priority.
- Descriptions.
- Who’s responsible.
- Who’s assigning it.
Since every workplace is different, there may be some additional details you can include to tailor it to your team's needs. So, before getting started, take a moment to mull that over. If you can’t think of any now, you can add them later, but remember, less is more. You wouldn't want to add any unnecessary steps.

To get started with your project request board, open a blank document in Google Sheets. Write the following titles, and any extras you come up with, across the top of the spreadsheet:
- Task—here, you’ll give the assignment a unique title.
- Description—under this title, you’ll write a brief summary of what you need them to do. To keep things tidy, use Clip in your Text wrapping settings to tuck text under the next cell.
- Assignee—this is where you’ll tag the coworker you’re handing the task over to.
- Priority—here, you can display the urgency.
- Due—this will communicate the task’s deadline.
- Status—your team uses this column to share progress.
- Created by—the delegator will put their name here so that assignees know who the task and information are coming from.

Help your titles stand out by bolding them and adding a background color to the row. You can also freeze the top row of your Google Sheet by highlighting it and going to View in the top menu, Freeze, and then 1 row.
Adding Status Buttons in Google Sheets
Adding a status button to your project request board gives you and your coworkers a quick way to share progress. It’s also a great way to get a quick overview of everyone’s workload and identify if someone could use an extra hand. Some examples of status you can use are:
- To-do.
- Doing.
- Done.
- Stuck.
- On hold.
- For review.
You can create a working status button, much like the ones you find in project management software like ClickUp and Asana, by adding a dropdown menu to your sheet. To do this:
- Highlight your status column. Hold CTRL or CMD and click the title cell to deselect it.
- Go to Data in the top menu.
- Click Data validation, and a sidebar will open.
- Under Criteria, make sure you have Dropdown selected.
- Fill your options into the text fields below, using the Add another item button to create additional spots.
- Assign each one the color of your choice.
- Hit Done.

Now you’ll have a menu your team can use to show a task's status. There's an edit button at the bottom of the list, but that only works for the selected cell. To change all your status buttons, return to the data validation menu and pick the rule you want to edit from the sidebar.
Repeat these steps to add quick options to your Priority, Assignee, and Created by columns if you want.
Using Comments to Assign and Discuss Tasks in Google Sheets
If you simply tag or mention someone in the sheet, Google won’t send a notification. When assigning someone to a project, you can give them a heads-up by following these steps:
- Select the name of the task you’d like to hand over to them.
- Right-click and choose Comment or go to the speech bubble icon in the toolbar.
- Type @ and then their name or email address—if you want, you can also include a message here.
- Click on Assign.

Now, if your coworker has questions, they can add them as a comment in the same thread. By keeping all of your communications about the task in the same place you assigned it, you’ll both know exactly where to find the conversation again later if someone needs a refresher.
Using Version History in Google Sheets
Since there will be more than one person using the sheet, it’s good you have a backup, just in case someone accidentally deletes or writes over important information. At the top of your sheet, you’ll notice a hyperlink that states the most recent edit occurred. Click this, and you’ll see backups from previous work sessions and the changes that took place.
Using version history in Google Sheets is handy because you can see your previous projects and notes if you need a record of them. But you can also revert to a previous version if your sheet gets messed up somehow—it happens.
Note: If you want a more direct record of completed assignments, add another sheet to your document using the plus symbol in the bottom-left of your screen and cut and paste your rows in there once the status changes to Done.
Get Collaborating With Google Sheets
Creating a project request board in Google Sheets is an excellent way to save time when delegating and collaborating on assignments. Not only will there be less back and forth, but everyone will know where to find the information for tasks, having it all in one place.
It also helps you avoid some of the awkwardness you could feel about asking for help or dishing out tasks. You’ll get more comfortable with that as you go.