You can't complete a real-life project in Python successfully without a virtual environment. Tools like virtualenvwrapper and virtualenv are common for creating and managing virtual environments for web development, while anaconda is widely used by data scientists.
Let's examine how you should create and manage your Python virtual environments with the various management tools available.
How Virtual Environments Work
When you create a virtual environment, you're instructing your machine to make an additional temporary copy of Python. That copy is independent of the Python version on your system variable. If you're not familiar with this, take a look at the basics of Python virtual environments.
The created virtual environment doesn't just work; you'll need to activate it. In fact, anything you do outside of a virtual environment will not work without activation. This is a way to keep your global space a lot cleaner.
The basic principle is that the dependencies in virtual A will not work for virtual B---unless you install the dependency specifically for virtual B.
Despite this, a common pitfall for most newbies and even some experts is to install their dependencies in the global space before activation. That will never work; you should always activate before dependency installation.
How to Use the Various Environment Tools: Pros and Cons
As mentioned earlier, different environmental management tools exist for Python. Let's take a quick look at each one of them, including how they work and their possible shortcomings.
1. Virtualenv
Virtualenv is an awesome management tool for those that know their way around it. It's pretty simple, though it can be frustrating for beginners.
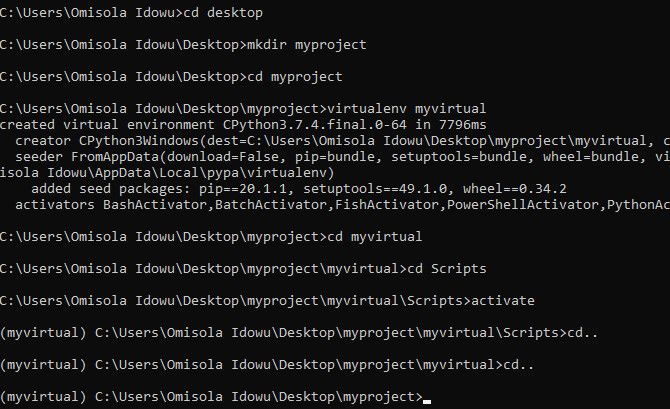
To create a virtual environment with it on Windows, open up a Command Prompt window to your chosen location. Type mkdir [Folder] to make a new folder, replacing the text and brackets with your chosen name.
Next, type cd [Folder]to move into the new directory, followed by the command virtualenv [Environment Name]to create a virtual environment.
If you're not familiar with the command line yet, take a look at some essential Command Prompt commands you should know.
Next, change folders into your virtual environment by typing cd [Environment Name]. Once you're inside [Environment Name], type cd Scripts; be sure to use an uppercase S in Scripts. Once you're inside the Scripts folder, activate the virtual environment by typing activate.
One major disadvantage of using virtualenv is that you must be in its Scripts directory to activate it. Thus, you'll need to do a lot of navigating around. For instance, if your project is in another directory, you'll have to navigate back into it from the environmental Scripts folder. This process can become tiring, confusing, and inefficient.
To reduce this busywork and save time, a good practice is to make the virtual environment in the same directory where you intend to place your project. This way, each project will have its specific environment inside of its containing folder.
That can save you a lot of trouble when trying to recall the virtual environment that's specific for a project, in cases where you have different virtual environments for various projects.
Take a look at the image below for how to do this. Note that myproject and myvirtual are the project and the virtual environment directories respectively.
2. Virtualenvwrapper
As the name implies, virtualenvwrapper wraps all your environments in a single folder. Unlike virtualenv, it creates that folder by default and names it Envs.
Note that the installation command for virtualenvwrapper on Windows is pip install virtualenvwrapper-win. But pip install virtualenvwrapper will work for macOS.
To make a virtual environment with this tool, open up CMD; you don't need to navigate into your project's folder. Once at the command line, type mkvirtualenv envname. It creates a pre-activated virtual environment for you.
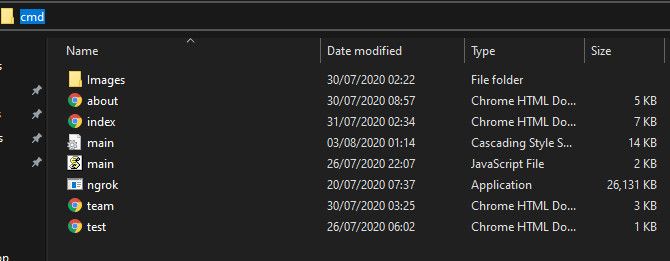
The next time you want to use the created environment, a good practice is to open a Command Prompt directly in your project's directory. You can do this by opening the project's folder and typing cmd in the large navigation box at the top of the panel.
Once you're in the CMD, use the command workon envname to activate your virtual environment.
Although this tool is quite handy and easy to use, it becomes a problem when you forget the name you gave to an environment for a particular project. That's common when you already have dozens of virtual environments in that one Envs folder.
However, it's a waste of time if you have to keep trying out each of the environments to see which one works. To solve this problem, always ensure that you delete redundant virtual environments in your Envs folder.
3. Anaconda Distribution
Anaconda distribution is a heavy environment management solution created for data science. Although, depending on preference, it's still used in web development. This tool comes with a navigator that lets you create and manage your environments.
It's more automatic than manual and acts as a combination of the virtualenv and pip packages. This means you can always use conda install to install dependencies instead of pip. But for some reason, conda seems to be limited in terms of package installability.
One solution to this limitation is to install pip in your conda environment using the conda install pip command. In some cases, that may not be necessary, as calling pip directly in a conda environment without hard-installing pip still works.
However, conda isn't recommended for newcomers that use Windows, as setting it up requires some technicalities. That's beyond the scope of this discussion, but for a quick idea, you'll need to add your Anaconda distribution to your system's path.
Note that Anaconda also has a built-in shell, called Anaconda shell, that carries out instructions like the CMD. You can try it out by searching for Anaconda prompt via your Windows search bar.
To use the conda as an environmental management tool, you'll need to first install the Anaconda distribution. Ensure that you select the correct operating system before you start your download.
After setting up your Anaconda distribution, open up your command prompt and type conda create envname to create a conda's virtual environment. For Windows users, conda isn't available for direct use in the command line. You'll have to call it from the batch file using conda.bat create envname.
To activate an already created virtual environment, use conda activate envname. If you're a Windows user, type conda.bat activate envname. When you open up the Anaconda Navigator, all available environments will be listed out.
Version Upgrade and Downgrade in Virtual Environments
If you're working on a project and need to change the version of a dependency, an easy way to do that is to upgrade to the version of interest.
For instance, if you wish to upgrade a pandas version, open up your CMD and type python -m pip install --upgrade pandas==0.25. That command will uninstall the previous version of pandas and install the newly requested version.
It's pretty much the same if you need to downgrade a version; all you need to do is to change the version number. That way, you can always switch dependency versions in a virtual environment without migrating into a new one.
Mastering Virtual Environments in Python
These Python virtual environment tools come in handy and are easy to interact with. Don't worry about which ones other people consider "the best;" it's more about your preference. The right tool is the one that best serve your project.
For more on Python, check out how to program and control your Arduino using Python.


