Whether you're an entrepreneur or a corporate professional, you must have a business card to help you network. However, as we transition from traditional physical workspaces to online, remote, and virtual work, so should our business cards.
After all, if you're attending a virtual summit, there's simply no way for you to hand over a physical card to someone who's on the other side of the globe. So, if you have a bit of a creative streak, why not make one yourself?
Here's how you can make a digital business card (that can double as a printed one) using Adobe Photoshop.
1. Prepare Your Information

Before diving into Adobe Photoshop, you should first prepare your information. You need to ensure that you have the correct credentials before you start creating and sending out your digital business card.
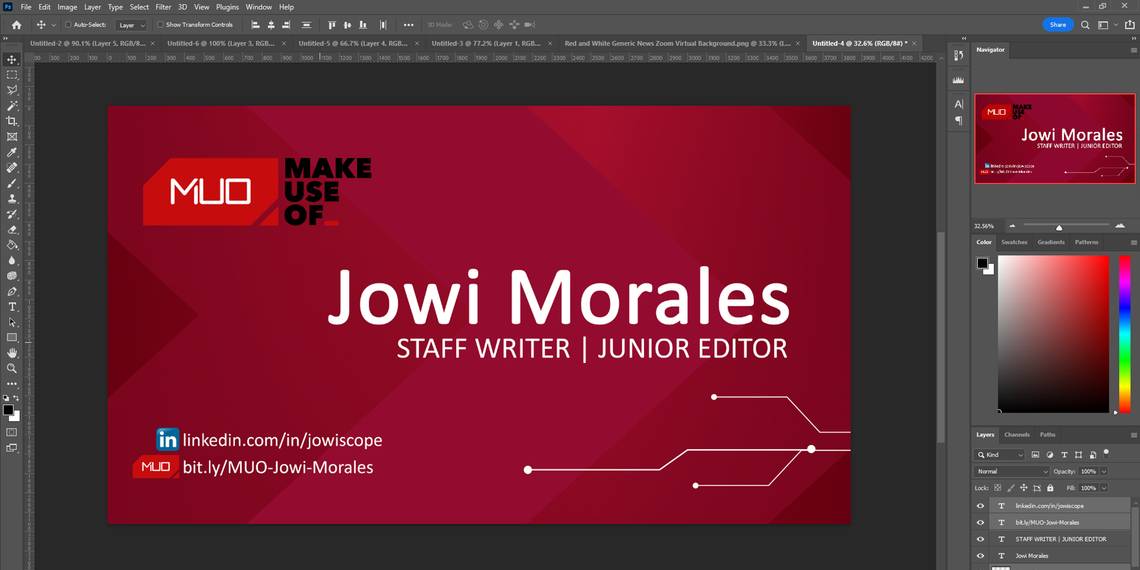
Aside from the basics, like your name, company, and position, you should also add your contact details. If you primarily transact online, you should at least have your email address on there. You should also prepare your professional social media profiles, preferably those with customized links, to make it easier for people to reach you.
If you have accounts on multiple platforms, you can use a link landing page to make it easier for people to find you on their preferred platform. You can also use an URL shortener to customize your links and make them look professional. And if you intend to print your digital business cards, too, it might be useful to add a QR code to make it easier to scan.
Those with physical locations and whose clients contact them via telephone should also add their addresses and mobile or landline numbers.
2. Set the Size and Layout

Most printed business cards have a standard landscape layout of 3.5 x 2 inches. This dimension is similar to credit cards and driver's licenses, as their primary purpose is to be easily kept in wallets and purses. If you're creating a digital business card that you also want to print physically, you'll have to keep with this tradition.
To get started, open Adobe Photoshop. On the top menu bar, click on File > New. Alternatively, you can press Ctrl + N to open the New Document window. From there, go to the right column and under the Width section and choose Inches from the dropdown menu.
You then need to type in your preferred dimensions—let's use 3.5 x 2 inches in this example. Under Resolution, type in 300 and ensure that Pixels/Inch is selected in the dropdown menu beside it. Once you've put in the correct details, go ahead and click Create.
Remember, the numbers given above are the minimum ideal resolution for your file. You can choose a larger custom resolution or change it to a portrait layout if you want to make something unique.
3. Pick a Good Design
If you're good with graphics, feel free to create your own design on Adobe, but you can also find several templates and designs online if you don't know how to make one yourself. You just have to follow one rule when picking a design: it should be clean.
While it doesn't have to be one single color or completely minimalist, avoid using complex shapes and patterns on your card. This can distract the person looking at your card and make your details hard to read, thereby defeating the purpose of easily sharing your credentials.

Once you've settled on a background image, you need to open it in Adobe Photoshop. Then, select the entire image by pressing Ctrl + A or clicking Select > All. You then need to copy it by pressing Ctrl + C or going to Edit > Copy.
After copying the file, return to your original Photoshop file and press Ctrl + V or choose Edit > Paste to place the background image.
4. Include Your Logo and Photo
For most professionals, you don't need to include your photo in your card. After all, your profile picture is generally irrelevant unless you're a model or an artist. It's more important to add your company's logo and make it stand out. That way, the people who have your business card will automatically associate you with your company.

To insert your company logo, you can repeat the same steps as the previous section—open the image file and then copy and paste it into the file you're working on. You then need to resize it to ensure it's the perfect size on your business card.

To do so, press Ctrl + T while ensuring that the logo's layer is selected. Alternatively, you can go to Edit > Free Transform to change your image size. Once you activate free transform, your logo will be bound by a blue box with white anchor points.
Just grab any of the anchor points to resize the image as you desire. You should also ensure that the maintain aspect ratio icon is selected on the top toolbar to avoid distorting your logo.
5. Use a Readable Font
This is crucial for every design, as legibility plays a key part in business cards. That's why you should avoid fancy, hard-to-read fonts. Instead, focus on simple but elegant text that will make it easy to read.
Also, limit your font style to three different designs at most. It can look confusing and disjointed if you have too many different fonts on your card. One rule of thumb is to have two similar fonts to help differentiate your name from other details.

To add text to your digital business card, go to the right toolbar and select the Horizontal Type Tool icon. Your mouse should turn into a text input cursor when hovering over your file. Click on your business card, and you should see Lorem Ipsum appear. Type the text you want to see on your card.

Once you've finished typing, click on Window > Character to reveal the character editing menu. From here, you can change the font, font size, font color, letter spacing, and more. Ensure that the text you want to edit is selected. From there, feel free to experiment with the effects until you get your desired look.
6. Add Your Links

As mentioned earlier, you shouldn't forget to add links to your social media profiles. For a cleaner look, you don't have to type out the name of popular platforms. Instead, you can use their logos, which are just as recognizable.
If you have a physical location, you can also add a Google Maps link, making it easier for people to find your site. And to make long URLs easier to read and type, don't hesitate to use link shorteners.
7. Save and Export

Once you've completed your design and are satisfied with what you've made, you should save your project. To do so, go to File > Save a Copy. In the window that will open, select the directory where you want to save your digital business card.
From there, type what you want to name the file under File name. And then, under the Save as type dropdown menu, choose either JPEG or PNG. Once you've made your selections, hit Save. Your digital business card should then appear in the directory where you saved it.
Create Your Own Digital Business Card With Photoshop
In the age where almost everything is on the internet, it's high time for you to have a digital business card. This file can help you easily share your contact information with the right people, leading them to your website, profiles, address, and maybe even your portfolio.
A digital business card goes beyond sharing your basic information. That's because the power of links and QR codes can deliver pretty much anything. Aside from what's listed above, you can use them to add media like podcasts, YouTube videos, or maybe even a sample of your 3D work. With digital technology, the sky is the limit.