
If you aren't familiar with the term catch-all mailbox, it's an email address where you can receive emails sent to invalid email addresses that have your domain name.
To make it more practical, assume your email address is grey101@example.com, and for some reason, your client sends an email to gray101@example.com. Such a mistake would have the email bounce back to the sender. But having a configured catch-all mailbox allows such messages to be delivered to a dedicated inbox that you can access.
Let's look at how you can create a catch-all mailbox in Office 365.
Office 365 and the “Catch-All Mailbox” Option
Among many Office 365 customers, the Catch-All mailbox is a viral feature, primarily because it prevents the loss of business-related information when typos are made on email addresses. Sadly, Microsoft isn't directly supported, presumably because it can cause loopholes for spam emails that overload Office 365 mail systems.
But there is a way around this caveat, and we intend to let you in on it. You should, however, keep in mind that catch-all mailboxes only work for emails sent from external domains. That said, here are the step-by-step instructions to create a catch-all mailbox.
Configuration of a Catch-All Mailbox
To implement the catch-all mailbox configuration in the Exchange Online environment, we propose three simple features:
- The Dynamic Distribution Group
- A Shared Mailbox
- An Exchange Online Transport Rule
Lastly, you will need a new transport rule for Exchange Online. This rule will be responsible for implementing the terms that the catch-all mailbox operates on.
Step 1: Creating a Dynamic Distribution Group
The first step involves creating a dynamic distribution group. This distribution group lists all your organization's Office 365 email addresses to receive emails from external domains. To create a dynamic distribution group, here are the steps to follow.
-
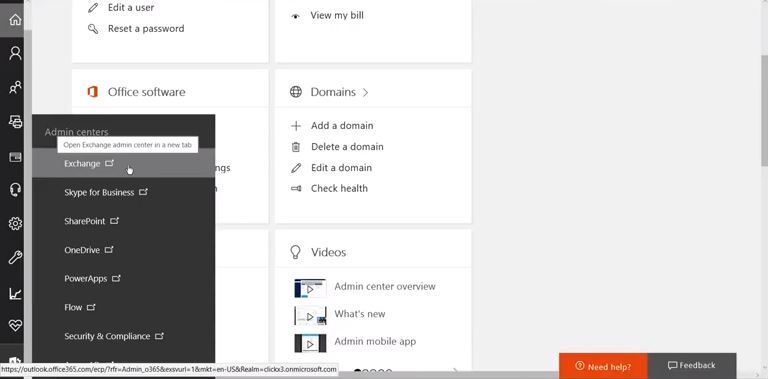
Go to the Office 365 Portal > Show All > Exchange. Clicking on Exchange will redirect you to the Exchange Administration Panel.
- On the Exchange panel, select Recipients > Groups.
-
Once you have done this, find a + sign on a New Office 365 Group drop-down menu and select Dynamic distribution group.
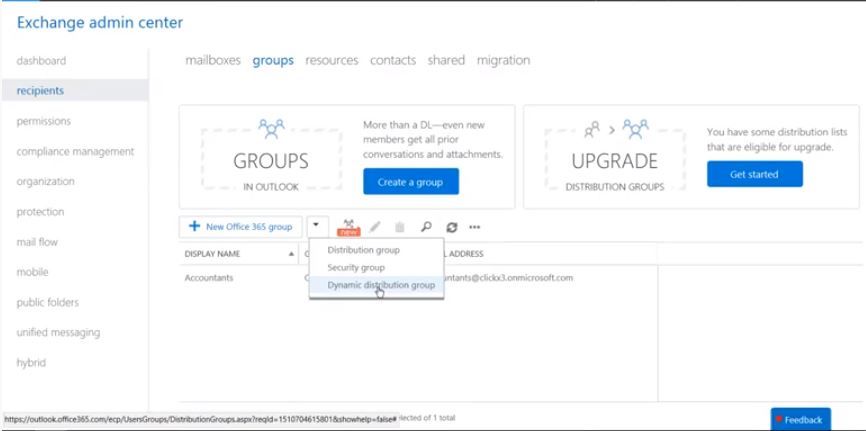
- Then go to Recipients > Groups > Dynamic distribution group. Doing this should open a new field that will require you to input some details. The mandatory information is the Display name and the Alias and Members. You can use the same name for the first two.
- To add members, select All recipient types and click Save.


Now, you have officially created your dynamic distribution group; now, you need to set up a shared mailbox.
Step 2: Setting-Up a Shared Mailbox
The second step in setting up is a shared mailbox. Because an organization has many recipients, it requires a shared space for them to view the emails that come in through the catch-all mailbox. This space is called a shared mailbox. Here's how to go about setting it up:
-
Go to Office 365 Portal > Groups > Shared Mailboxes > + to create a new shared mailbox.
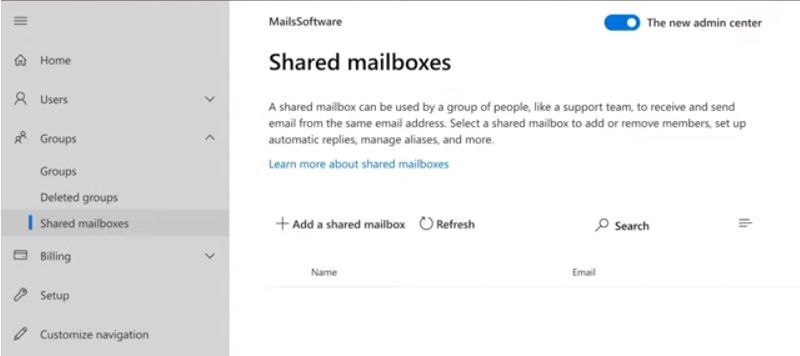
- Then go to Office 365 Portal > Groups > Shared Mailboxes and add a shared mailbox. Here, add your domain name and Admins email address and click Add.
-
In the tab that appears, click Next steps, and select Add members to this mailbox. Click on it and add users who will be in the shared mailbox. Use your dynamic groups here.
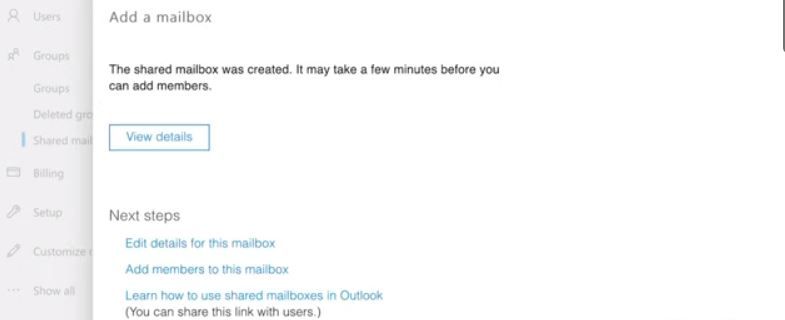
- After adding all the members, click Save, and there you have it. Your mailbox is all set up. Now, what's left between you and your catch-all mailbox is the Exchange Online Transport Rule.


Step 3: Creating the Exchange Online Transport Rule
Now you have your shared mailbox with the dynamic list of people you want on it; it's time to create rules for your catch-all using the following steps.
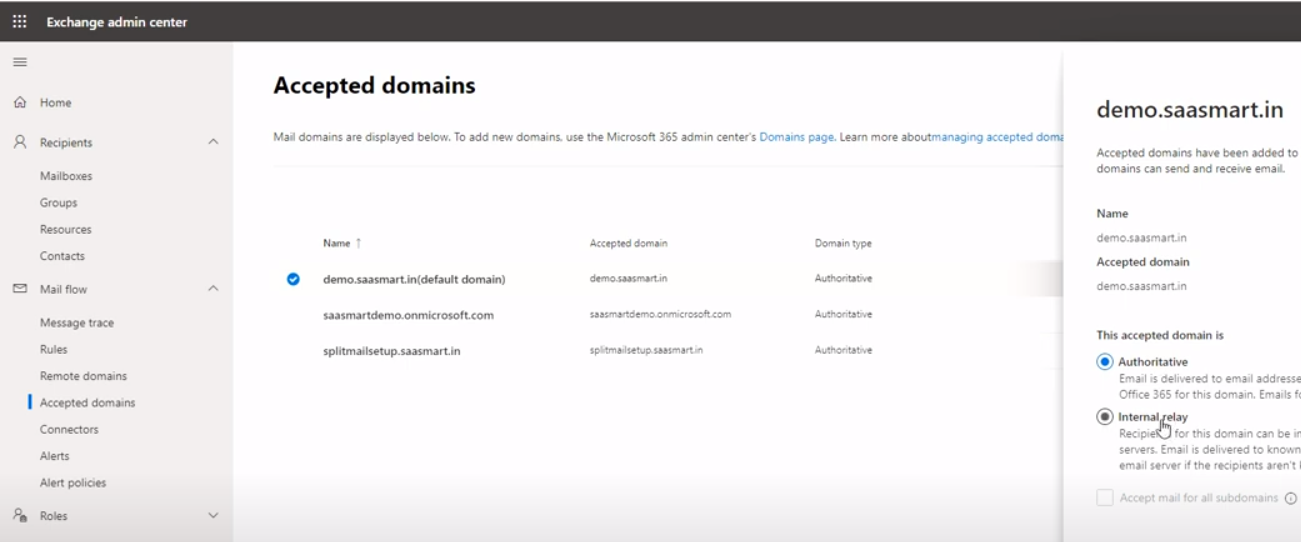
- Go to the navigation menu and select Show all > Exchange > Mail flow > Accepted domains.
- Her choose Office 365 Portal > Show All > Exchange > Mail flow > Accepted Domain > Internal Relays.
-
Make sure to select Internal Relays under your domains. This is a crucial step because it is what makes your transport rule work. So be keen not to skip this step.
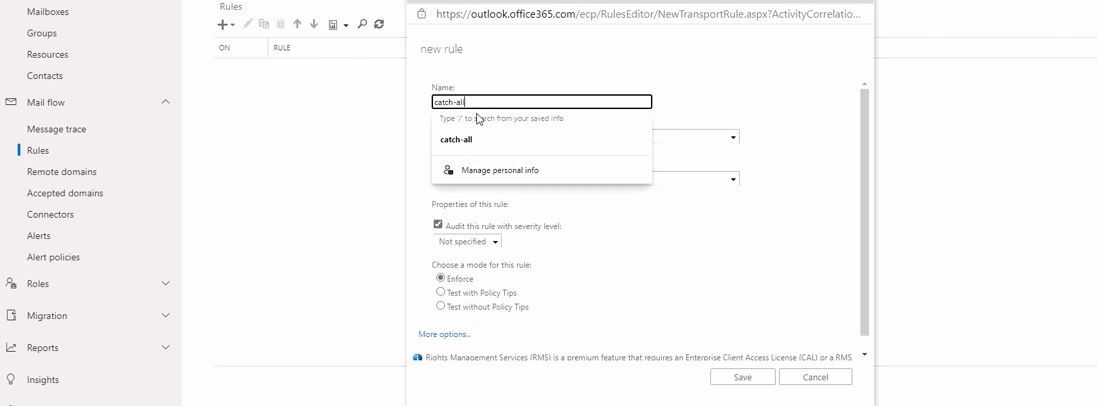
- Then go back to the navigation panel, and click on Mail Flow > Rules > + > Create new rule and name your new rule Catch-all. Now, you need to create application criteria.
-
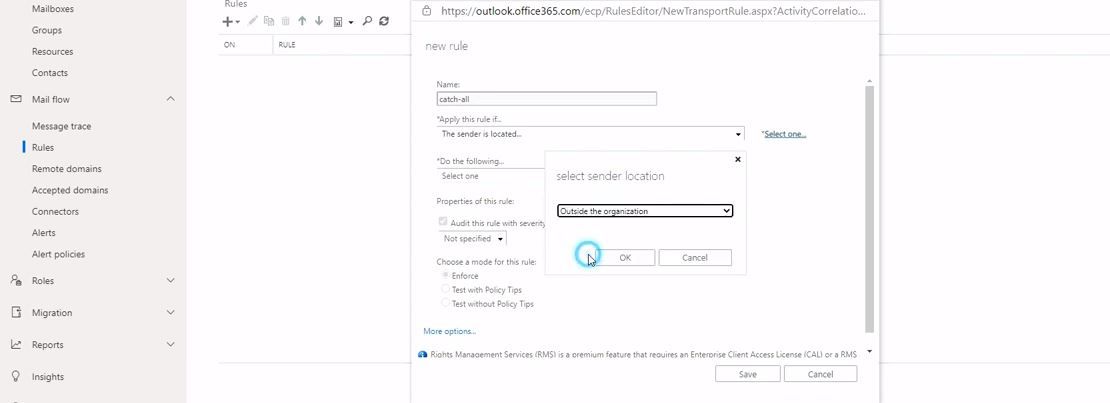
Go to if the sender is located, and select Outside the organization.
-
Then finally choose Do the Following > Redirect the message to and choose CatchAll. With this, you will have officially managed to create your catch-all mailbox.


How the Exchange Online Environment Works (Authoritative vs. Internal Relay)
Whenever a public domain name is registered in Office 365, the domain is considered an Accepted Domain. The Exchange Online server perceives itself as the only authority on the public domain name registered.
So, if you try to send an email from the registered public domain, the Exchange Online Server will go through the Global Address List (GAL) looking for the recipient's address. If the address exists, the message will be delivered to its destination. However, should it detect that the address doesn't exist on the GAL, the sender will receive a message telling them that the recipient doesn't exist.
To solve this problem, you have to change the registered domain name from the default Authoritative to Internal Relay. In this case, if your sender sends an email to a non-existing recipient, Exchange Online knows to forward the message to 'other mail infrastructure' instead of sending out an error message to the sender. If you have registered more than one public domain name for your organization, you will have to change each domain setting from Authoritative to internal relay separately.
As we mentioned earlier, Exchange Online doesn't support the catch-all mailbox feature by default. This means you will have to use the method we have described for you. There are also other methods, like code. But, not everyone knows their programming languages, so we think it's easier for you to stick to the more straightforward stuff.
Is There a Downside to Using a Catch-All Mailbox?
There could be a risk or two in using a catch-all mailbox on Office 365. The most obvious of these risks is that this mailbox can allow potential phishing attacks on the email system and the accounts attached to it.
For example, external sources can target known account names within an organization and direct emails with malicious intent to those inboxes. Since emails will automatically be directed to those accounts rather than be discarded, this would pose a significant security risk, resulting in sensitive information being sent outside the organization without the account owner's knowledge.
Don't Miss Your Emails Anymore
We can't stress enough the importance of having a catch-all mailbox configured for your organization. These mailboxes are the lifeboats of misspelled or mistyped email addresses. Courtesy of them, you can say goodbye to missing out on important emails because of minor errors made on email addresses registered with your domain.
Like every lifeboat that can capsize from a hole that lets in too much water, catch-all mailboxes can also go south from the many spam messages they let in. So, consider your options and ready yourself before you decide to set up a catch-all mailbox for your organization.