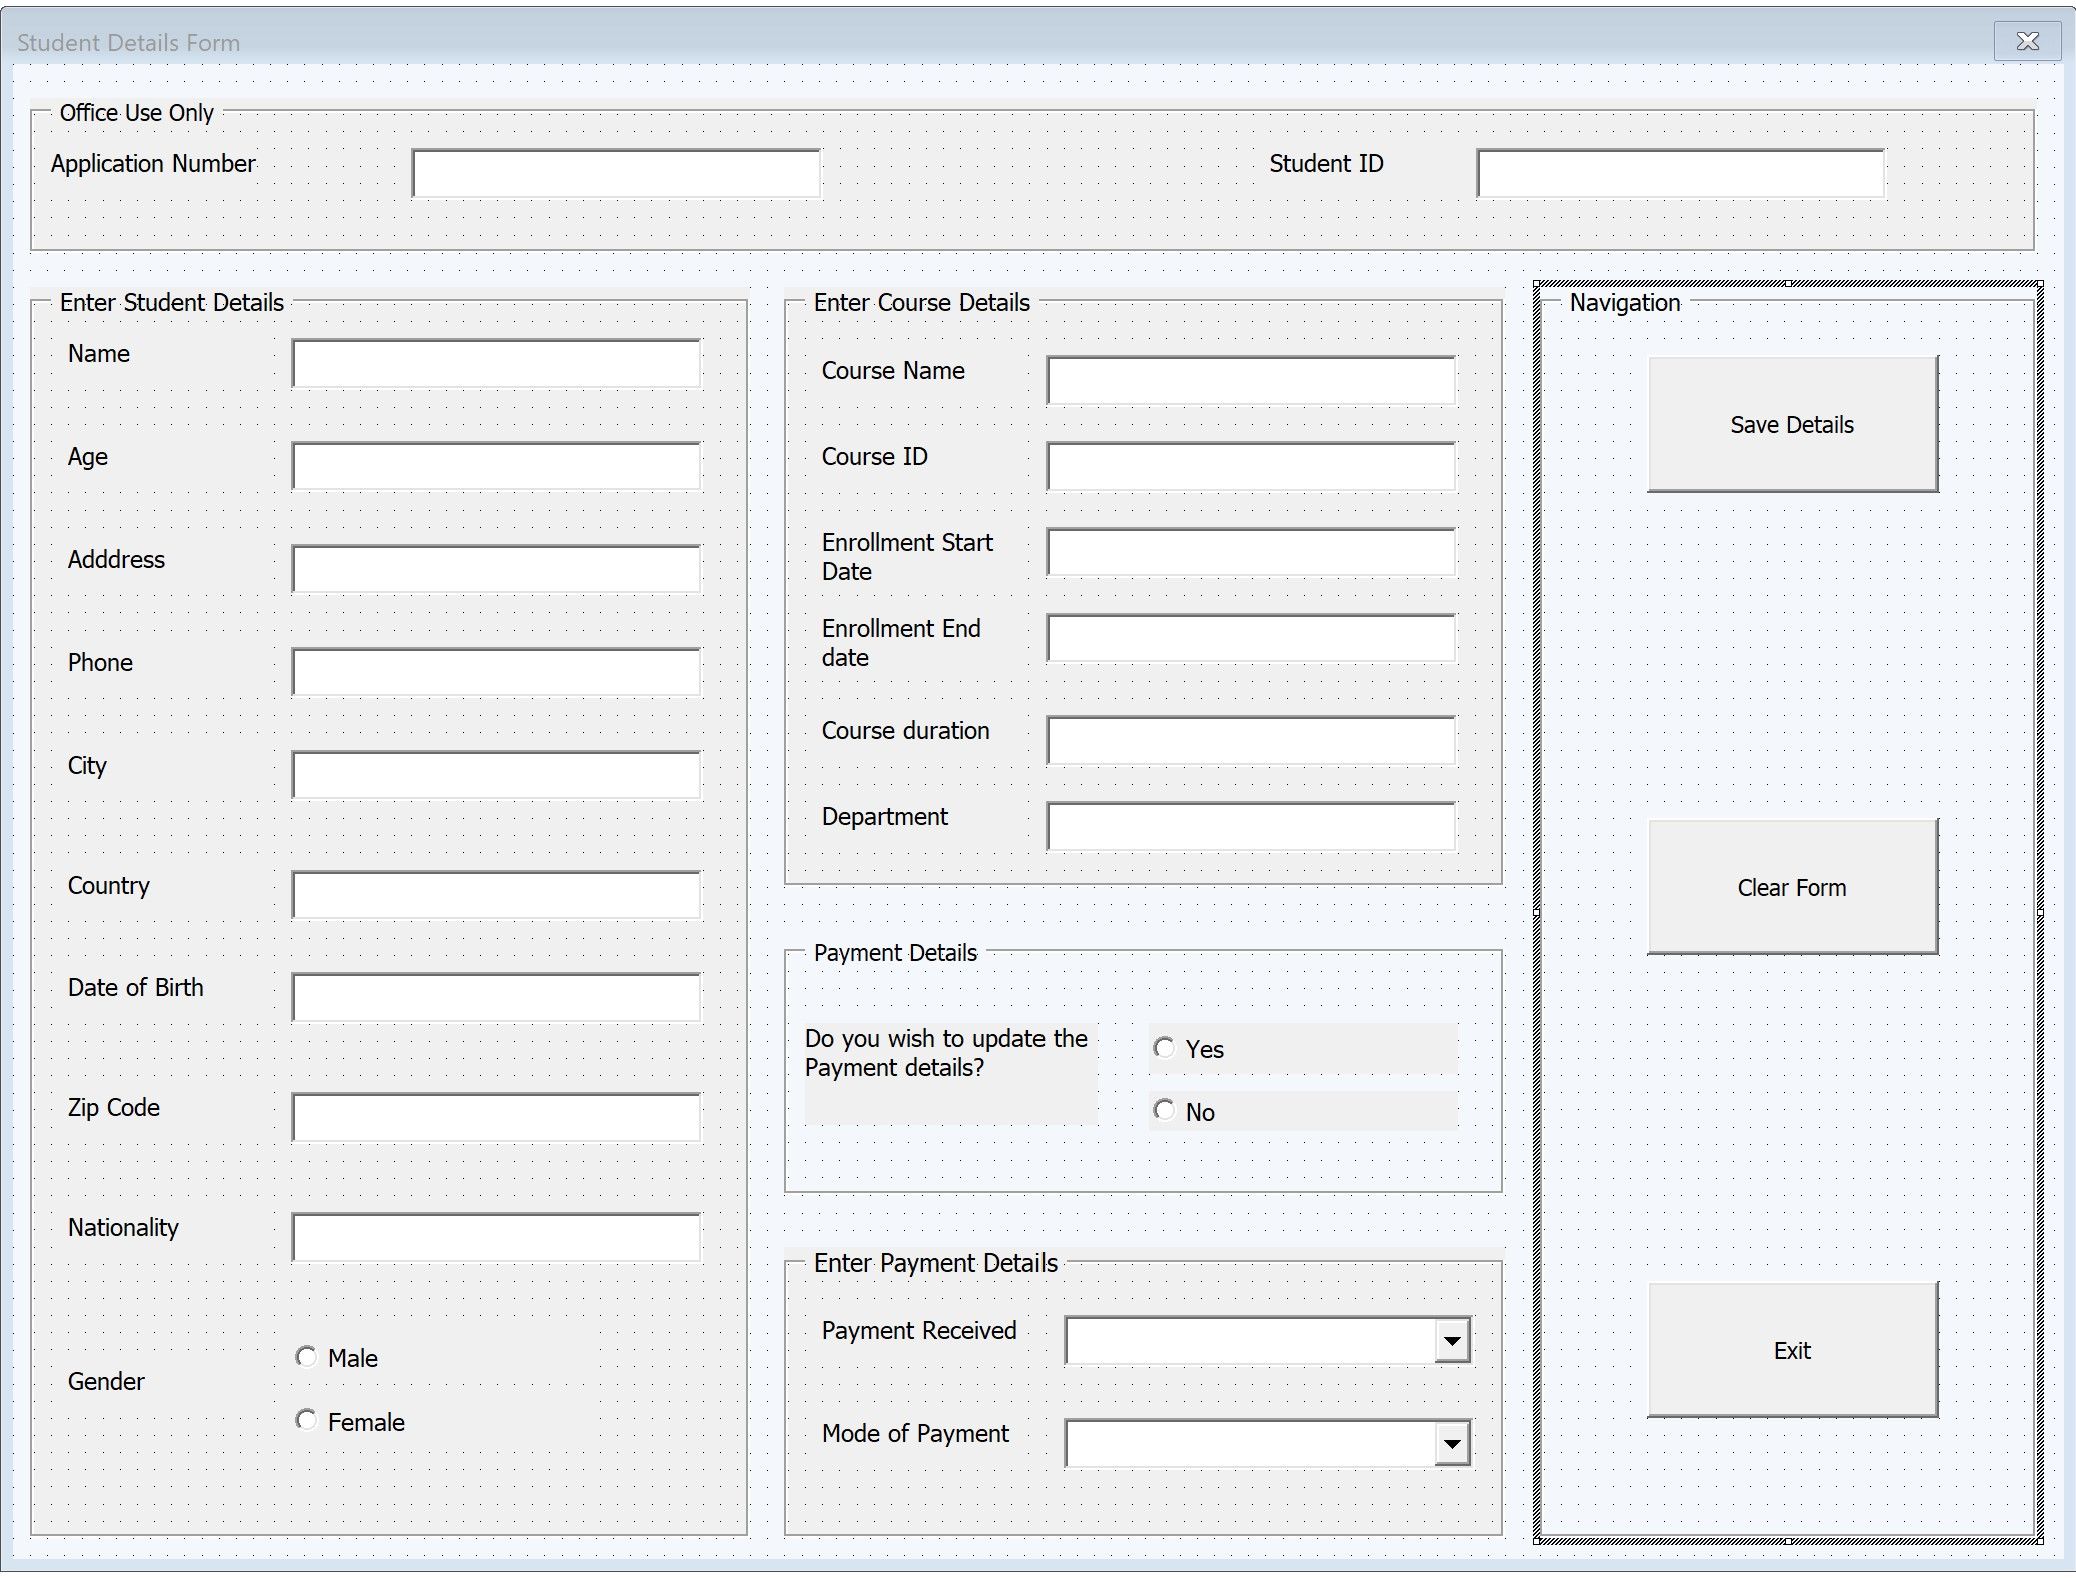
Visual Basic is an excellent language for automating repetitive tasks in Excel. Imagine taking your automation up a notch by creating highly functional user forms that also look tidy to the end-users.
User forms in VBA present you with a blank canvas; you can design and organize the forms to fit your needs at any given time.
In this guide, you will learn to create a student-based data entry form that captures relevant information in linked Excel sheets.
Creating a User Form With Excel VBA
Open a new Excel workbook and perform a few preliminary steps before you start creating your data-entry form.
Save your workbook with the desired name; don’t forget to change the file’s type to an Excel Macro-Enabled Workbook.
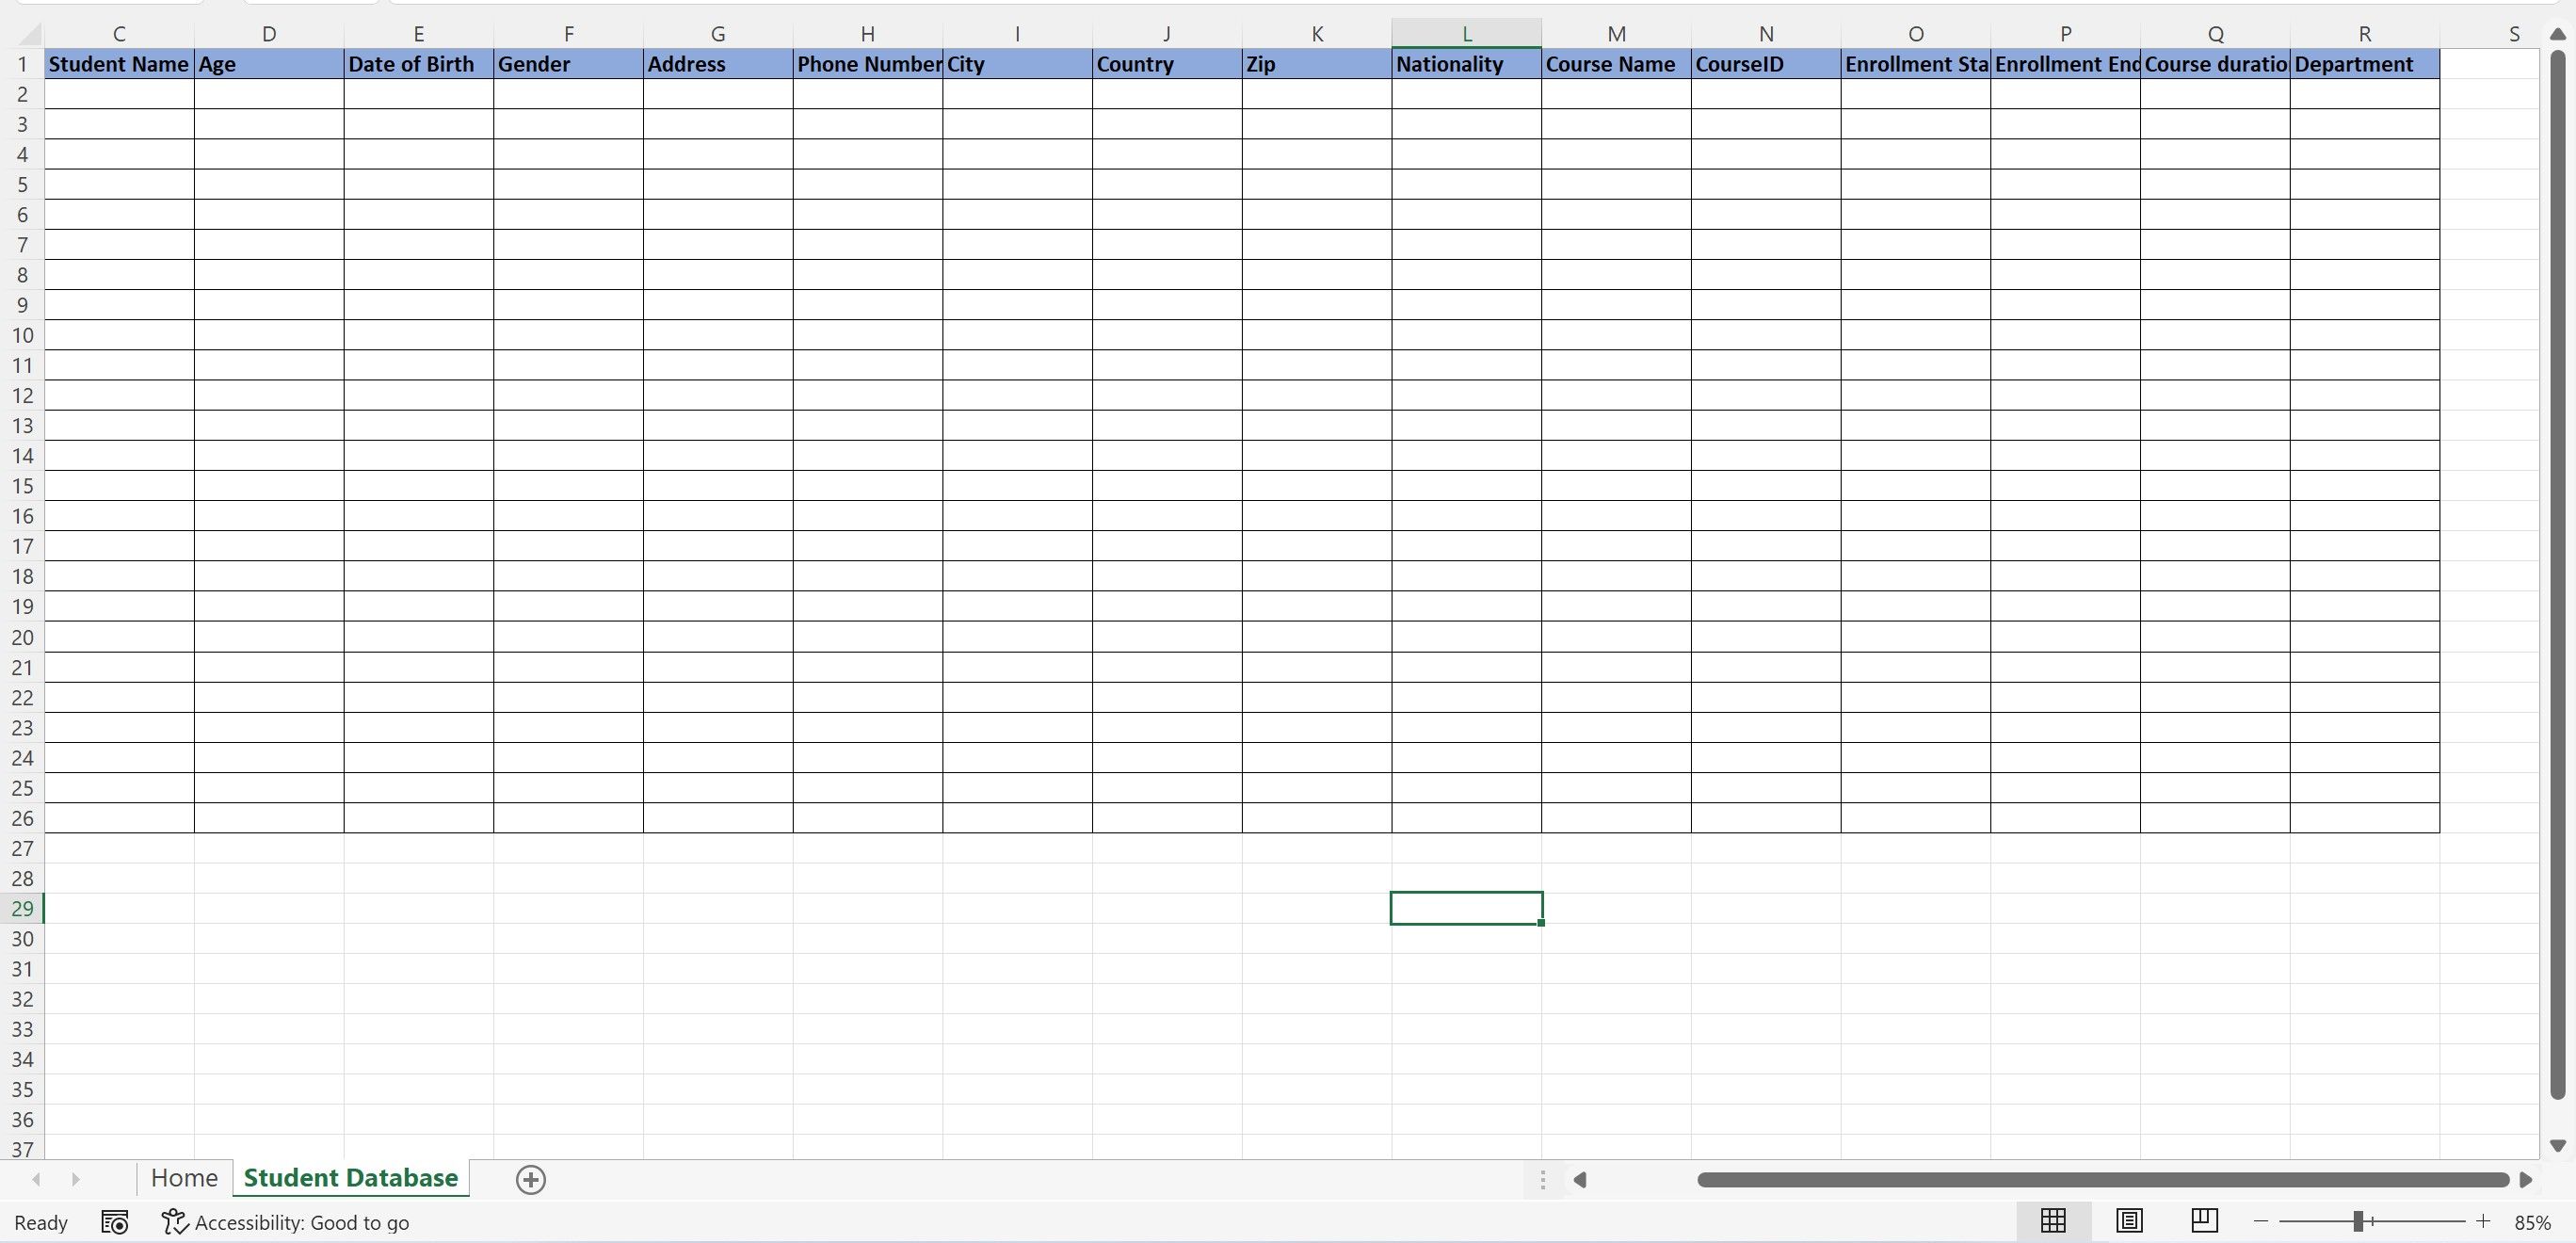
Add two sheets to this workbook, with the following names:
- Sheet1: Home
- Sheet2: Student Database
Feel free to change these names as per your requirements.
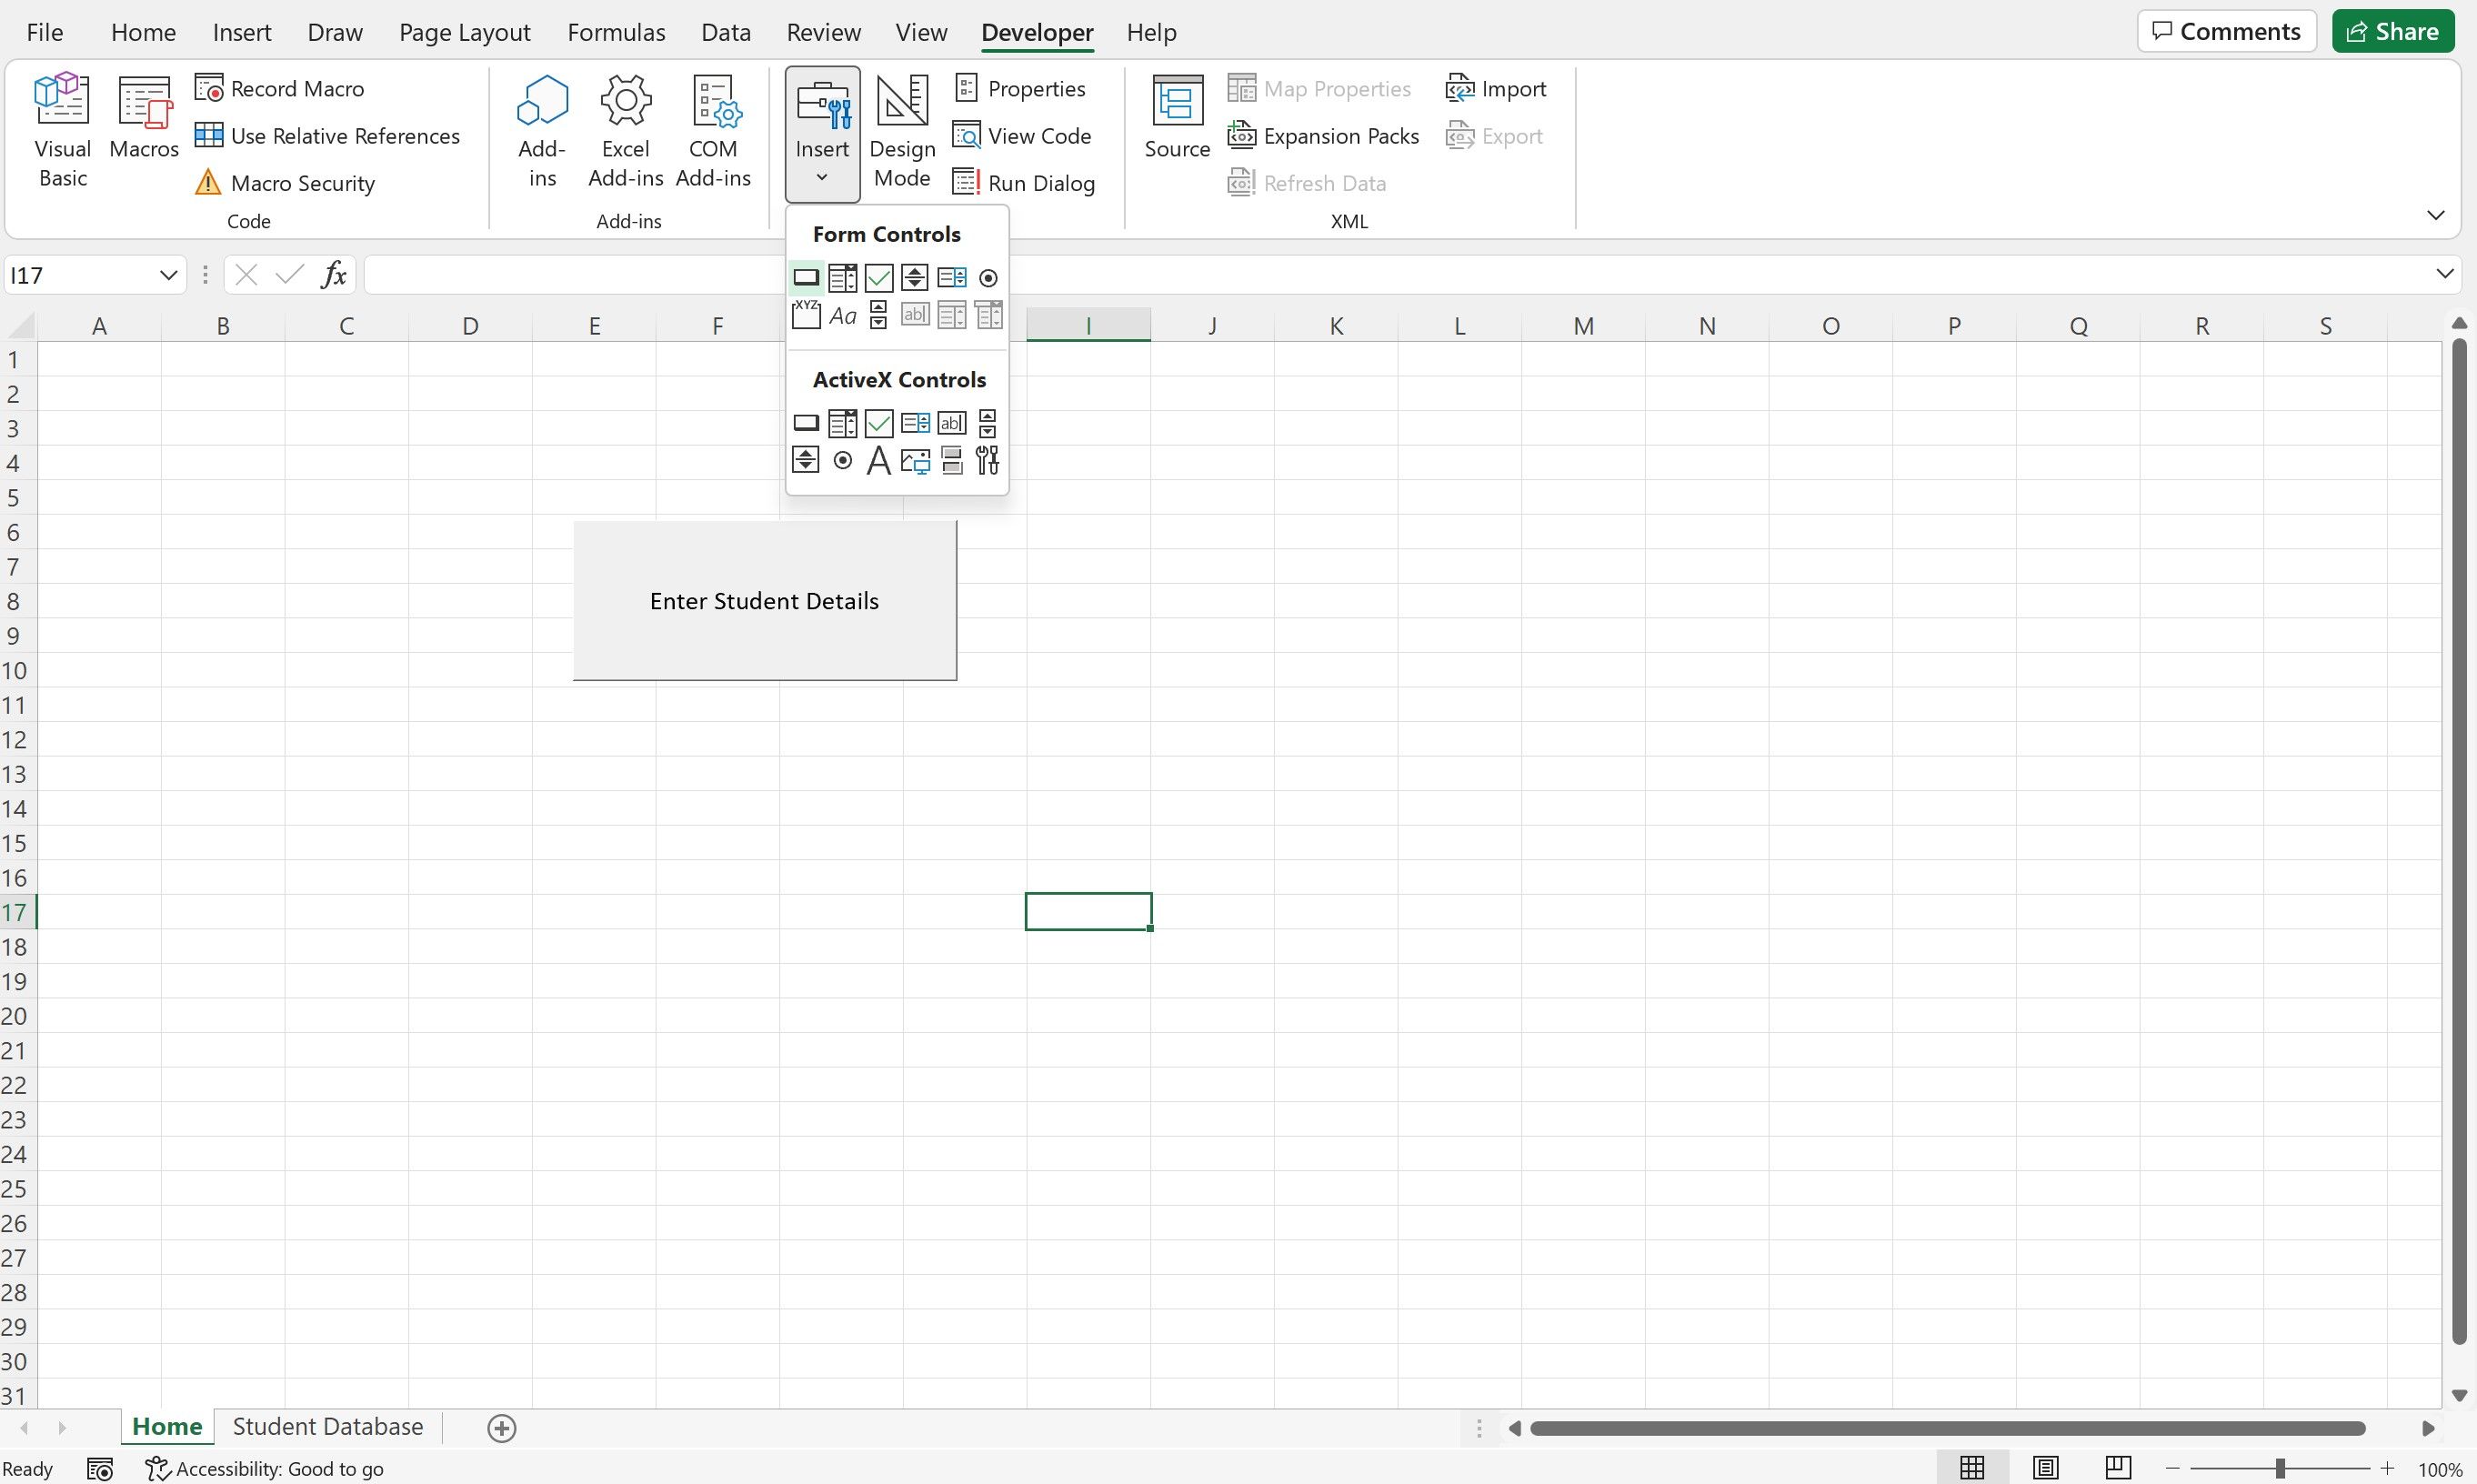
In the Home sheet, add a button to control the user form macro. Go to the Developer tab and click on the Button option from the Insert drop-down list. Place the button anywhere on the sheet.
Once you've placed the button, rename it. Right-click on it, and click on New to assign a new macro to show the form.
Enter the following code in the editor window:
            Sub Button1_Click()

UserForm.Show

End Sub
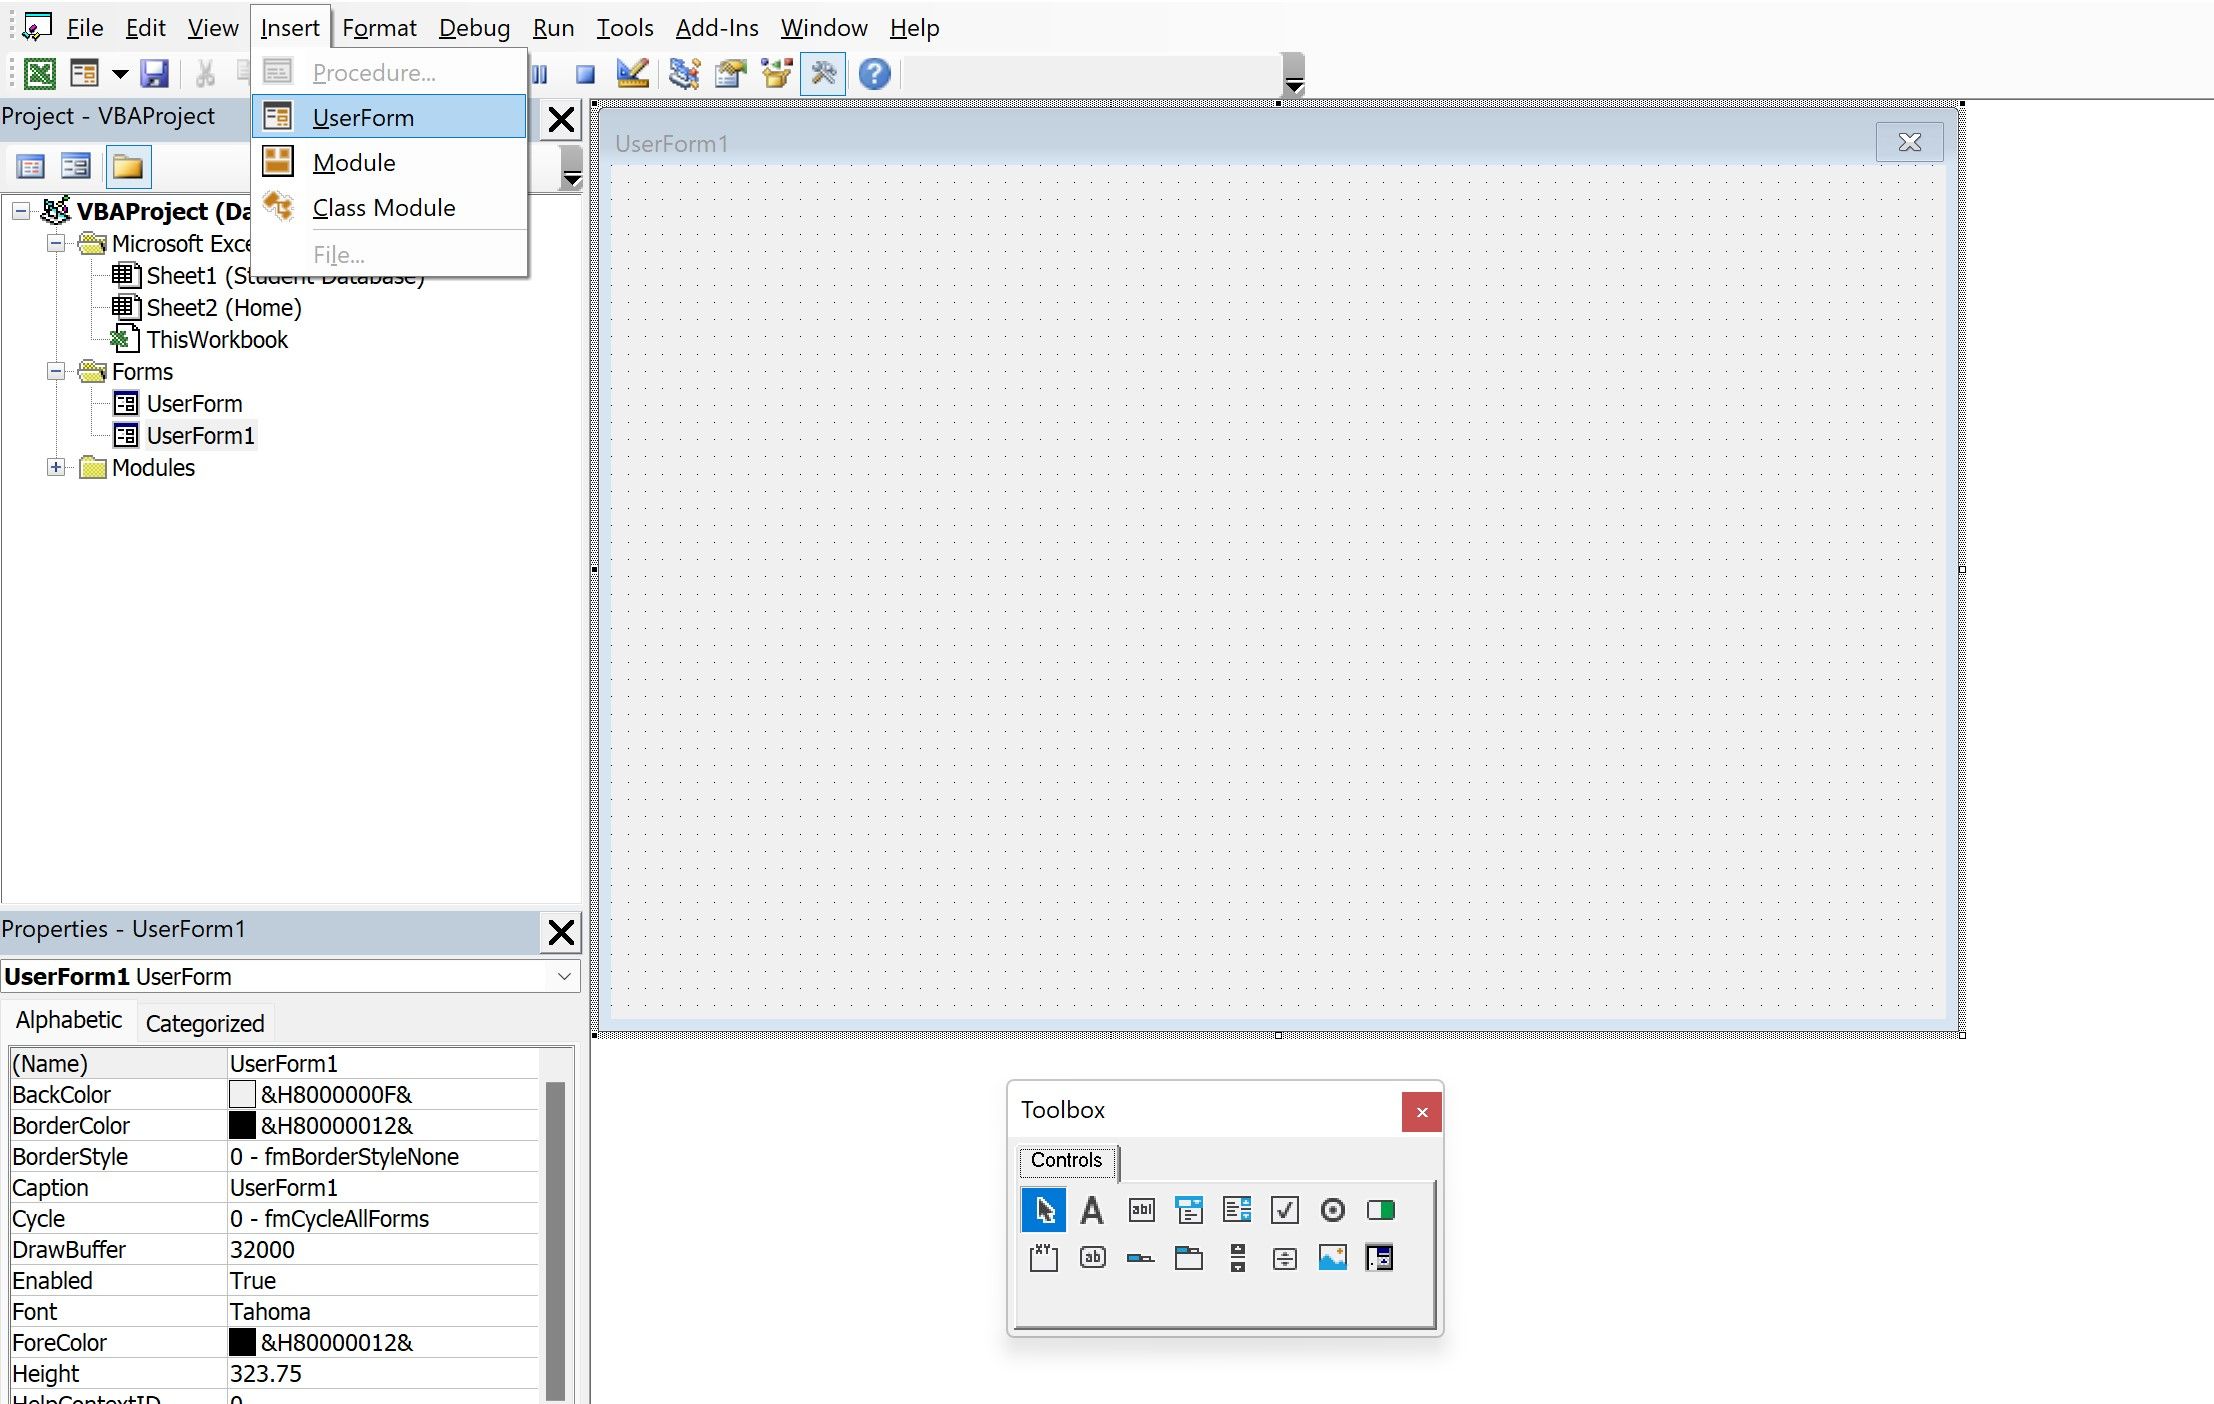
Once the Home and Student Database sheets are ready, it’s time to design the user form. Navigate to the Developer tab, and click on Visual Basic to open the Editor. Alternatively, you can press ALT+F11 to open the editor window.
Click on the Insert tab and select UserForm.
A blank user form is ready for use; an accompanying toolbox opens along with the form, which has all the essential tools to design the layout.
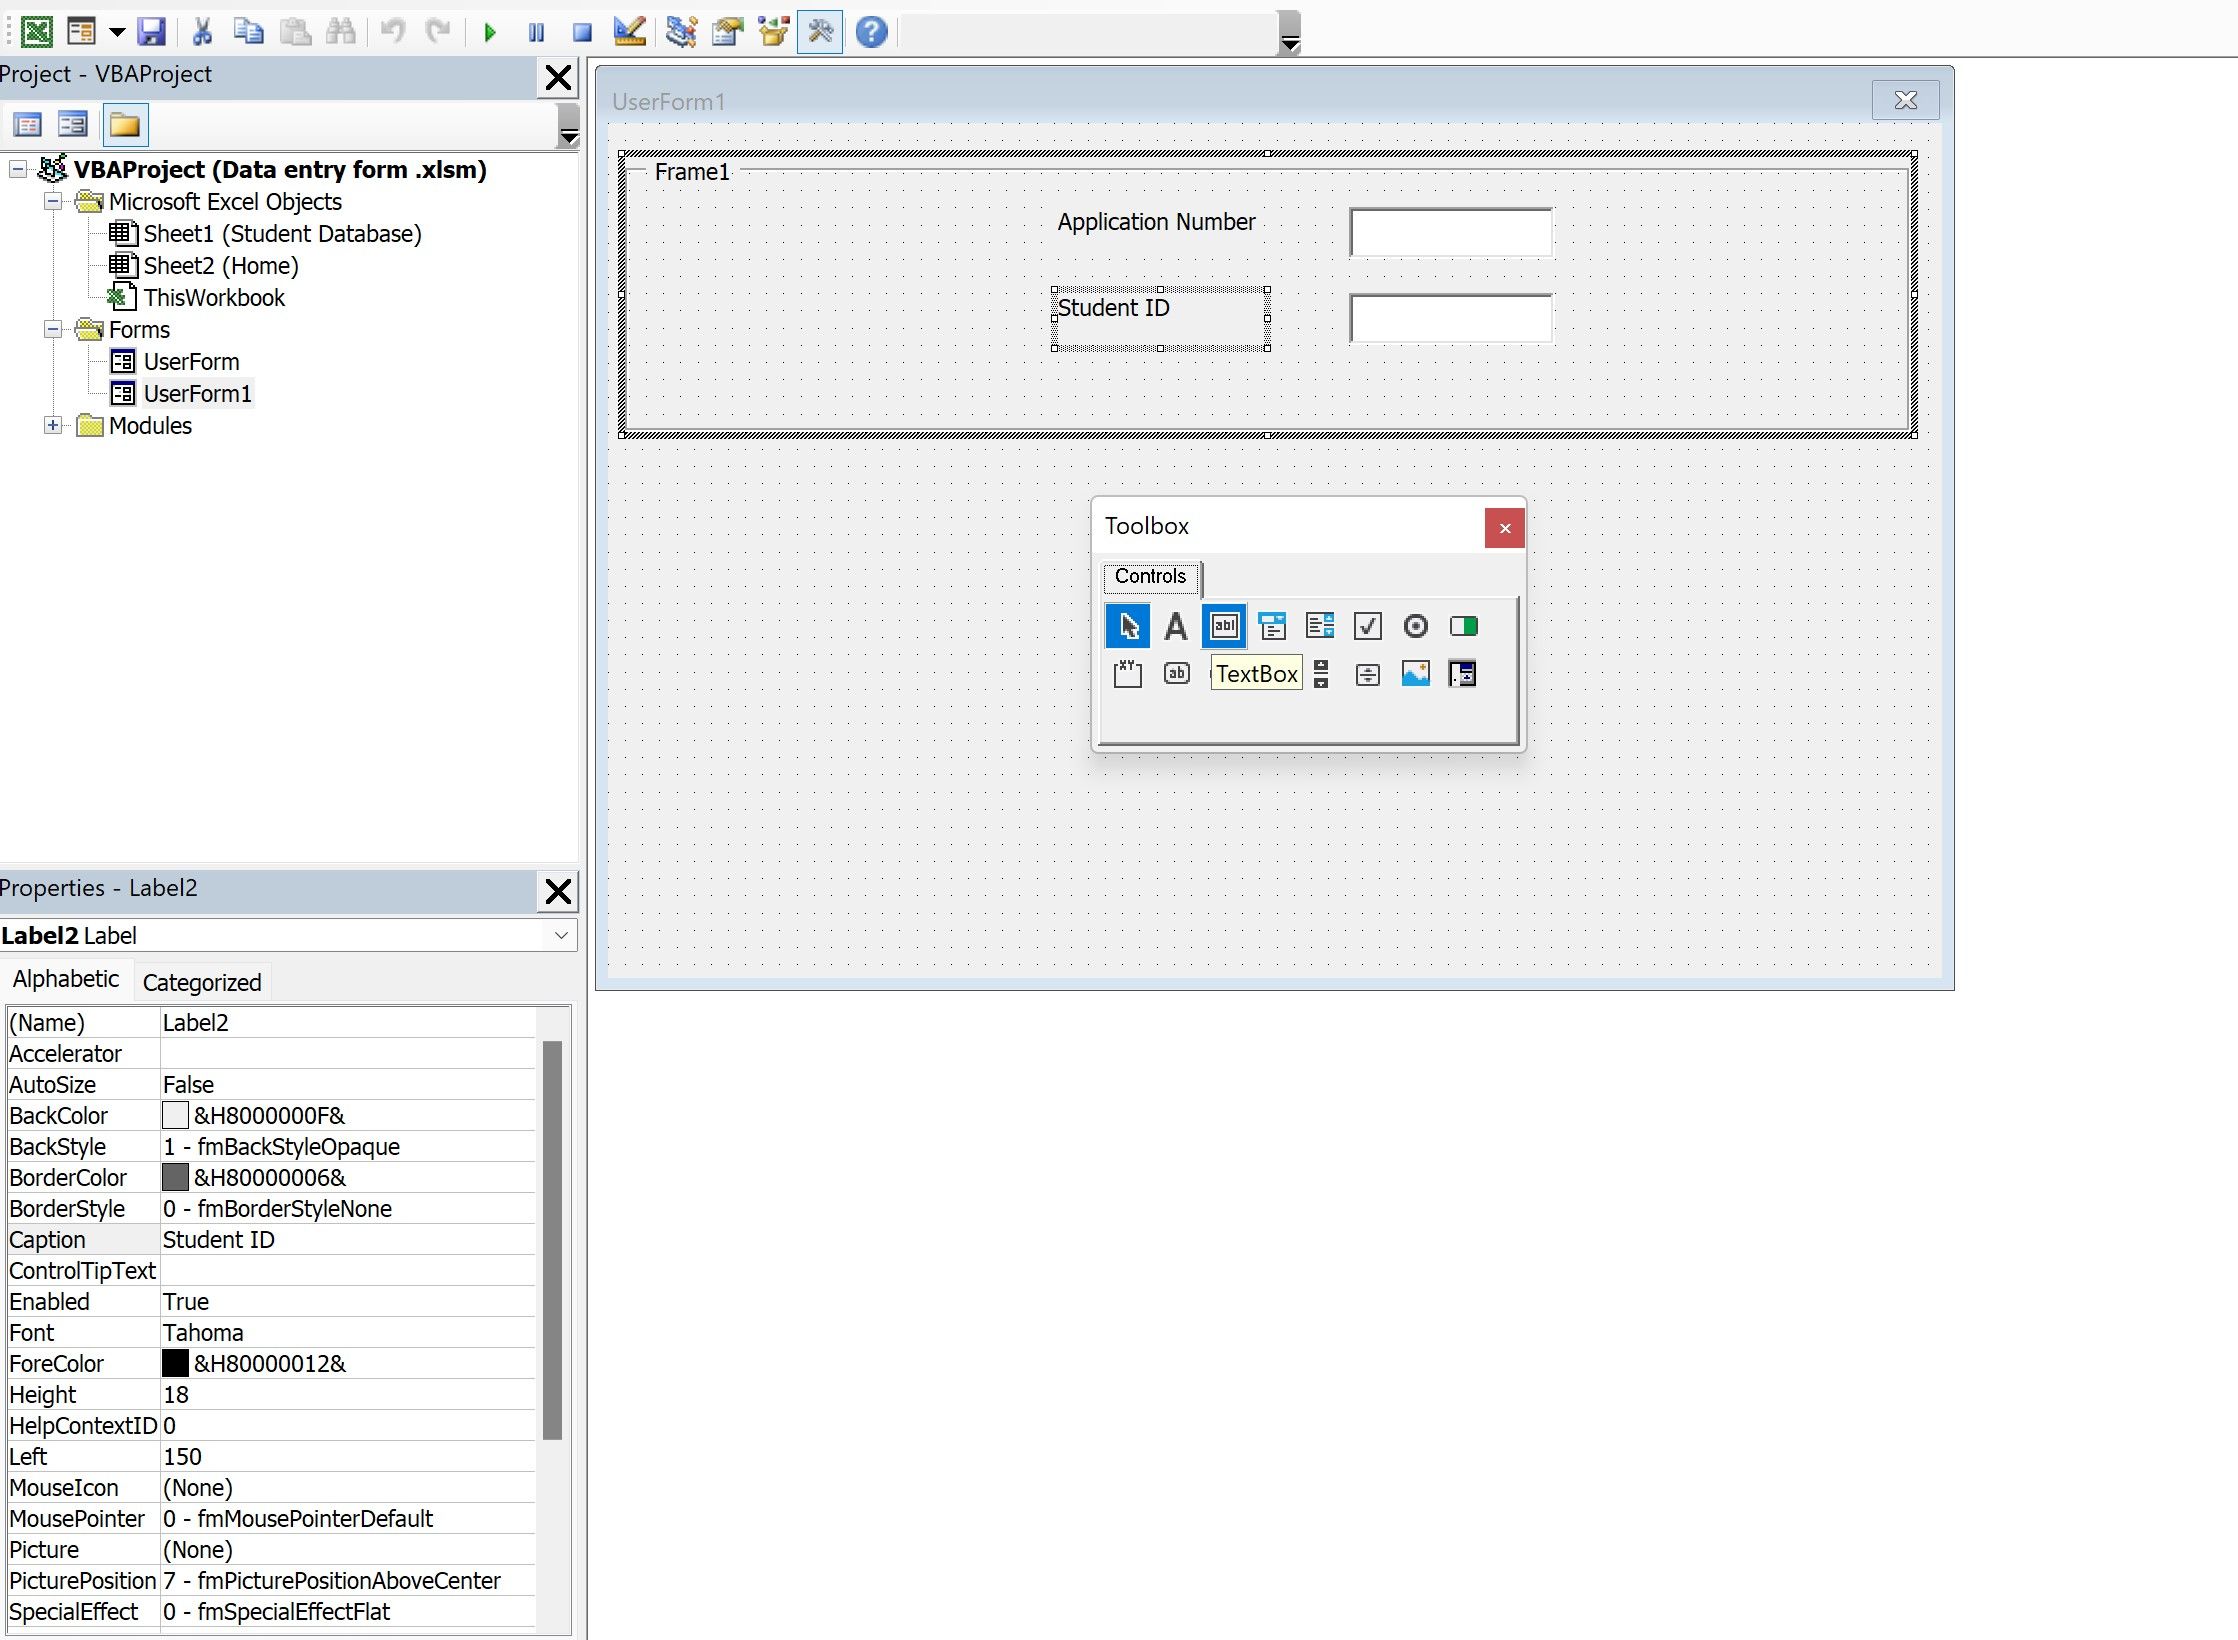
From the toolbox, select the Frame option. Drag this to the user form and resize it.
In the (name) option, you can change the name of the frame. To showcase the name on the front-end, you can change the name in the Caption column.
Next, select the Label option from the toolbox and insert two labels within this frame. Rename the first one as Application Number and the second as Student ID.
The same renaming logic applies; change the names via the Caption option within the Properties window. Make sure you select the respective label before changing its name.
Next, insert two text boxes next to the label boxes. These will be used to capture the user’s inputs. Change the names of two text boxes via the (Name) column within the Properties window. The names are as follows:
- Textbox1: txtApplicationNo
- Textbox2: txtStudentID
Designing the Student Details Frame
Insert a vertical frame and add 10 labels and 10 text boxes. Rename each of them in the following manner:
- Label3: Name
- Label4: Age
- Label5: Address
- Label6: Phone
- Label7: City
- Label8: Country
- Label9: Date of Birth
- Label10: Zip Code
- Label11: Nationality
- Label12: Gender
Insert corresponding text boxes next to these labels; insert two (or more) optionbutton boxes from the user form toolbox next to the gender label. Rename them Male and Female (along with Custom), respectively.
Designing the Course Details Frame
Add another vertical frame and insert six labels and six text boxes corresponding to each label. Rename the labels as follows:
- Label13: Course Name
- Label14: Course ID
- Label15: Enrollment Start Date
- Label16: Enrollment End Date
- Label17: Course duration
- Label18: Department
Designing the Payment Details Frame
Insert a new frame; add a new label and rename it "Do you wish to update the Payment details?" Insert two optionbuttons; rename them Yes and No.
Similarly, add a new frame containing two additional labels and two combo boxes. Rename the labels as follows:
- Label19: Payment Received
- Label20: Mode of Payment
Designing the Navigation Pane
In the final frame, add three buttons from the toolbox, which will contain code for the execution of the forms.
Rename the buttons in the following manner:
- Button1: Save Details
- Button2: Clear Form
- Button3: Exit
Writing the Automated Form Code: Save Details Button
Double-click on the Save Details button. In the ensuing module, insert the following code:
            Private Sub CommandButton2_Click()


‘declare the variables used throughout the codes

Dim sht As Worksheet, sht1 As Worksheet, lastrow As Long


'Add validations to check if character values are being entered in numeric fields.

If VBA.IsNumeric(txtApplicationNo.Value) = False Then

MsgBox "Only numeric values are accepted in the Application Number", vbCritical

Exit Sub

End If


If VBA.IsNumeric(txtStudentID.Value) = False Then

MsgBox "Only numeric values are accepted in the Student ID", vbCritical

Exit Sub

End If


If VBA.IsNumeric(txtAge.Value) = False Then

MsgBox "Only numeric values are accepted in Age", vbCritical

Exit Sub

End If


If VBA.IsNumeric(txtPhone.Value) = False Then

MsgBox "Only numeric values are accepted in Phone Number", vbCritical

Exit Sub

End If


If VBA.IsNumeric(Me.txtCourseID.Value) = False Then

MsgBox "Only numeric values are accepted in Course ID", vbCritical

Exit Sub

End If


'link the text box fields with the underlying sheets to create a rolling database

Set sht = ThisWorkbook.Sheets("Student Database")


'calculate last populated row in both sheets


lastrow = sht.Range("a" & Rows.Count).End(xlUp).Row + 1


'paste the values of each textbox into their respective sheet cells


With sht

.Range("a" & lastrow).Value = txtApplicationNo.Value
.Range("b" & lastrow).Value = txtStudentID.Value
.Range("c" & lastrow).Value = txtName.Value
.Range("d" & lastrow).Value = txtAge.Value
.Range("e" & lastrow).Value = txtDOB.Value
.Range("g" & lastrow).Value = txtAddress.Value
.Range("h" & lastrow).Value = txtPhone.Value
.Range("i" & lastrow).Value = txtCity.Value
.Range("j" & lastrow).Value = txtCountry.Value
.Range("k" & lastrow).Value = txtZip.Value
.Range("l" & lastrow).Value = txtNationality.Value
.Range("m" & lastrow).Value = txtCourse.Value
.Range("n" & lastrow).Value = txtCourseID.Value
.Range("o" & lastrow).Value = txtenrollmentstart.Value
.Range("p" & lastrow).Value = txtenrollmentend.Value
.Range("q" & lastrow).Value = txtcourseduration.Value
.Range("r" & lastrow).Value = txtDept.Value


End With

sht.Activate


'determine gender as per user's input

If optMale.Value = True Then sht.Range("g" & lastrow).Value = "Male"

If optFemale.Value = True Then sht.Range("g" & lastrow).Value = "Female"

'Display a message box, in case the user selects the Yes radio button


If optYes.Value = True Then
MsgBox "Please select the payment details below"
Else:
Exit Sub


End If


End Sub
If you're not sure what parts or any of the code means, don't worry. We'll explain it thoroughly in the next section.
Automated Form Code Explained
The textboxes will contain a mix of text and numeric values, so it's essential to restrict the user's input. The Application Number, Student ID, Age, Phone, Course ID, and Course Duration should contain only numbers, while the rest will contain text.
Using an IF statement, the code triggers error pop-ups if the user enters a character or text value in any of the numeric fields.
Since the error validations are in place, you need to link the text boxes with the sheet cells.
The lastrow variables will calculate the last populated row, and store the values in them for dynamic use.
Finally, the values are pasted from the text boxes into the linked Excel sheet.
Clear Form and Exit Button Codes
In the clear button, you need to write the code to clear the existing values from the user form. This can be done in the following manner:
            With Me

.txtApplicationNo.Value = ""

.txtStudentID.Value = ""

..txtName.Value = ""

.txtAge.Value = ""

.txtAddress.Value = ""

.txtPhone.Value = ""

.txtCity.Value = ""

.txtCountry.Value = ""

.txtDOB.Value = ""

.txtZip.Value = ""

.txtNationality.Value = ""

.txtCourse.Value = ""

.txtCourseID.Value = ""

.txtenrollmentstart.Value = ""

.txtenrollmentend.Value = ""

.txtcourseduration.Value = ""

.txtDept.Value = ""

.cmbPaymentMode.Value = ""

.cmbPayment.Value = ""

.optFemale.Value = False

.optMale.Value = False

.optYes.Value = False

.optNo.Value = False


End With
In the exit button, enter the following code to close the user form.
            Private Sub CommandButton5_Click()

Unload Me

End Sub
As a last step, you need to input a few final pieces of code to create the drop-down values for the combo boxes (within the payment frames).
            Private Sub UserForm_Activate()


With cmbPayment

.Clear

.AddItem ""

.AddItem "Yes"

.AddItem "No"

End With

With cmbPaymentMode


.Clear

.AddItem ""

.AddItem "Cash"

.AddItem "Card"

.AddItem "Check"

End With

End Sub
VBA Automation Makes Work Easier
VBA is a multi-faceted language that serves many purposes. User forms are only one aspect within VBA—there are many other uses like consolidating workbooks and worksheets, merging multiple Excel sheets, and other handy automation uses.
No matter the automation goal, VBA is up to the task. If you keep learning and getting practice in, there's no aspect of your workflow you can't improve.


