If you enjoy using Canva for your designs, try adding a text mask to your work. Masked text is a great design element, especially when it is animated.
We’re going to show you how to create an animated text mask in Canva. Adding this skill to your toolbox will surely increase engagement with your designs.
Does Canva Have a Masking Tool?
Canva is a fantastic design tool. You can do many things to transform your designs. But does it have a masking tool? The short answer is no.
Canva, unfortunately, does not have a native masking tool. But that doesn’t mean you can’t mask in Canva. There are often workarounds to create something for which there isn’t a specific tool. Check out our guide for all the other cool things you can do with Canva.
A masking tool typically creates a non-destructive way to show or hide certain design elements. You can find masking tools in Adobe software like Photoshop, Illustrator, and even Adobe’s video software After Effects. It’s a very common design feature.
Creating a text mask in Canva will add a little more pizzazz to your designs. Sometimes, text on its own can be boring. Or you might even find that fancy-looking text is too hard to read. A text mask is a perfect culmination between the two; it gives you readable text, with a fun design element to engage your audience.
How to Create an Animated Text Mask in Canva

Although Canva offers some great template designs, we think this text mask will work best if you design your post from scratch. Click Create a design on the Canva homepage and pick your dimensions; we’re going to use a typical 1080x1080 square.
Choose a background color; something that works well with your brand colors. But if you want to make a statement, go for a bright, bold color. To pick a background color, click on the empty canvas and the square with a color spectrum will appear in the toolbar above the canvas. Click the spectrum to choose your background color.

You can choose colors by clicking one of the palette color options, inputting the hex code, or clicking the plus sign to identify your color from the spectrum. We’re using a yellow from the predefined color palette, labeled “Yellow #ffde59.”
Once you’ve chosen a color, the spectrum square will show that color. You can click it again to change it later on. If you need help creating a color palette, check out our guide on how to create color palettes in Adobe Illustrator.
As previously mentioned, you want a font that’s easy to read. In the same vein: the less wordy, the better. Pick a short phrase of one to three words.

Go to the toolbar along the left side and click Text. Canva’s text tool offers a variety of options, as well as full customization. Click the Add a heading option.
The default typeface for the heading is a great choice for this masking tutorial—it’s large, clear, and easy to read. Of course, you can choose your font from the drop-down list if you don’t like the default one. Look for a font with similar attributes, such as heavy width and clear formatting.

Once you’ve chosen your font, click on the default text in the text box and change it to your chosen phrase. Play around with line height, spacing, using capitals or lower-case letters, and so on.
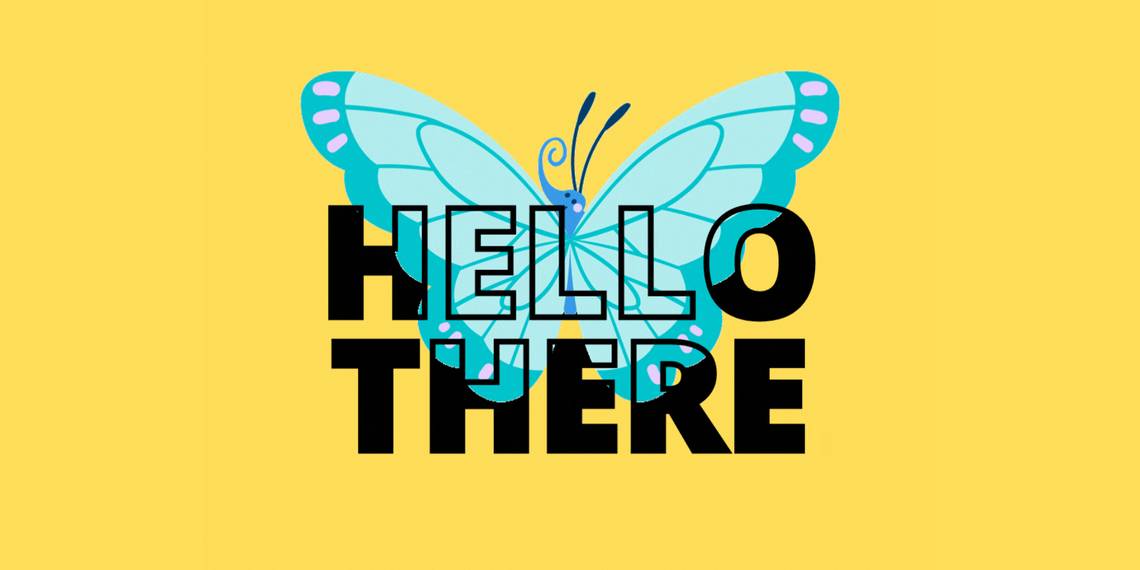
We’re formatting “HELLO THERE” with one word above the other as it’s visually appealing and creates the best space for the mask. Make your text as big as you can while still leaving an appealing border or space around it.
Now we’re ready to choose a font color. Click the A with a color spectrum under it to change the font color. We’re sticking with the default black as it contrasts our yellow background quite nicely.

To change the letter spacing or line spacing, click your text, then click the button on the top toolbar with three horizontal lines next to a double-ended arrow. You can visualize how the spacing changes as you move the toggle. The default spacing often looks awkward, so why not experiment with changing it?

Once you’re happy with how the text looks, what it says, and its spacing, you need to duplicate it. Do this by following the typical copy-paste command. With the duplicated text selected and on the top position, you’re going to click Effects in the tool panel. This brings up different text styles. Choose Hollow.
With the two different texts in the same color, it’s hard to see the difference. But your top text now only shows a stroke with no fill, whereas the bottom text has both a fill and stroke. Line up the hollow text with the original one, so you cannot see the hollow text.
Now it’s time to create the masking effect. Click Elements in the left toolbar. Look for an animation that reflects the meaning of the text. The animation should be solid and take up a lot of space, not a small line animation or something that will pixelate when made bigger.

You can search for an animation using any phrase, or you can go to the Stickers option and see if you can find something suitable there. You can always change it later on if it’s not appropriate.

When you’ve found an appropriate sticker or animation, click on it. It will appear at the back of your canvas, behind the text. Right-click on the animation and select Bring Forward. This will layer your elements with the solid text at the back, animation in the middle, and stroke-only text on the top.

Scale and move the animation around the canvas to see how it works with the text. Notice how the masking effect can be seen with the animation in between the text layers.

An animation with more moving parts will show the masking effect more prominently than a fairly static animation. Using animated elements highlights the masking effect more than a static illustration—but overall, the effect is the same.

You can save your design once you are happy with your animation, text placement, and all the other design elements. Click Share > Download and choose between exporting as an MP4 or a GIF, depending on your intended use.
Transform Your Designs With Animated Text Masks
By using this Canva masking workaround, you can transform your designs without the time and effort it takes to learn Adobe products. This quick masking trick can breathe life into otherwise plain and boring designs. Engage your audience with an animated text mask design.