One of Windows 11's most advertised features is its upgraded support for window snapping and tiling. Still, even if it's a significant evolution of a pretty helpful feature, it doesn't hold a candle compared to what PowerToys' FancyZones brings to the table.
Yes, that means you can have better window snapping and tiling on Windows 10 without having to upgrade to Microsoft's new (and much more demanding) operating system. So, let's see how you can use PowerToys' FancyZones to manage your windows and keep your desktop organized.
How to Install PowerToys on Windows
Despite PowerToys being an official collection of utilities by Microsoft for their own Windows OS, they are neither included in the operating system nor hosted at Microsoft's site. Instead, you will find their official home at GitHub.
Pay a visit to that page and read the available documentation to check for any potential problems or quirks of the latest available version. At the time of writing, it was 0.49, and its installation file was PowerToysSetup-0.49.0-x64.exe.
Follow the instructions there to download PowerToys, and install them on your computer like any other piece of software. Although they are a collection of various utilities, they all come in a single executable. However, for this guide, we will only use FancyZones.
So, after PowerToys is installed, run it, and you will see its icon in the Windows tray. Note that since the Windows tray only displays a limited number of icons, you might have to expand it to locate PowerToys.

Our journey begins by right-clicking on this icon and choosing Settings from the menu that pops up.
How to Customize FancyZones
Although you can start using FancyZones with its default settings, it becomes even better if you invest some time to customize it to your liking.
First, ensure that it's active: choose FancyZones from the list on the left, and check that Enable FancyZones is turned on.

While on this page, scroll down to the Zones section and ensure that Hold Shift key to activate zones while dragging is enabled. This way, your windows will snap to the zones you'll define in the following steps only when keeping the Shift key pressed.
If using more than one monitor, enable Show zones on all monitors while dragging a window to have your windows snap to zones on all screens.
If you are using monitors with the same resolution, ratio, DPI scaling, arranged next to each other, you might also want to enable Allow zones to span across monitors. This way, FancyZones will treat all your monitors as one giant desktop, allowing you to define zones that also span multiple screens.

Enable most options under Window behavior to avoid having windows jump around when you close and reopen them, change screen resolutions, or swap zone layouts.
"Most" except for:
- Move newly created windows to the current active monitor (Experimental) (which can be somewhat buggy).
- Make dragged window transparent (which is a matter of personal preference).

How to Customize Layouts and Monitors in FancyZones
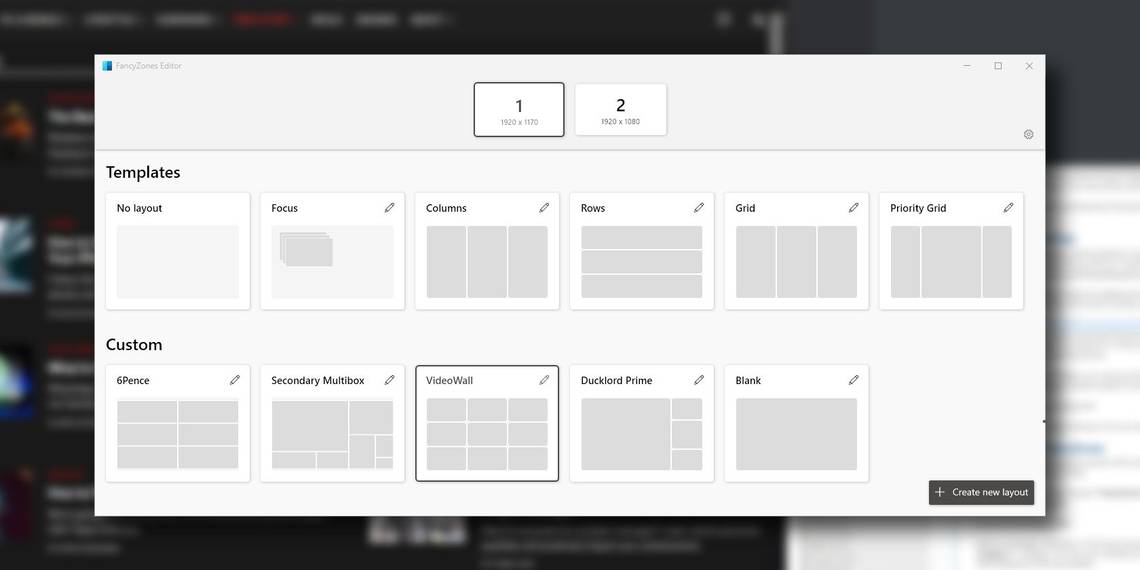
FancyZones comes with multiple zone layouts. If you're using more than one monitor, you can even have a different layout active on each.
To enable snap-to-zone support for your monitors, scroll up to the top of FancyZones' page, and click on Launch layout editor. You will see a new window with enumerated thumbnails for your monitors at its top and previews of the available zone layouts directly underneath.
Theoretically, your primary monitor should be preselected. Thus, to enable snapping support on it, you only have to choose one of the zone layouts. If you want to do the opposite, to disable snapping support, you can either choose the No layout template or return to the previous menu and disable FancyZones altogether.
Do the same for the rest of your monitors if you have more than one, and remember that you can also choose a different layout for each monitor.

FancyZones proves useful for both multiple monitors and larger ones. However, there are alternatives that could be better suited for that purpose, as we saw in our article on virtual monitor apps to maximize your ultrawide monitor.
How to Make Your Own Zones in PowerToys
Windows 11 puts snap layouts front and center, and we've already covered how to use snap layouts in Windows 11. Still, as you'll soon see, FancyZones offers you even more control, since it allows you to create your own zone layouts. With a custom layout, you can have your windows snap where you want them instead of relying on what someone else believes is best for you.
What's even better is that you can have as many custom zone layouts as you wish and switch between them with a keypress.
To create your first custom zone payout, click on the aptly named Create new layout button at the bottom right of the window.
Give a name to your layout in their new windows that appears, and choose if you prefer a Grid or Canvas setup.
- Grid means that all zones will be either horizontally or vertically stacked.
- Canvas setups are more free-form but potentially less organized since they allow you to have overlapping zones.

FancyZones will show you a window with useful shortcuts that can assist while editing your layout, but the process is quite intuitive.
- You can click inside any existing zone to split it horizontally into two. If you keep the Shift key held while doing that, the split will be vertical.
- To resize your zones, you can click and drag on the icons that appear on top of their borders.
- To merge two zones, click and drag from one to the other. Then, click on the Merge button that pops up.
- Use Tab to cycle between zones and dividers, and Delete on the keyboard to remove the active divider.
When you are happy with your custom zone layouts, click on Save & apply to store it in FancyZones' custom list.

When back in FancyZones' layout list, click on the little pencil icon on the top right of its thumbnail to customize your layout further. From the new window that appears, you can:
- Change your layout's name.
- Choose a number from 1 to 10 to assign to it a shortcut.
- Re-edit its zones by clicking on the pencil icon over its preview thumbnail.
- Increase or decrease the space around each zone. A higher number means that your windows, when snapped into those zones, will be farther apart. Decrease the number to bring them closer, or dial it down to zero to have them touching.
- Change each zone's Highlight distance to tweak its hotspot. A lower number means that you will have to drag a window almost precisely to the center of a zone to have it snapped there. In contrast, increase that number to have a zone "activated" sooner. Keep in mind that if you set that number too high and have relatively small zones, it might be harder to target the one you wish. Click on Save to store the tweaked settings.

How to Snap Windows Using PowerToys
Is FancyZones active, with a zone layout enabled on your monitor? Press Shift on your keyboard before or after you start dragging a window around your monitor(s). You will see a preview of the available zones, over which you can move your window and "drop it" to have it resized and snapped.
Remember how you can select a number for each FancyZones layout as a shortcut? Keep CTRL + Win + Alt held while pressing that number to switch to that zone layout. If you have more than one monitor, click first on a spot of your desktop "inside" the monitor where you want to apply the layout.
Although there is no way to arrange your windows according to a layout automatically, FancyZones will try to restore them where they last appeared.
The Benefits of Windows 11, Without Windows 11
The only thing that PowerToys' FancyZones has missing compared to tiling and snapping in Windows 11 is the interactivity: you won't see previews of your layouts when you hover over a windows' maximize button.
Apart from that little nitpick, everything else is better. You have more options, more customizability, more versatility, all thanks to a collection of free, open-source tools by Microsoft itself. There goes another reason to upgrade to Windows 11!