A multi-computer setup, however beneficial it may be, comes with its own share of logistical problems: chief of these being cluttered and untidy desks. Add to this the slew of accessories and other hardware components like SBCs and microcontrollers that live on your desk, and you've got a recipe for multitasking catastrophe.
One way to avoid such a problem is to use a KVM switch. However, if you do not wish to spend on hardware, there is KVM software, such as Barrier, that mimics the functionality of a KVM switch and allows you to use your keyboard and mouse between multiple computers or a computer and a Raspberry Pi at once.
What Is Barrier?
Barrier is open-source KVM (keyboard, video, mouse) software that mimics the functionality of an actual KVM switch and enables you to use a single keyboard, mouse, or video monitor with multiple computers.
It's essentially a fork of Synergy, another popular KVM app with similar functionality. Although, when pitted against each other, Barrier takes the top spot since it's free, easy to use, and provides a well-rounded experience.
One of the advantages of using Barrier over a hardware KVM switch is the ease of switching between devices: you can switch focus with KVM software by simply moving your mouse cursor to either edge of the screen — depending on how you configured your setup.
How to Download and Install Barrier
To start using Barrier, download and install it on the computers you want to control with the same keyboard and mouse. It's available on all major operating systems: Linux, macOS, Windows, and even Raspberry Pi OS, and is easy to install and configure.
To install Barrier on Linux/Raspberry Pi OS, enter the following command in the Terminal:
sudo apt install barrier
For macOS, type:
brew install barrier
On Windows:
Unlike Linux or macOS, you can install Barrier on Windows using the GUI. To do this, download the Barrier installer and run it as you would with any EXE file on Windows.
How to Configure Barrier on Computer and Raspberry Pi
Barrier uses a client-server architecture to function: you need to set one computer as a Barrier server and the other as a client. The server machine is the one to which the keyboard and mouse primarily connect, whereas the client(s) is the other computer that will use the main (server) machine's peripherals.
Assuming you're using your Linux, macOS, or Windows computer as the server and your Raspberry Pi as the client, here's how to configure Barrier on the client and server end.
Configuring Barrier on Server Machine
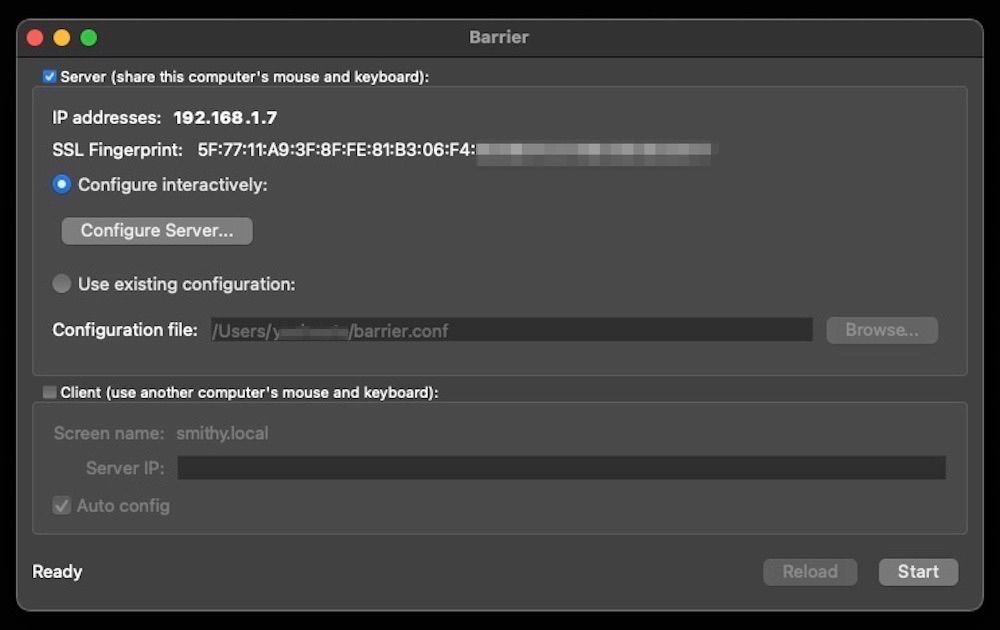
- Open the Barrier app on the computer (Linux, macOS, Windows) you want to set as the server.
-
Check the checkbox for Server (share this computer’s keyboard and mouse), select Configure inactively, and click on the Configure Server button below it.
-
In the Server Configuration window, click the computer icon on the top-right and drag it to a position that resembles your actual computer setup on the desk.For example, if your primary computer is on the left and your secondary computer is on the right, set the position of the computers in the configuration window accordingly.
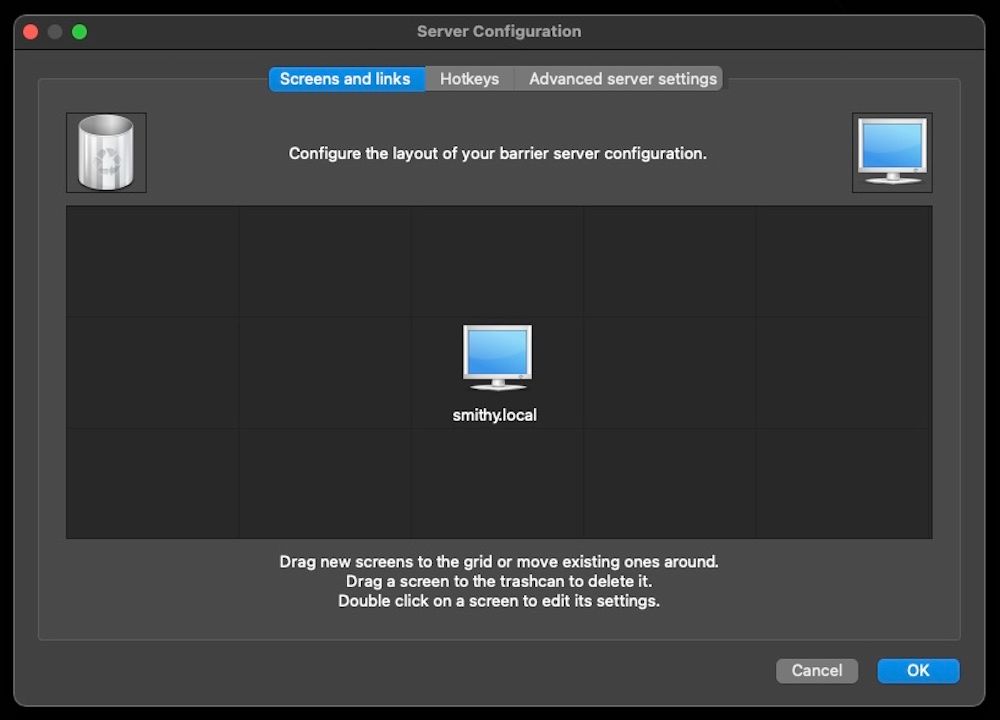
- Double-click on the computer you just dragged, and give it a name in the text field next to Screen name.
- Click OK.
- On the main Barrier page, click Reload to apply your changes and tap on Start to start the Barrier server.


Configuring Barrier on Client Machine
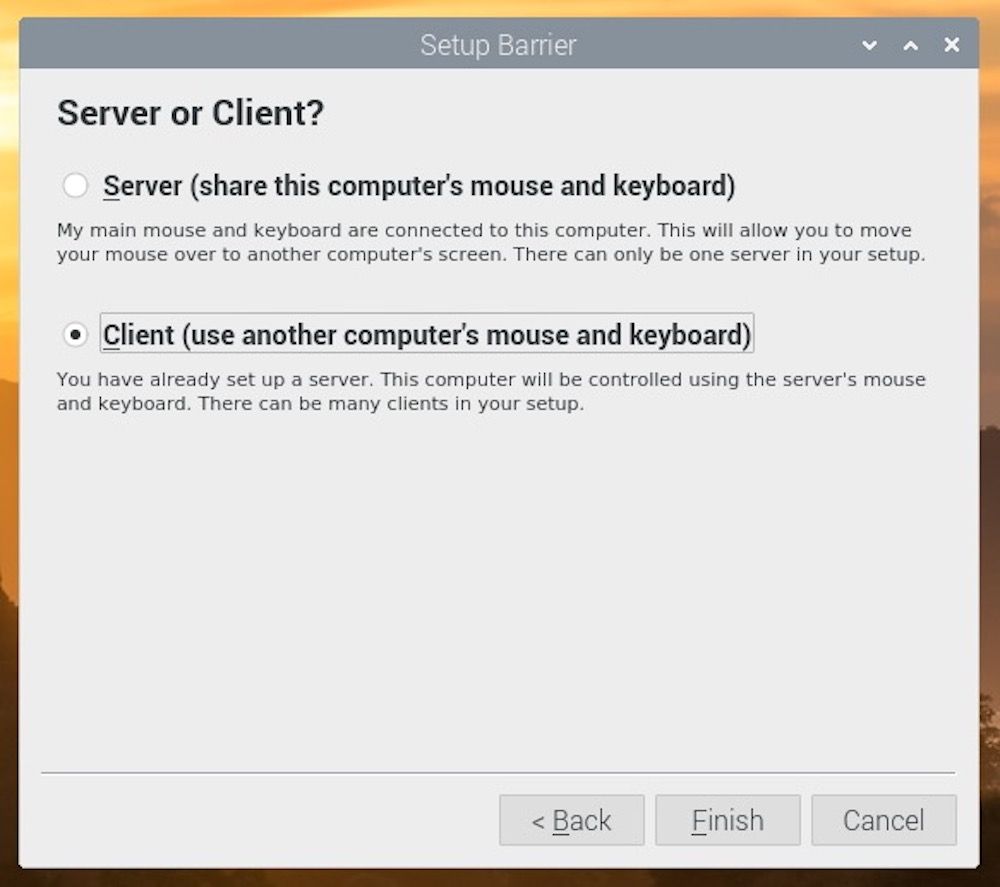
- Open the Barrier app on your Raspberry Pi.
-
Select the radio button next to Client (use another computer's mouse and keyboard).
-
Check the checkbox for Auto config.

- Click on Apply to tell the Barrier client to save your changes.
- Hit Start to establish connectivity between the Barrier server and client.


If you followed the above steps correctly, Barrier will recognize the server on your other computer and establish a connection with it. However, in case it can't connect to the server, you can configure it manually.
To do this:
- Open Barrier on the server machine and note its IP address.
- In the Barrier configuration on the client machine (Step 3), enter your Barrier server’s IP address in the text field next to Server IP.
Once that's done, hit Apply and click Start to start Barrier.
How to Use Barrier
Now that you've got Barrier configured on your computer and Raspberry Pi in a client-server configuration, every time you want to use it, simply open the app on both your server and client machines and click Start.
Once Barrier is up and running, make sure you have the keyboard and mouse connected to your primary computer — one that's running the Barrier server. Now, move the mouse pointer to the left or right of the display — depending on how you configured your server and client machine earlier in the setup process — to transfer control over to the other machine.
You can now use your mouse and keyboard to select items and type text, respectively, on the other machine. Perform the same step to switch control from the client to the server or other client machines.
If you plan to add more computers to your setup, you can set them up as clients using the steps listed earlier in the post and move your mouse left-to-right or right-to-left to switch focus between them and the server machine. One thing you should always keep in mind, though, is the position you've configured your server and client machines at in the Barrier setup configuration.
Sharing Peripherals Between Computer and Raspberry Pi Made Easy
Using Barrier, you can use a single keyboard and mouse to control your computer and Raspberry Pi effortlessly and declutter your workstation without having to buy extra peripherals.
Over time, if you find yourself using Barrier to control your multi-computer setup often, you can set it to run at startup automatically. There are different ways to accomplish this depending on the operating system. Check out our guides to do this on Linux (and Raspberry Pi OS), macOS, and Windows.