PDF is a universal document format. It requires less storage space and is easy to share. So, if you've got a bunch of images you want to share with someone, it's best to convert them into a PDF document first. That way, you can keep the sequence of images intact (if required) and easily transfer them multiple times without hassle.
iOS offers many ways to combine images into a PDF document. Below, we'll discuss four unique methods to help you combine multiple images into a PDF on your iPhone.
1. How to Combine Images Into a PDF Using Photos
Apple's Photos app is capable of more than just displaying images. It lets you edit, annotate, and print images directly from your iPhone. In addition, you can also use it to combine multiple images into a PDF document, thanks to the Print functionality.
To do this, make sure the images you want to combine into a PDF file are present in the Photos app and follow these steps:
- Launch the Photos app on your iPhone.
- Go to the album containing the images you want to combine into a PDF and choose the ones you want in the PDF. Make sure to select the pictures in the order you want them to appear in the PDF document.
- Hit the Share icon in the bottom left and select Print from the iOS Share Sheet.
- On the Print Options screen, tap the Paper Size option and select Photo Large.


After you've tap on print, follow these steps to save it as a PDF.
- Tap the Share icon again and select Save to Files.
- Navigate to the folder where you want to save the PDF file in Files.
- Tap on the name in the text box at the bottom of the screen and give a suitable name to the file.
- Finally, hit Save to save the PDF file.


If you wish to share this PDF file, go to the Files app, select it, and hit the Share button. Now, you can either AirDrop it or send it over the internet using a messaging or email app.
2. Combine Images Into a PDF Using the Files App
Although the Photos app can create a PDF from multiple images, it has one problem. If the width of a few images in your selection is different, it doesn't automatically adjust the same for the rest of them. And therefore, you may end up with a PDF with white borders around some of the images.
To avoid this, you can use Apple's Files app instead. This offers two advantages. First, it comes in handy when the images you want to combine are not present in the Photos library, i.e., they're either stored on the phone's local storage, iCloud, or some other cloud storage service. And second, it creates PDFs without affecting the quality of the images in them.
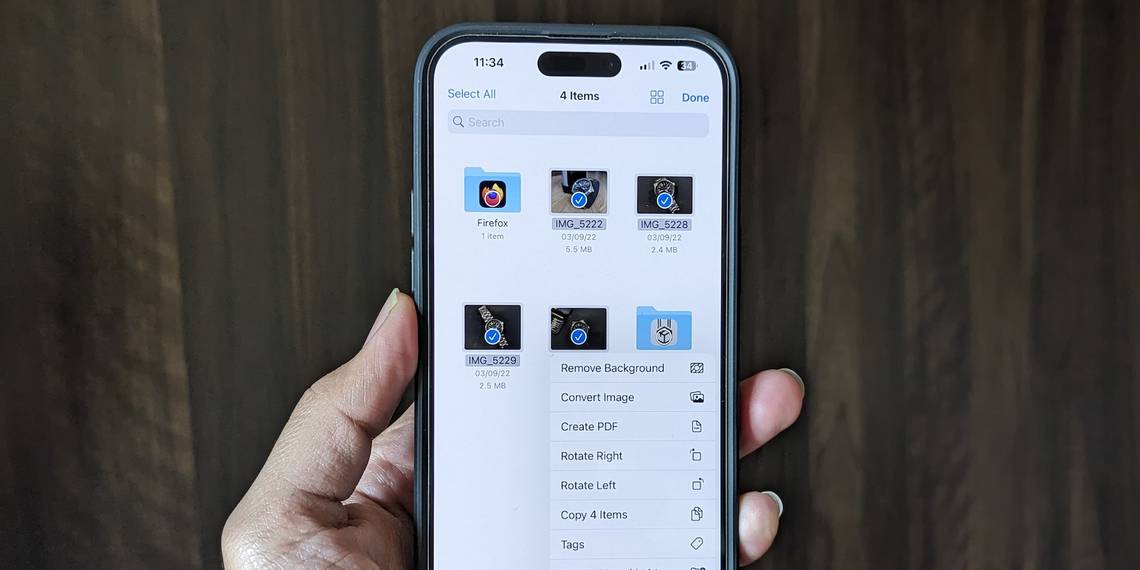
Here's how to combine images into PDF using Files:
- Open the Files app.
- Go to the folder with the images you want to combine into a PDF.
- Hit the ellipsis icon in the top-right corner, tap on Select, and choose the files you want to combine.
- Tap the ellipsis icon in the bottom right again and select Create PDF from the menu.


Files will now create a PDF document with a filename that's essentially the name of the first file in your selection. Here's how to rename it.
- Long tap and hold on the file and select Rename.
- Type in a new (distinct) name for the file. If you want, you can also add tags for better organization.
- Hit Done to save the file.


Similarly, you can also combine images in the Photos library using Files. For this, you must first save the images to Files. Select the photos, hit Share, select Save to Files, and pick the location where you want to save them in Files.


3. How to Combine Images Into a PDF Using Apple Books
Apple Books allows you to read ebooks and listen to audiobooks on the iPhone. But little do people know that it can also help you combine multiple image files into a PDF document.
Much like the Files app, Books combines images into a PDF while keeping their image quality intact. Here's how to use it:
- Go to the Photos app.
- Select the photos you want to combine into a PDF.
- Hit the Share icon in the bottom left and select Books from the list of app suggestions. If you don't see an app, scroll left on the app suggestions, hit More, and select Books.


As you do this, Books will create a PDF and save it. Head back to Books, and you should see the PDF document here.
Since items in your Books library are synced to iCloud, your PDF can also be viewed under iCloud Drive in the Files app. However, if you wish to save it elsewhere, you can do that too. Go back to Books, tap on the ellipsis button below the file, and select Share PDF. Choose Save to Files, pick the destination folder, rename it, and hit Save.


4. Combine Images Into a PDF Using a Third-Party PDF Tool
Last but not least, you can also combine multiple images into a PDF on your iPhone using a third-party image-to-PDF converter. While there are several of these available on the App Store, we recommend using an app called Photo to PDF Converter Scanner. It's free, quick, and offers a few extra options.
Download: Photo to PDF Converter Scanner (Free)
- Launch the Photo to PDF Converter Scanner app on your device and allow it access to your Photos library.
- Tap the Gallery icon, select the photos you want to club together into a PDF file, and hit Next.


Once you've picked the photos you want to turn into a PDF, here's what you need to do:
- On the PDF Options screen, set your margin, orientation, and size preferences. Make sure to set the size to Original to retain image details in the PDF.
- Hit Done. PDF Photos will create a PDF and open the Share menu.
- Select Save to Files from this menu and go to the folder where you want to save the PDF.
- Tap the file's name at the bottom and give it your desired name.
- Finally, hit Save.


Easily Share Multiple Photos in a Single PDF File
Combining multiple images into a PDF greatly simplifies sharing images on the iPhone. In addition, it also helps you group a bunch of similar pictures, so you can keep your scanned documents or images organized and access them easily.
But that's not all, as there's a lot more you can do with your PDF on the iPhone. For instance, if your PDF contains sensitive information, you can lock it using a password. Or, if you want to annotate some of its content or add a signature, you can use markup tools in the Files app to do it effortlessly.