
For your Chromebook to be productive and efficient, it must have a strong internet connection because, after all, its main function is to browse the internet. However, you might face a number of problems with your network connection that can slow down the internet speed on your Chromebook.
Luckily, you can resolve many of these network issues with an easy built-in solution. All you have to do is change the default DNS server on your device.
So, let’s understand what a DNS is, why it is beneficial to change it, and how you can change it on your Chromebook.
What Is DNS?

Domain Name System, or DNS for short, provides a naming mechanism to identify different websites on the internet. A request to open a web page or to download a file must pass through it.
By default, your Internet Service Provider or ISP sets the DNS server, which is not always reliable. It is sometimes unable to process requests and slows down the internet. Moreover, the ISPs often block access to several websites through their DNS.
As network requests pass through the default DNS, on rare occasions, these requests can contain viruses and malware because some default DNS servers are not strong enough to detect and quarantine these threats. Although, this is rarely the case as most ISPs take care of this issue at their end.
Benefits of Changing the DNS Servers

Big tech companies such as Google, Cloudflare, Norton, AdGuard, and others have their own DNS servers. These servers are fast, strong, and reliable and can improve your internet connection, unblock restricted websites, and strengthen your privacy and security.
By changing the DNS, you can access geographically-restricted content. Most DNS servers allow you to configure parental controls and filter the web according to your preferences. They also protect you from fake websites trying to hack you through malware.
How to Change the DNS on Your Chromebook
To change the DNS on your Chromebook, all you have to do is tinker with some options in the settings menu. Your device is using the DNS provided by your internet service provider by default.
Please note that before making changes to the DNS, make sure to save a screenshot of the settings or note down the default DNS address somewhere just in case changing DNS causes issues on your device.
Before changing the DNS, first, decide on which new DNS you’d like to use. There are many public DNS servers available such as Google, Cloudflare, OpenDNS, and many others.
Now, to switch to the DNS server of your choice, open the Chromebook settings. You can do so using one of the following methods:
-
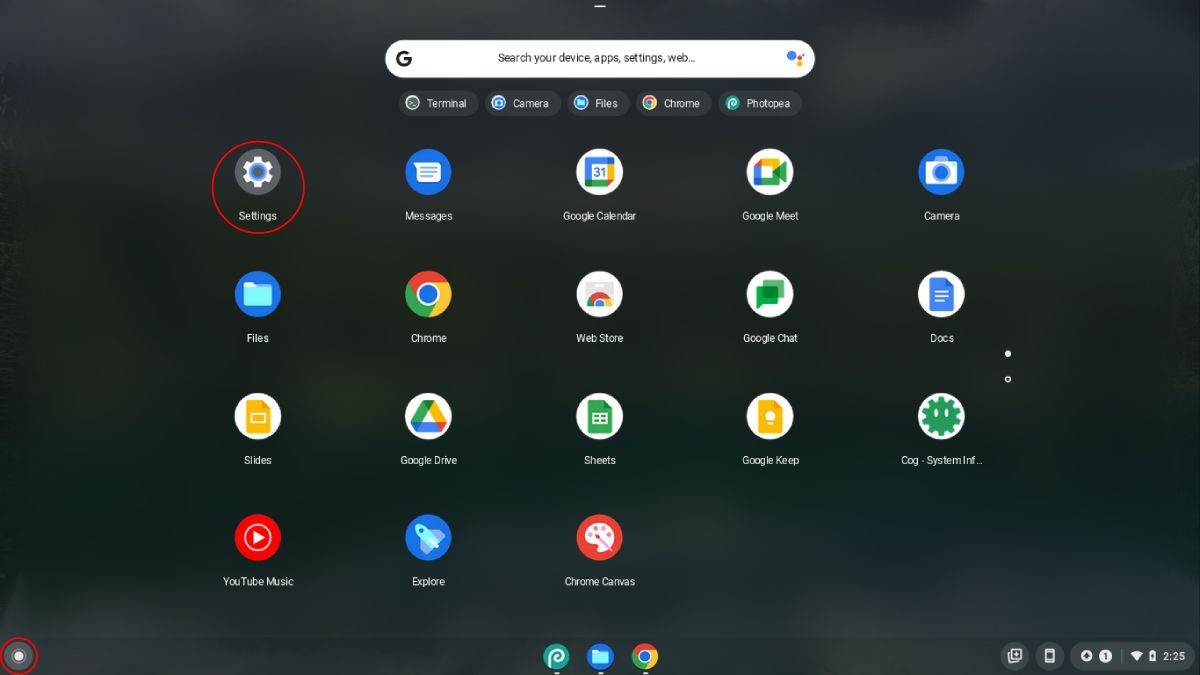
Click on the Launcher, then on the Caret icon (^) to find Settings.
-
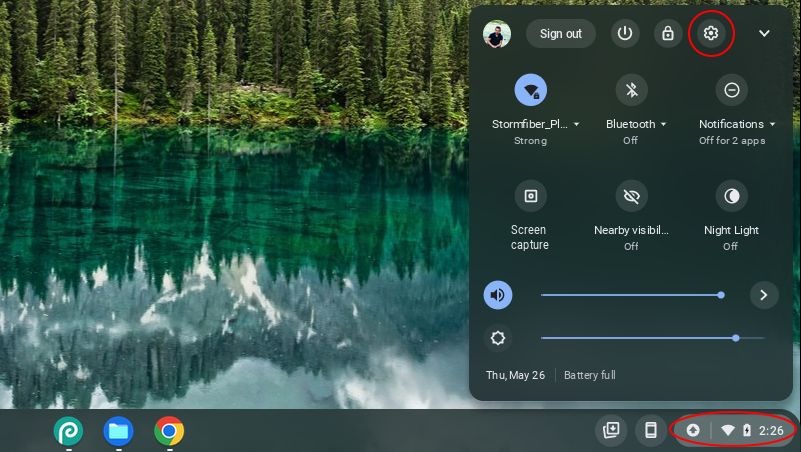
Or you can click on the Time option in the bottom-right corner and click on the Gear icon.


Changing the DNS for a Specific Internet Connection
If you have multiple internet connections, you might want to change the DNS for a specific connection only. To do this, go to the Network menu in the settings. The Network menu will present you with several options.

Click on the network type you are using, for example, Ethernet, Wi-Fi, or mobile network. We chose Wi-Fi and then the specific Wi-Fi that the device was connected to. After that, click on Network to expand the options.

Inside the expanded Network sub-menu, you will see information such as IP address, name servers, and MAC address. The option you’re looking for is Name Servers, which is another name for DNS servers.

Under Name Servers, you have three options for setting the DNS. By default, the Automatic name servers are selected, which are the DNS servers provided by your ISP. The second option is Google name servers, which is the DNS provided by Google. To change from default DNS to Google name servers, simply select the Google name servers option. It will then change your DNS to 8.8.4.4 and 8.8.8.8.
If you want to set a custom DNS such as the ones provided by Cloudflare or OpenDNS, select the third option, Custom name servers. Here, you can enter the DNS servers of your choice. For example, the OpenDNS servers are 208.67. 222.222 and 208.67. 220.220.
Once you’ve added the custom values in this space, you have successfully set a custom DNS. Here is a comparison of Google DNS and Cloudflare DNS, as these are among the best providers these days.
Changing the DNS for All the Network Connections
If you don’t want to bother changing the DNS servers for each of your network connections, you can simply set a system-wide DNS server that automatically applies to each connection.
To do this, go to your Chromebook’s settings as mentioned above. From the left sidebar, click on Security and Privacy. Here, click on the last option that says Use secure DNS.

In this option, your ISP’s DNS is selected by default. You can change it to the DNS of your choice by clicking on the second option that says With. You can either select a predefined DNS server from the dropdown menu or enter a custom DNS.
Whichever name server you set here will work on all of your internet connections. So, you don’t have to change every single one of your connections’ DNS servers manually.
Some of the Best DNS Servers Available
To save you some time searching for DNS servers, here is a list that you can use.
| DNS Server | Primary DNS | Secondary DNS |
| 8.8.8.8 | 8.8.4.4 | |
| Cloudflare | 1.1.1.1 | 1.0.0.1 |
| OpenDNS | 208.67.222.222 | 208.67.220.220 |
| AdGuard DNS | 94.140.14.14 | 94.140.15.15 |
| Quad9 | 9.9.9.9 | 149.112.112.112 |
| Comodo Secure DNS | 8.26.56.26 | 8.20.247.20 |
| CleanBrowsing | 185.228.168.9 | 185.228.169.9 |
| CyberGhost | 38.132.106.139 | 194.187.251.67 |
| Yandex DNS | 77.88.8.88 | 77.88.8.2 |
| Neustar Ultra DNS | 156.154.70.5 | 156.154.71.5 |
| DNSWatch | 84.200.69.80 | 84.200.70.40 |
| OpenNIC | 206.125.173.29 | 45.32.230.225 |
| UncensoredDNS | 91.239.100.100 | 89.233.43.71 |
There are many more DNS providers out there that you can find with a simple Google search. Just make sure to check the reviews of the provider before using it.
Set the DNS of Your Choice for Better Browsing
DNS is important for smooth network flow and privacy. It is almost always good to use reliable and fast DNS servers rather than the default ones, as it will not only help you access geographically-restricted content but also improve the network latency.
If accessing blocked content on the internet is your ultimate goal, you should consider installing a VPN instead of switching DNS on your Chromebook.