
By default, when you close the lid of your Windows laptop, it automatically enters sleep mode. This feature not only helps save battery power but also lets you resume your work quickly when you open the laptop again. However, did you know you are not tied to this default action?
Whether you want to keep the laptop running, shut it down, put it to sleep, or hibernate it, this guide will show you how to change your Windows laptop's default response when you close the lid.
1. How to Change the Lid Close Action via Control Panel
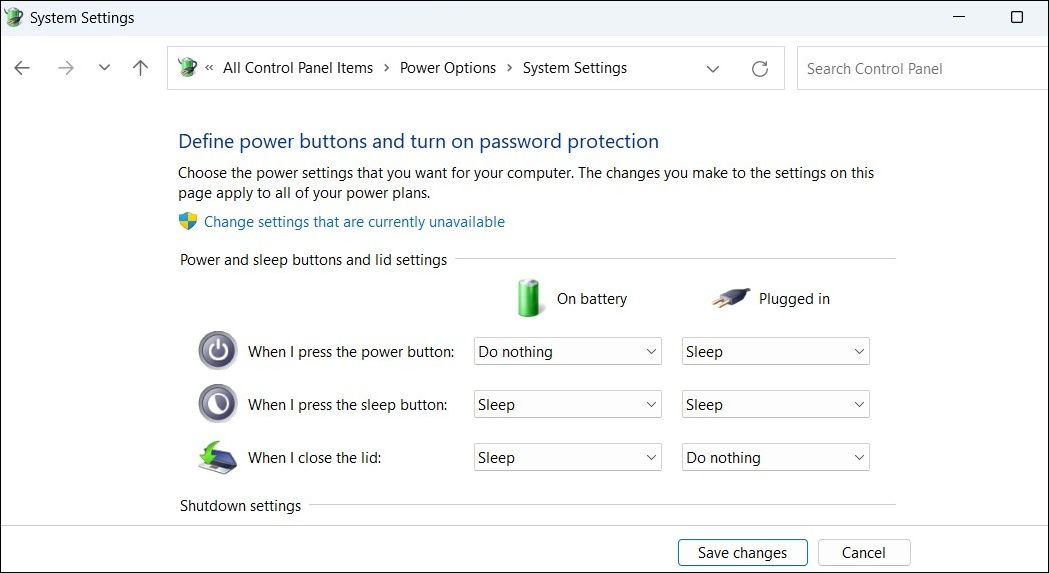
The Power Options applet in the Control Panel lets you configure various power management settings on Windows. Here's how you can use it to customize the lid close action on your Windows laptop.
- Click the magnifying icon on the taskbar to access the search menu.
- Type control in the search box and press Enter.
- In the Control Panel window, use the drop-down menu in the top right corner to change the view type to Large icons or Small icons.
- Open the Power Options applet.
- Click the Choose what closing the lid does option from the left pane.
- Use the drop-down menus next to When I close the lid to select your preferred action for On battery and Plugged in.
-
Click the Save Changes button at the bottom.

2. How to Change the Lid Close Action Using Advanced Power Options
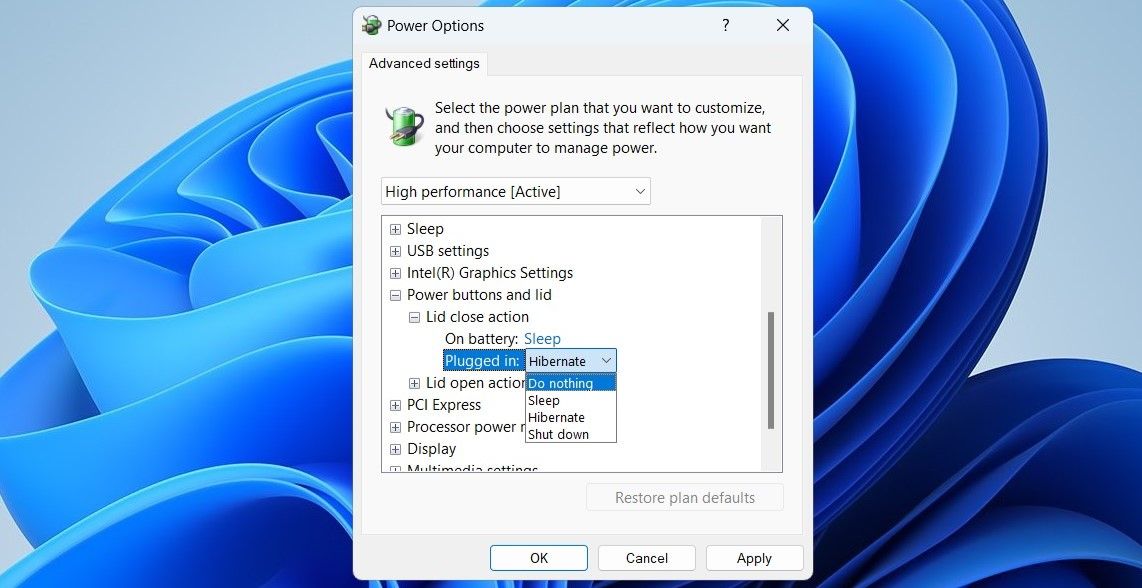
Another way to customize the lid close action in Windows is through the advanced power options. With this method, you configure the close lid action for each of your power plans separately. Here are the steps you can follow.
- Press Win + R to open the Run dialog box.
- Type powercfg.cpl in the Open field and press Enter.
- Click the Change plan settings option next to your power plan.
- Select the Change advanced power settings option.
- Double-click on Power buttons and lid to expand it.
- Expand Lid close action.
- Use the drop-down menus next to On battery and Plugged in to select your preferred action.
-
Hit Apply followed by OK.

3. How to Change the Lid Close Action With Group Policy Editor
The Local Group Policy Editor is a useful tool for configuring various system-level settings on your computer. It also provides the option to change the default lid close action on Windows.
It’s worth noting that the Group Policy Editor is only accessible on the Professional, Education, or Enterprise editions of Windows. However, there is a workaround that allows you to access the Local Group Policy Editor on Windows Home as well.
To change the default lid close action on Windows using Group Policy Editor:
- Press Win + R to open the Run dialog box.
- Type gpedit.msc in the box and press Enter to open the Group Policy Editor.
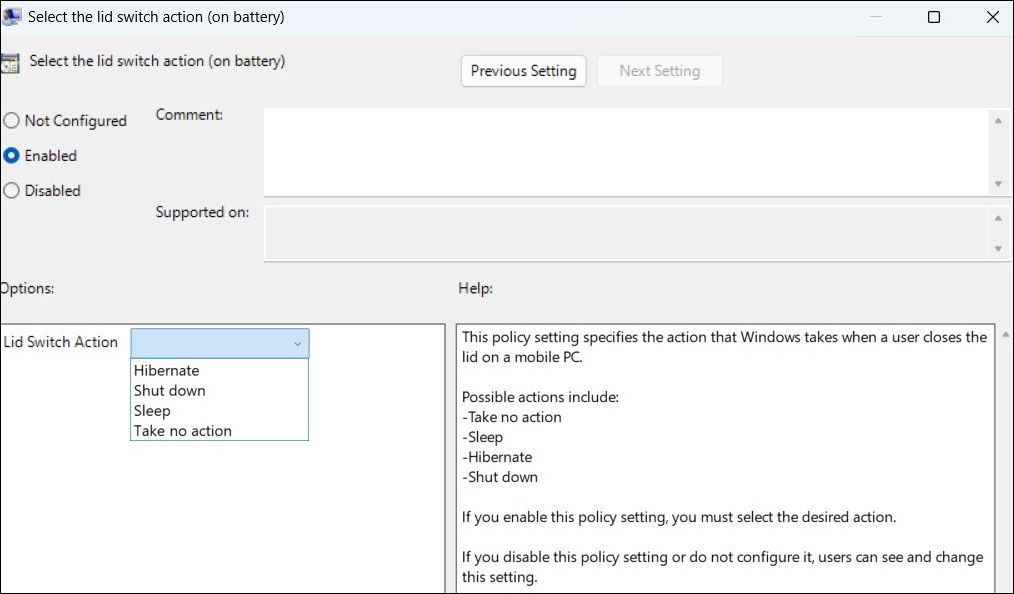
- In the Local Group Policy Editor window, use the left pane to navigate to Computer Configuration > Administrative Templates > Power Management > Button Settings.
- Double-click the Select the lid switch action (on battery) policy on your right.
- Select the Enabled option.
- Click the drop-down menu next to Lid Switch Action to select from the available options: Hibernate, Shut down, Sleep, Take no action.
-
Hit Apply followed by OK.

Likewise, if you want to customize the default lid close action while your laptop is connected to a power source, double-click the Select the lid switch action (plugged in) policy on your right, select Enabled, and then choose your preferred option.
Customize the Default Lid Close Action on Your Windows Laptop
Changing the default lid close behavior on Windows is a simple process that allows you to customize your laptop's behavior according to your needs. Whether you prefer to conserve battery life by putting your laptop into sleep mode or want to keep your apps running by choosing to do nothing, changing the default lid close behavior on Windows is both quick and easy.