Biqu B1


The Biqu B1 isn't just great for the price; it's great, period. It prints reliably, and it's easy to operate. Although it needs some construction, the build guide is comprehensive and everything is well labeled, so any skill level should have no issues putting it together.
- Brand: Big Tree Tech
- Build Volume: 9.25x9.25x10.62 inches (235x235x270 mm)
- Connectivity: Micro-SD and USB
- Heated Build Plate: Yes, with removable spring steel sheet
- Feed Type: Bowden tube
- Dimensions: 16.2x19.4x15.8 inches (412x492x402 mm)
- Weight: 17.6lbs (8kg)
- Great instructions and labeled part bags
- Superb adhesion and double-sided print bed for extended lifespan
- RGB lighting in the print head and control dial
- Very reliable printing
- Easily upgradeable
- Noisy fans, even when idling
It's not often that a printer comes along which only unique selling point seems to be that it's available in pink and has some RGB lights, but at first glance, that's exactly what the Biqu B1 is. But if you can look past that, you'll find a remarkably well built and reliable printer at an affordable price point. I wasn't expecting much, but the Biqu B1 taken the spot as my daily printer of choice; it's just that good. And it's also available in black.
Note: if you purchase from Amazon, we have an exclusive coupon for the black version of this printer. Enter code 6SB64EP7 at checkout for $30 off, taking the price to $250! (Valid until the end of February 2021). And be sure to enter the competition to win a Biqu B1 at the end of this review.
Biqu B1 Design and Specifications
In terms of core design, there's nothing remarkable or innovative about the Biqu B1 at all. It's an Ender 3 clone, and arrives half-built, with the bottom half (which includes the power supply and motherboard) already made. Parts are all machined and anodized (in a gorgeous pink, no less), and fixed onto a standard t-slot frame.

After unpacking the printer, I admit I panicked a little. I had glossed over the small print about this printer being a kit build, and the sheer number of bits and screws was quite overwhelming. I've tried to build a 3D printer from a full kit before, and it went horribly wrong and is still sitting in my loft to this day, mocking me relentlessly every time I venture up there.

Thankfully, every small bag of screws is labeled with the precise contents, and which step it relates to. It's this sort of attention to detail that makes the Biqu B1 stand above the competition.

A full color illustrated 20-step build pamphlet is included, and I'm confident that you won't have any problems putting this together even if you have zero experience. A bag of all the tools you need is also included.
Bed Leveling
Although a BLTouch auto-leveling upgrade is available as an optional purchase (and a bracket included in the core set), I wouldn't bother. The manual leveling process is easy enough.

After homing all of the axes, enter the manual leveling interface screen, and place a piece of A4 paper underneath the nozzle. At each of the five points, in turn, raise or lower the print bed using the dials underneath such that you can move the paper around with the slightest of friction. The last of the five points is in the center, with no dial underneath, but if the other four points are correct, that should confirm it. You will need to repeat the process a few times, as leveling one side will invariably affect the others.
Once completed, you're ready to start printing. There are some small test small files included on the SD card, but they're not particularly impressive, so I'd recommend slicing your own right away.
Slicing
The Biqu B1 is natively supported by a range of slicing software. I used Cura on Mac OS, and found a ready-made profile included in the download. Print quality ranges from 0.12mm layer height to 0.28mm.

Export your sliced Gcode files to the included micro-SD card, or a USB drive, then insert that into the side of the control panel on the printer.
Printer Interface
The 3.5" touchscreen interface on the Biqu B1 is one of the cleanest, intuitive, and comprehensive I've seen yet. Menu items are obvious, and you can even delve into the terminal to directly talk to the printer in Gcode if you wish. Uniquely, a retro Marlin interface can also be used, thanks to a unique dual-operation mode. I'd recommend sticking with the default Biqu Touch mode, however.

Live Z-adjustment is possible during prints (curiously named "BabyStep"), but leveling was so easy and accurate that I never actually needed to use this feature.

If the filament sensor detects a run-out, the print head is moved off safely to the side and the print paused. You can then retract the remainder through the Bowden tube (I'd suggest using a little piece of card to divert it and ensure it doesn't get stuck in the filament sensor on the way back), and insert a new one. Unlike some models I've used which restricted retraction and feeding to 10mm intervals, the interface on the Biqu BH1 goes up to 200mm at a time. Filament changes don't take more than a few minutes to complete.
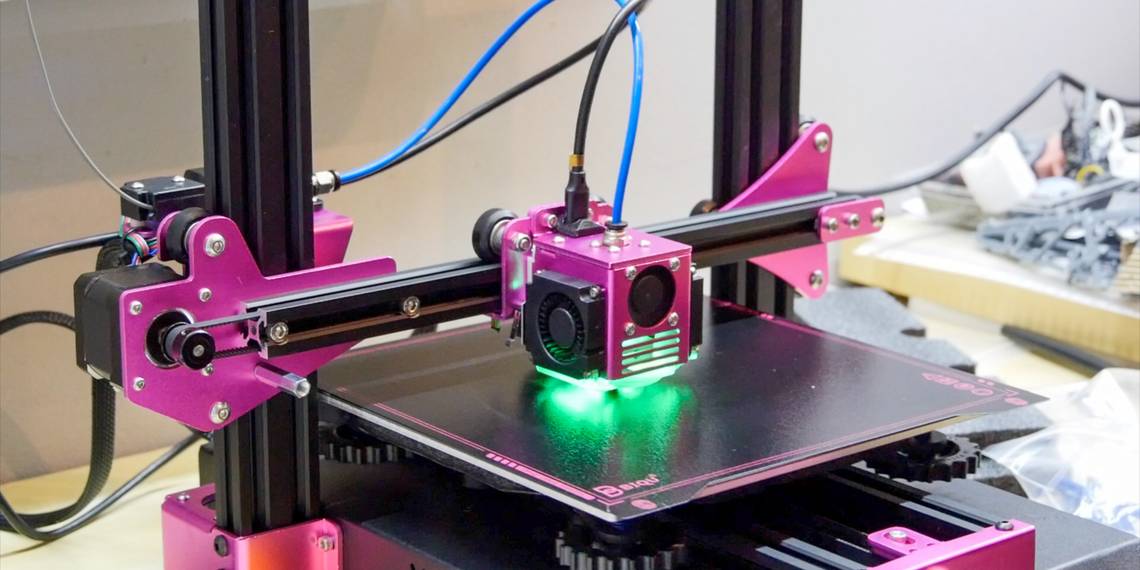
Heated Bed and Spring Steel Sheet
A heated bed and removable steel print surface is certainly not unique on this type of printer, but dig deeper and a few things stand out here.

Firstly, I want to point out that I have yet to experience any curling around the edges or other adhesion issues, and the first layers were superb with every model I printed, in both PLA and PETG. I didn't use any glue, tape, or hairspray; just a simple wipe-down wipe 99% alcohol between prints. In my experience, this is quite remarkable.

This also indicates that the heat distribution to the heated bed is even across the whole surface, and there's no inherent warping in the bed. Though initial small prints on the center of a bed can often go well, it's only while trying to print much larger objects that fill the whole print bed where you'll start to see the effects of uneven heating and a warped surface.

As an aside, the surface of the steel sheet produces a pleasing stippled effect on the bottom layer.

The thin spring steel sheet is designed to be removed when a print is finished, such that you can remove stubborn prints by bending the sheet and snapping the print off. In reality, I haven't needed to do this yet. Without fail, once cooled, every print has naturally detached itself from the surface.

Lastly, the steel sheet is double-sided, so if one side has worn down over time, simply use the reverse side to double the life span.
Repairability
After a week of printing with the Biqu B1, my initial impressions are outstanding, but of course, I don't yet know how it'll perform in the long term.
Though I wouldn't normally attempt any kind of repair on a 3D printer, the experience of at least half-building this one makes me believe I could, should the need arise. Having a printed instruction manual on how to put it together again is also comforting. But there are other factors that make the Biqu B1 a good candidate for repairs and upgrades.
Inside the base, the SKR1.4 motherboard has removable TMC2088 stepper drivers. These could be replaced or upgraded easily.
The hot-end assembly is connected with only two screws, a custom USB-C cable, and a Bowden tube. Replacing the entire hot-end, or swapping out for a CNC or laser module, should be trivial. In fact, Biqu has a direct drive print head (ie, one which the filament feeds directly into rather than via a Bowden tube) available now as an optional upgrade.

The spring steel is double-sided to extend the life-span, but this implies it will eventually need to be replaced. Thankfully, it's quite a lightweight component, and you can purchase another from a number of outlets for less than $30.
Should You Buy a Biqu B1 Printer?
The Biqu B1 isn't just great for the price; it's great, period. I've been reviewing 3D printers for around a decade, and models that cost over $1000 haven't printed this reliably. The Biqu B1 will take pride of place in my workshop as my daily printer.

The only downside is the noise—not from the stepper motors (which are virtually silent), but from the fan in the base. This is running whether the machine is actively printing or not, so you'll probably want to shut it down completely when idle. It's noisy enough that I wouldn't want it in the office with me. But this is a minor flaw in an otherwise superb printer, and perhaps something you could upgrade if it really bothered you.

(Stackable planter from Thingiverse)
If you're worried about the fact it's only half built when it arrives: don't be. The instructions are comprehensive, illustrated at every step, and the component bags are fully labeled. All the tools you need are provided.
At less than $300, the Biqu B1 is a steal.