It can be worrying when your BIOS fails to detect or recognize the ATA/SATA hard drive. Even worse, there are multiple causes for this issue, so it can be hard to nail down the exact reason why your computer can't detect your hard drive.
Fortunately, there are tricks you can use to better narrow down what's causing this issue. As such, read on as we cover how to solve an unrecognized hard drive in Windows 10.
Reasons Why BIOS May Not Detect or Recognize an Internal Hard Drive
Depending on whether you are using a PC or laptop, the causes for BIOS not detecting your internal hard drive problem can vary for many reasons. But here are a few of the most common factors to look out for.
- Your internal hard drive is not enabled in the BIOS. Some motherboards like Asus may require you to enable CSM in the BIOS settings to detect the storage device.
- Hard drive incompatibility with your motherboard
- Missing or incorrectly installed Serial ATA driver
- Faulty or loosely connected data cables
- Faulty hard drive
- Incorrect jumper settings on the drive
1. Check if the Hard Drive Is Disabled in BIOS
Some motherboard manufacturers disable unused SATA ports in the BIOS by default. If you are using a PC, make sure the hard drive is enabled in the BIOS.
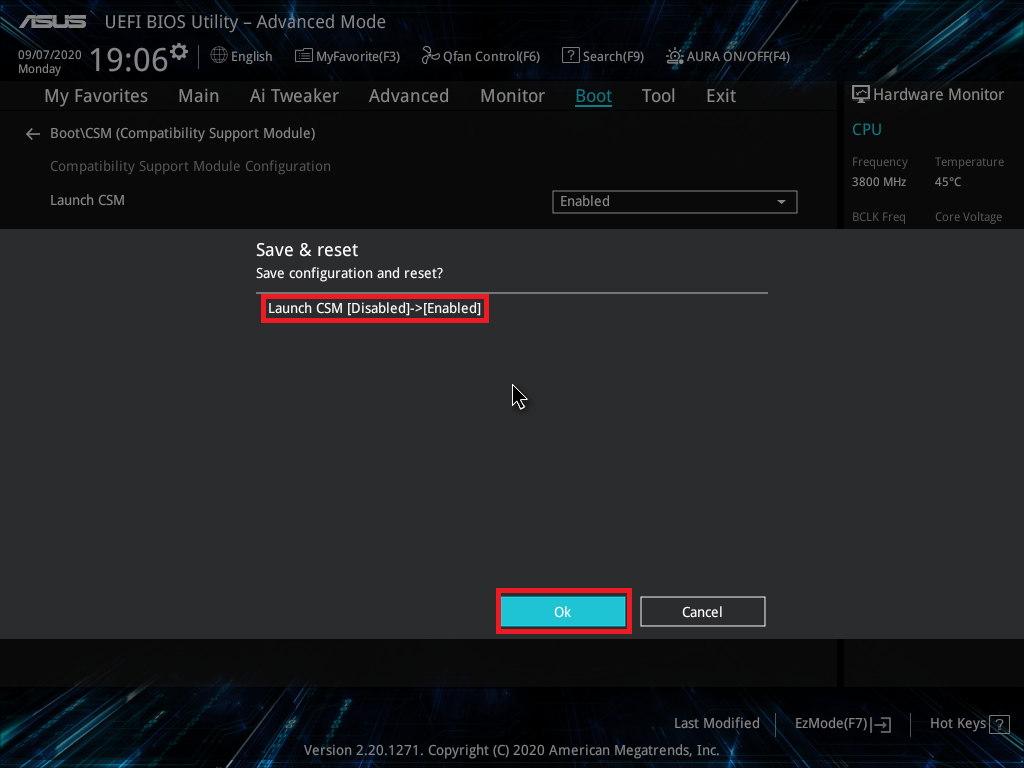
For example, if you use an Asus motherboard, you may want to enable CSM (Compatibility Support Module) in the BIOS setting. This allows you to show both UEFI and non-UEFI devices on boot priority.
To enable CSM in the Asus motherboards:
- Shut down the computer if it is powered on.
- Press the power button to turn it on, and as soon as you see the Asus logo appear, starting pressing the Delete key on your keyboard. This will allow you to the UEFI BIOS Utility—EZ Mode.
- In the EZ Mode, press the F7 key to switch to Advanced Mode.
- Open the Boot tab in the Advanced mode.
- Next, expand the CSM (Compatibility Support Module) section.
- Click the drop-down for Launch CSM and select Enabled.
- Press the F10 key and click OK to save the changes.
2. Update the BIOS to the Latest Version
Updating the BIOS (Basic Input Output System) to the latest available version can help fix compatibility issues and improve performance.
Depending on whether you are using a UEFI or Legacy BIOS, there are multiple ways to update it. You can refer to our detailed guide on how to update your UEFI BIOS in Windows or your motherboard/laptop manufacturer's documentation for specific details.
3. Load the BIOS' Default Settings
If you have made changes to your BIOS, including CPU overclocking or memory overclocking, your system may fail to detect your storage drive due to instability.
Fortunately, you can go into the BIOS and revert it to its default configuration to undo any changes. The steps involved to load the default settings can vary depending on your laptop or motherboard manufacturer.
To load default BIOS settings:
- Shut down your PC and wait for it to power off completely.
- Next, press the Power button and hit F2/F8/Del key to enter BIOS Setup Utility. Depending on the laptop and motherboard manufacturer, you may have a different key to enter BIOS.
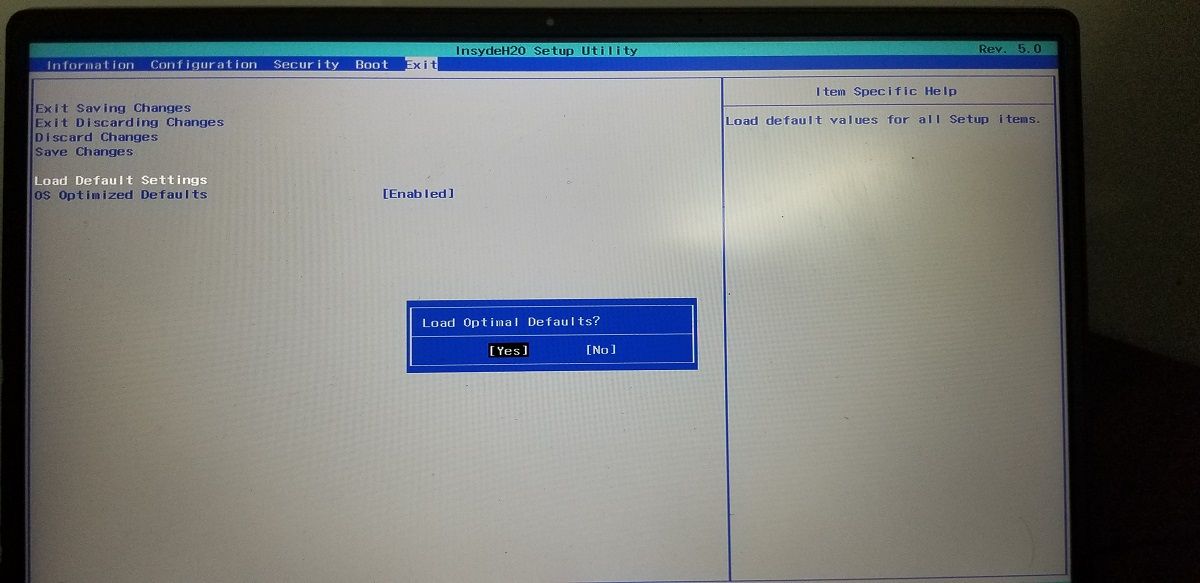
- Once in the BIOS, use the arrows keys to open the Exit tab.
- Use the down arrow keys and highlight Load Default Settings.
- Hit enter and then select Yes to load BIOS default settings.
- Press F10 and hit enter to exit and save changes.
Loading the default settings will reset all changes you have made to your BIOS.
4. Remove and Reconnect the Hard Drive
Your computer may fail to detect the hard drive if there is a disk failure, drive corruption, and loose connection. To verify the status of the disk, try removing the hard drive by carefully disconnecting the cables and look for any physical damages.
For old hard drives, clean out the dust and connect it to your PC. If the issue persists, try connecting it to a different computer if available. This will help you determine if the issue is with the motherboard or hard drive.
5. Check for Faulty or Unplugged SATA Cables
The BIOS will not detect a hard drive if the data cable is faulty. Make sure the SATA cables are in good condition, and you have connected them promptly. Also, inspect the motherboard for bent or misaligned pins.
Check your hard drive manufacturer's documentation for the right type of cables. For example, some manufacturers recommend using UDMA cabling for ATA drives. These color-coded cables require proper orientation to establish a proper connection. You can find your drive's supporting documentation on its manufacturer's website.
Furthermore, try connecting an old DVD drive using the SATA cables to the motherboard and see if it works. If not, it is likely that your data cable is malfunctioning. Try replacing the cable and see if that helps.
6. Check if the Drive Spins Up
If your hard drive is not getting sufficient power or no power at all, it will not spin up. You can do a quick check to see if it's spinning up, and if it's not, you've identified the cause of your mystery error. Just remember that this trick won't work with solid-state drives, because they don't have a platter that spins around.
To verify if power issues are preventing your BIOS from detecting the drive, try these troubleshooting steps.
- Shut down your PC and make sure it is completely powered off.
- Next, open the computer case and disconnect the data cable from the hard drive.
- Power on your computer and check if the drive spins. You can tell if it's spinning it you feel a slight vibration to the touch.
7. Use a Bootable Diagnostic Tool to Check the Disk Health
You can use the proprietary hard drive diagnostic tools offered by the disk manufacturer to perform a health check. Seagate offers SeaTools for DOS while Western Digital has Data LifeGuard Diagnostics.
Download the tools and create a bootable drive. Boot from the drive and check if it detects your hard drive. If the diagnostic cannot detect anything, it is possible that you have a faulty HDD and may require replacement.
Fixing a BIOS That Can't Find Your SATA Hard Drive
The average life span of an HDD is around 4 years, and it will probably show some signs before going kaput. If the BIOS does not detect an older HDD, begin with troubleshooting the BIOS-related issues. Check for unstable overclocking, BIOS CMS configuration, faulty data cables, and even outdated BIOS to fix the problem.
Additionally, use the hard drive diagnostic tools provided by your HDD manufacturer to check for hardware failure. If the drive hasn't completely failed yet, you can use a Windows installer disc and attempt to transfer important files.


