Once you've got your video primed and ready to roll, you're going to have to export it to get it on YouTube. However, there are a few things you need to know before you hit Upload.
Here, we'll go over the basics of exporting your video from Adobe Premiere Pro, as well as the ideal export settings for YouTube.
Export Settings: The Basics
To learn the rules of the game, you're going to need to know what makes a video easy to upload and stream. Exporting for efficiency means making the final output as light-on-its-feet as possible.
Unfamiliar with the lingo? The artist in the thick of things may blow right by these important attributes. Don't worry—we've all been there.
Here are some terms you need to know:
- Video codec: determines the way that Adobe Premiere Pro compresses your project, and will influence the character and quality of the export once it leaves the program.
- Lossless video codec: produces a final product close to the quality of the original. More aggressive codecs compactify your project so that it may be streamed online without bogging down your viewer's computer.
- Video format (video container or wrapper): amounts to the file type extension that will house the video in your browser (an MP4, for example). This allows videos to be received outside of a specialized video production program like Premiere Pro and played back universally.
- Resolution: video resolution is the dimensions that the frame consists of. HD video can be 720 or 1080.
- Frame rate: shows how many frames your video contains per second—23.976, 24, 30, and 60 fps are common ones.
- Destination bitrate: is concerned with the width of your video's eventual data stream, which is essential when exporting with the intent to upload on a platform like YouTube.
- Interfaced (i) and progressive (p) footage: Progressive footage plays each full frame consecutively, while interlacing uses scan lines to cut down on bandwidth. For example, a 24p or 24i video will indicate the difference between interlaced or progressive footage.
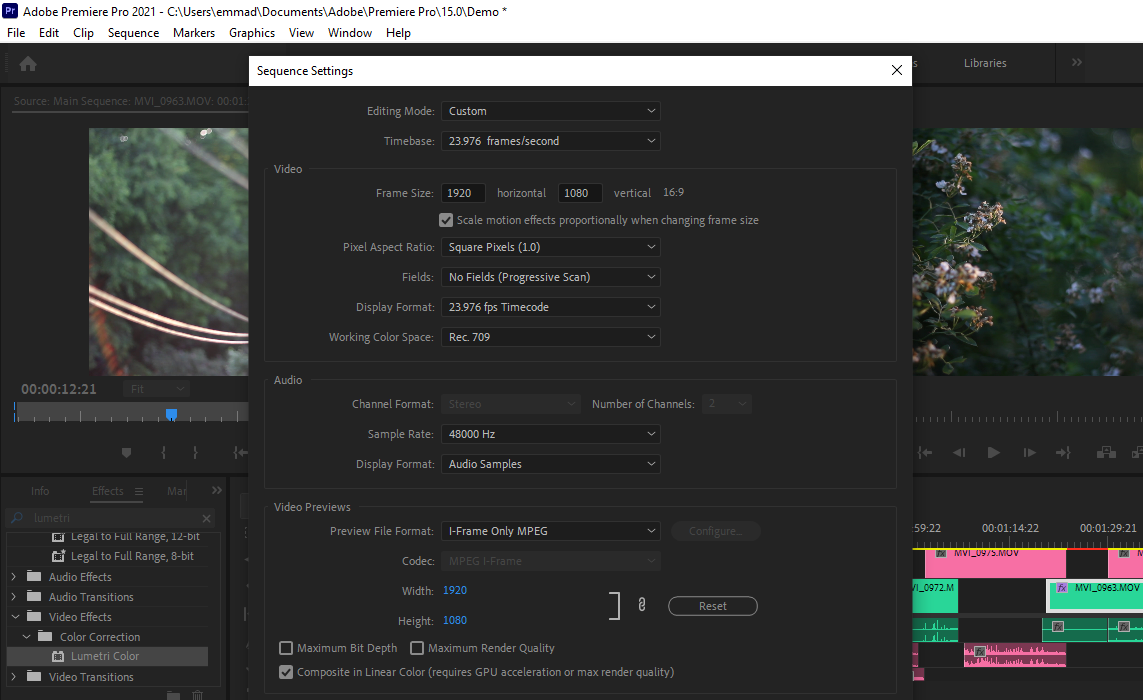
Want to check out some of these settings yourself? To adjust your frame rate, resolution, as well as your audio sample rate, you'll want to find your Sequence Settings in Adobe Premiere Pro.
Simply navigate to the Sequence Settings option under the Sequence dropdown. From here, you can make any adjustments as needed.
What Are YouTube's Recommended Export Settings?
Before making any adjustments, it's important to know YouTube's recommended export settings. YouTube recommends using an H.264 codec wrapped in an MP4 file container. It prefers a progressive framerate, and any of the most commonly-used rates are acceptable.
The maximum resolution allowed is 4k. Anything below this will be acceptable to upload. The current standard aspect ratio for YouTube is 16x9, although the platform will automatically accommodate whatever your video's aspect ratio happens to be.
It enforces no upper limit on bitrate, although rates that will not impact the continuity of the stream are advised. 10Mbps is recommended for 1080p video; 6.5Mbps is best for 720p. YouTube's preferred audio codec is AAC-LC. The audio bitrate recommendation for Stereo is 384 kbps.
You can read more about YouTube's recommended export settings from this YouTube Support page.
How to Use Adobe Premiere Pro to Export a Video to YouTube
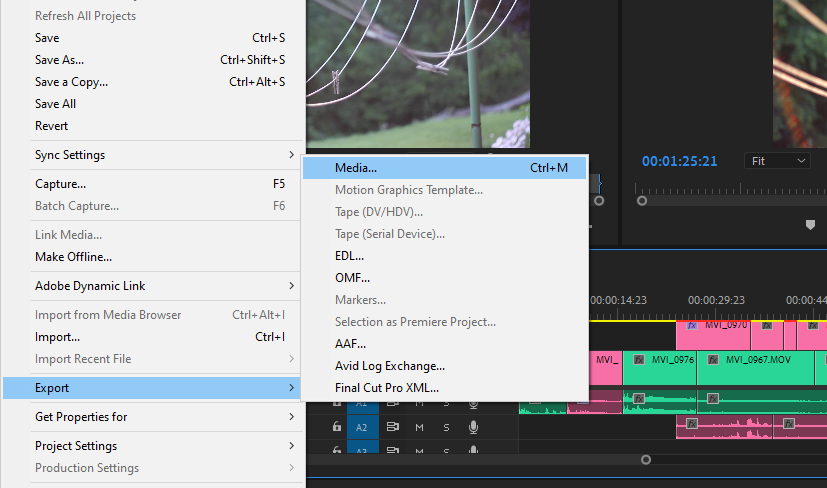
To start the export process, set an in point and an out point around what you would like to share in the main timeline. With the timeline panel selected, hit Ctrl + M to pull up the Export window. Alternatively, you can find the Export > Media option under the File dropdown menu.
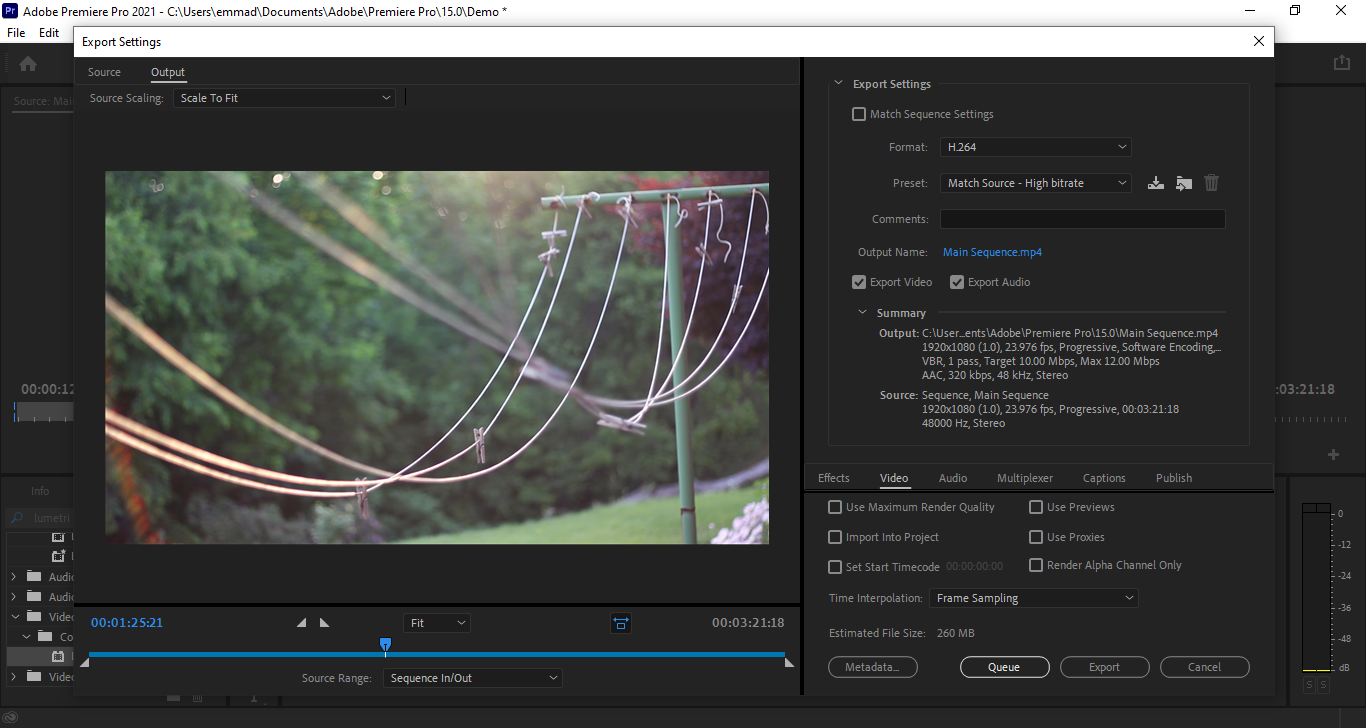
In the main Export window, you will have the option to change the export's codec and file type, among other things.
Under the Summary dropdown (below the checkboxes labeled Export Video and Export Audio), you'll be able to see your video's exact output settings, including the file destination. Cross-referencing your output against what YouTube recommends will ensure that everything is up to scratch before you begin to render your video.
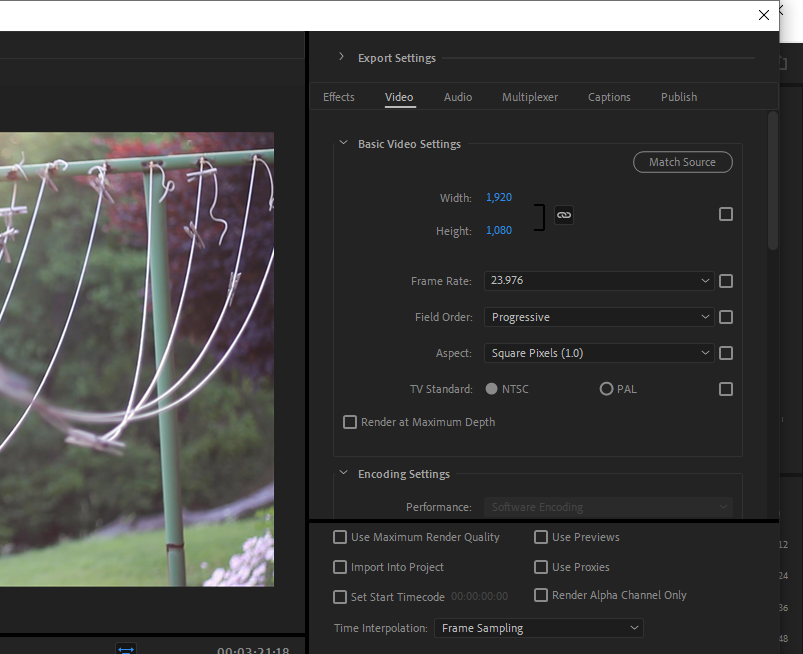
You can adjust additional values by clicking the Video or Audio tab underneath the main Export settings in the Export window. Here, you'll be able to match your export settings to suit YouTube's best practices specifically.
Once you've crossed your i's and dotted your t's, sharing your work with the world is as easy as hitting Export, or Queue-ing it up in Adobe Media Encoder.
Share Your Creation With the World
Now that you're familiar with the basics of exporting a video to YouTube, you should have no problem sharing your content with the world. Learning about export settings is the easy part—it's growing your channel that will prove to be the most challenging.


