MIDI is an abbreviation for Musical Instrument Digital Interface. It is a communication protocol that enables computers and other MIDI compatible devices to communicate. With its built-in serial ports, the Arduino is ideal for DIY MIDI projects. Let’s take a closer look at 10 of the best Arduino MIDI projects for beginners!
1. Arcade Midi Fighter

Build your own Arcade MIDI Controller! This MIDI controller is based on an Arduino Uno and features 12 buttons, four knobs, as well as two faders. Play drums, synths, effects or map it to anything else that’s MIDI related!
The Arduino Uno has six analog inputs for the knobs and sliders, and 12 digital inputs that can be used for buttons. However, the analog inputs can also be used for digital inputs, so you could customize this build to have more buttons instead of sliders and knobs if you’d like.
For build instructions, check out the full Arcade MIDI Fighter guide.
2. Mini UNTZtrument

This 16-button MIDI controller was inspired by the Novation Launchpad and designed by Adafruit. Based on an Arduino Leonardo, this device has four rows of buttons, each with a built-in LED, and four knobs. As the project is equipped with a button grid controller, the Adafruit Trellis, soldering it will be easy without a mess of wires involved.
A full bill of materials as well as step-by-step instructions can be found in the full Mini UNTZtrument guide. There is also another guide for the larger UNTZtrument.
3. MIDI Guitar

It was inspired by the Guitar Hero Controller, but this MIDI Guitar uses mechanical key switches instead and has a glowing NeoPixel LED strip around the guitar head. It is also equipped with a whammy bar for pitch bending. Users can play chords or notes as well as adjust modulation with motion due to the on-board accelerometer.
This build has a Grand Central M4 development board which utilizes an SAMD51 chip, but an Arduino Mega could be used instead. The MX MIDI Guitar enclosure was 3D modeled and the tutorial is available on Adafruit’s website.
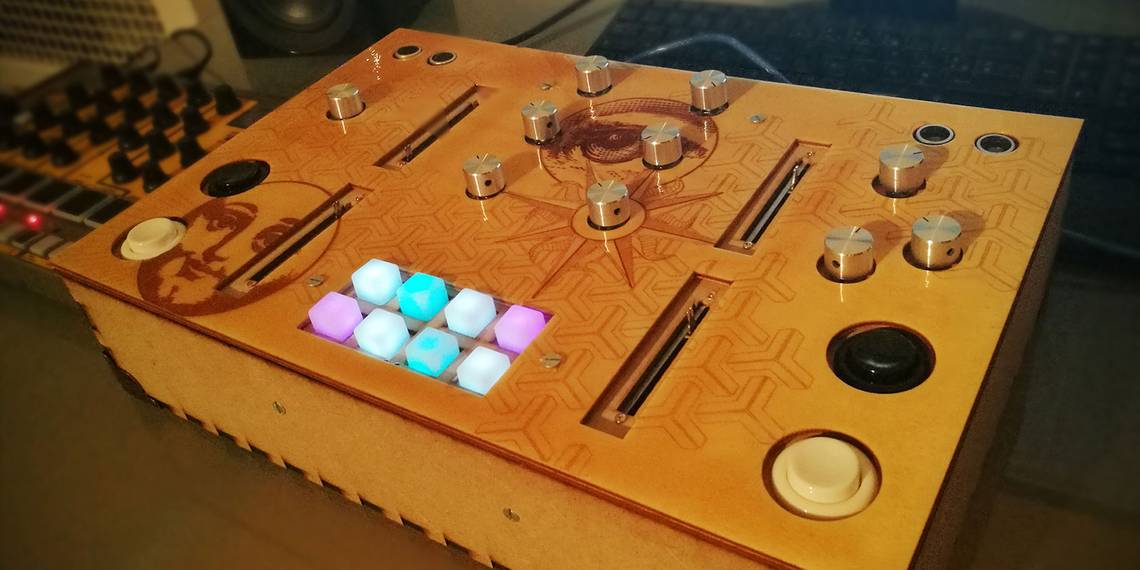
4. Lune

Designed for DJ sets, the Lune includes six potentiometers for EQ, three potentiometers for effects, an eight-button RGB LED pad, arcade buttons, an encoder, and even ultrasonic distance sensors for MIDI controlling!
The wooden enclosure was made with laser cutting; however, it’s possible to 3D print an enclosure with the variety of models available on Thingiverse. Follow along with the step-by-step guide over on Instructables.
5. MIDI Arpeggiator

An arpeggio is when the notes of a chord are played in quick succession. This is a MIDI device that creates arpeggio sequences in the form of MIDI messages. These are then sent through the DIN port to a central device like a computer with its software synthesizers. However, it can also be used with hardware synthesizers. The build tutorial and code are provided on the Arduino Project Hub.
6. Cthulhinho: A MIDI Sequencer

This is a MIDI sequencer built with an Arduino Nano and was designed for live performance in mind. Although it is a prototype, this wooden box is equipped with an OLED display, rotary encoder, six momentary push buttons, LEDs, DIN jack, and more. According to the maker, it is capable of controlling up to five synthesizers.
Users can also offload a melody to the Cthulhinho so they can focus on adjusting effects and sound sculpting with knobs or faders instead of fiddling with a keyboard. The full build instructions can be found on the Arduino Project Hub.
7. Arduino MIDI Controller with Encoder + OLED Display + EEPROM

This Arduino MIDI Controller has unlimited MIDI channels, faders, buttons, an OLED display, and even utilizes EEPROM to save changes to data. Other functionality includes bank selection, editable notes and encoder sensitivity. This controller can be used for all sorts of recording software, virtual instruments (VST), and playback devices.
The maker also notes that to add more controls, another Arduino board may be required. An alternate option is the Arduino Mega which has 54 digital input/output pins. The tutorial is available on the Arduino Project Hub.
8. Arduino MIDI Poly Synth
.png?q=50&fit=crop&w=1500&dpr=1.5)
It’s a polyphonic synthesizer made with an Arduino Nano. Polyphonic means that two or more notes can be played at the same time, as opposed to monophonic which can only play one. This synthesizer can be used to play up to three musical notes at once, so it’s suitable for playing chords.
The maker notes that an effects pedal can be connected to it which leads to all sorts of interesting sound textures with delay, chorus, phaser, flanger, reverb distortion, and so forth. Even though an Arduino Nano R3 was used in this build, an Arduino Uno R3 or Pro Mini could be used instead.
A full write-up of the build including bill of materials and code can be found in the Arduino MIDI Poly Synth tutorial.
9. Arduino MIDI Stepper Synth

The maker was inspired by floppy drive music, where floppy drives are controlled by stepper motors to pulse at certain frequencies to produce musical notes. It sounds amazing, and it is!
This project uses stepper motors to make music by extracting MIDI data which is then turned into a speed value that causes a stepper motor to create a corresponding pitch. The build instructions and code can be found on Arduino Project Hub.
10. DIY Guitar MIDI Controller (a.k.a. ‘Guitorgan’)

As its name suggests, this is a MIDI controller created with a guitar. It works by detecting what notes are being fretted through testing the electrical conductivity between the frets and the strings. This fret-detection method was used in the Guitorgan, an old-school electric organ.
The maker notes that this build includes a Arduino Mega, and a guitar with metal strings. One caveat seems to be that you can only expect partial polyphony from it. Create this build by following the step-by-step instructions and code on Instructables!
Which MIDI Controller Is Right for You?
In this article, we’ve looked at a range of MIDI controllers made with an Arduino. You could even use them with a digital audio workstation (DAW) such as Ableton Live.
All of these builds require other electronics apart from the Arduino; others require existing hardware such as an electric guitar. In addition, the enclosures for some of these builds only require the use of a breadboard in the prototyping phase. After which, to build the enclosure, it requires the use of a 3D printer or laser cutter. Why not have a go at making one?