
Data loss is inevitable, and may occur due to hardware and software failures. However, with regular backups, you can restore the data and critical applications, such as Home Assistant, back to their original or last working state. Here we'll explain a few different methods to create full and partial backups of your Home Assistant server on a local drive and cloud storage. You will also learn how to schedule automatic backups and use these backups to restore your Home Assistant server after a failure.
Ways to Back Up Your Home Assistant Server
There are two different ways in which you can schedule or create local and cloud backups of your Home Assistant server:
- Use the built-in system backup options to create local backups.
- Use the Home Assistant Google Drive Backup add-on to schedule local backups and upload them to the cloud (Google Drive) automatically.
Manually Create Home Assistant Backups on the Local Drive
You can create a full or partial backup of your Home Assistant Server on a local drive by following these steps:
- Log in to the Home Assistant server as an administrator.
- Go to Settings > System > Backups.
- Click the +Create Backup button.
- Enter a name for the backup.
-
Choose the backup method, i.e. Full backup or Partial backup. You can also encrypt the backup by selecting the Password protection checkbox.
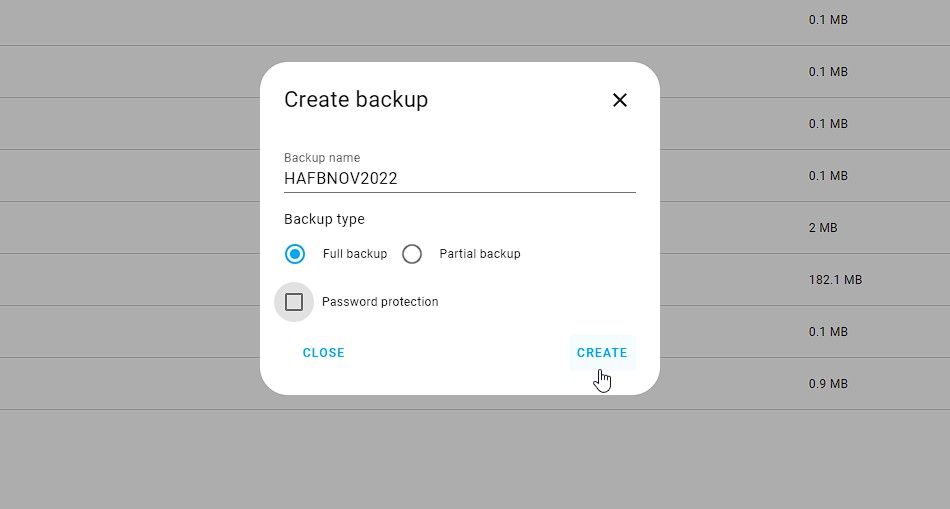
- Click Create. This may take a while to complete.
- After some time, you will see your backup in the Backups list.
- You can click on the latest backup to download the backup copy on your system.

Schedule Automatic Home Assistant Backups
You can automate these manual backups by using the Hassio.Backup_Full or Hassio.Backup_Partial service. To do so, follow these steps:
- Go to Settings > Automations & Scenes.
- Click Create Automation and choose Start with an empty automation.
- Click +Add Trigger and choose Time. Enter a time in HH:MM:SS.
- Click +Add Action and choose to Call a service.
- In the Service, search for the Home Assistant Supervisor: Create a full backup or the Home Assistant Supervisor: Create a partial backup option.
- You may enter a name for the backup or keep it as the default, and enter the password to keep the backups encrypted.
-
Click Save.
- Give the backup automation task a name with a description and click Save.

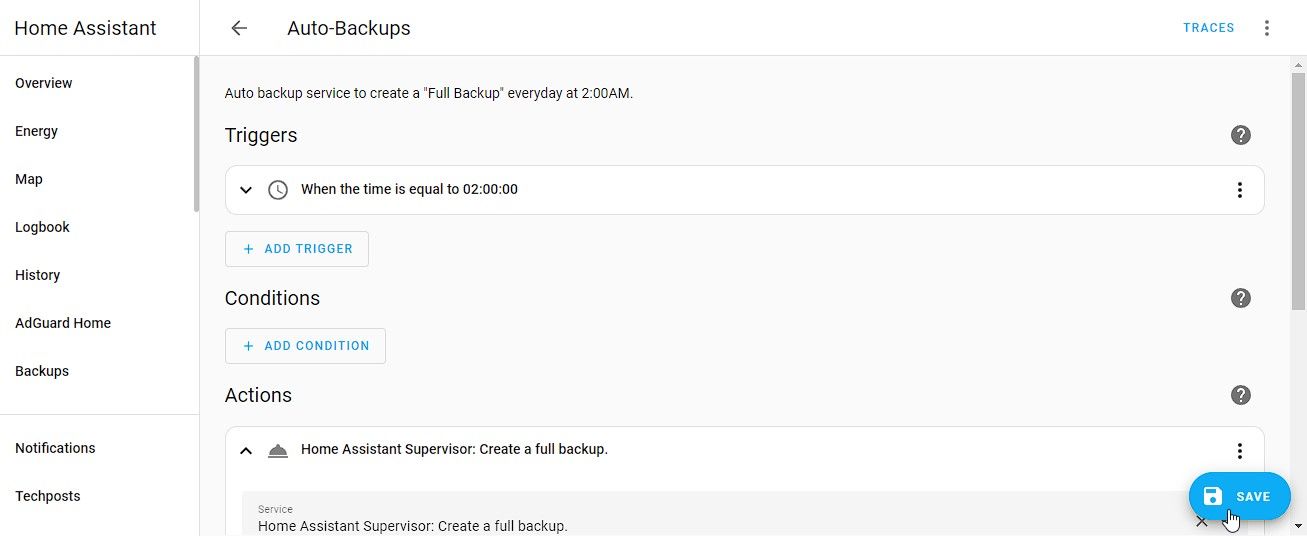
Alternatively, you can click on the three dots at the top in the automation window, choose Edit in YAML, paste the following code to create an automation for backup, and click Save.
        alias: Auto-Backups
description: Auto backup service to create a "Full Backup" everyday at 2:00AM.
trigger:
  - platform: time
    at: "02:00:00"
condition: []
action:
  - service: hassio.backup_full
    data: {}
mode: single

This will run the backup service and create a full automatic backup of the Home Assistant Server at 2:00 every day.
Alternatively, you can install the Samba Backup add-on to schedule the backups and set up a network-shared folder on Ubuntu with Samba to automatically copy the backup to the shared location.
Schedule Automatic Home Assistant Backups and Upload Them to Google Drive
Using the Home Assistant Google Drive Backup add-on, you can enable automatic backups of your Home Assistant Server. The add-on also automatically uploads the Home Assistant backups to Google Drive and cleans up the old backup so that the server or Google Drive doesn’t run out of space.
To install and set up automatic cloud backups to Google Drive in your Home Assistant Server, follow these steps:
- In the Home Assistant, go to Settings > Add-ons and click the Add-In Store button.
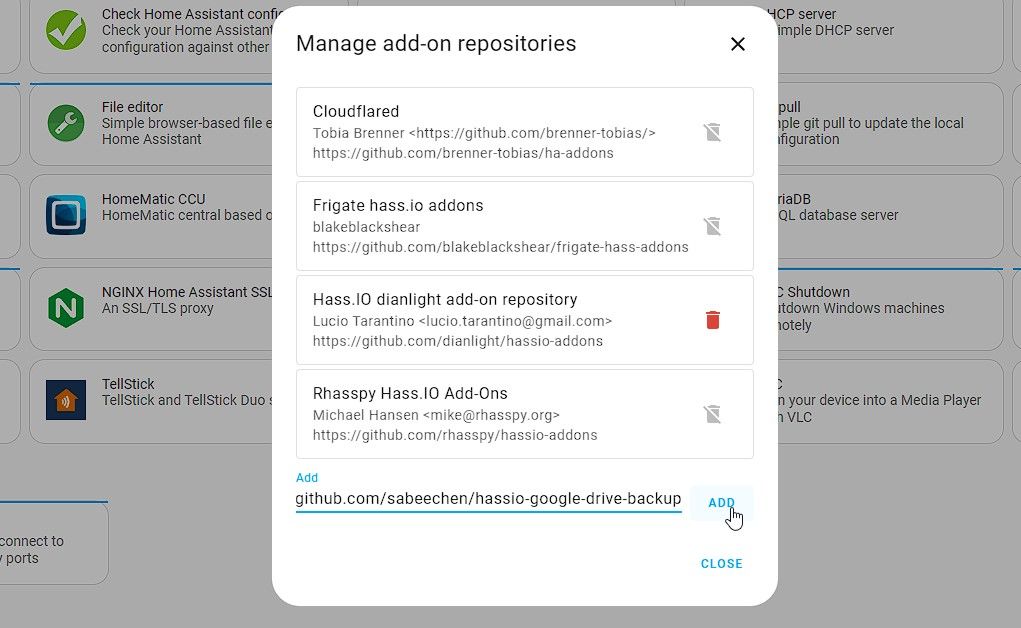
- Click the three dots at the upper right and choose Add Repositories.
-
Paste the link https://github.com/sabeechen/hassio-google-drive-backup and click Add.
- Then reload the current page and search for Home Assistant Google Drive Backup add-on.
- Click on the add-on and then click Install. Wait for a few minutes and let it finish.
-
Then click Start. After a few seconds, click Open Web UI. This opens the Home Assistant Google Drive Backup web user interface.

- Click Settings and enter the maximum number of backups you want to create and store in Home Assistant and Google Drive. Also, you can choose whether to keep the uploaded backup in Home Assistant or delete it after upload, and whether to delete the old backup before creating a new one. We kept them disabled.
- Scroll down and choose the number of days between the backups, and the time, and enter the password to secure the backups. Keep everything else as default and click Save.
-
Click Authenticate with Google Drive, log in to your Google Account, and authorize. You will get an authorization code string. Copy the code string, go back to the Home Assistant Google Drive Backup page, and paste it into the empty field. Click Save.

-
You will be redirected to the default backup status page where you can create new backups, view backup progress, upload progress, etc.
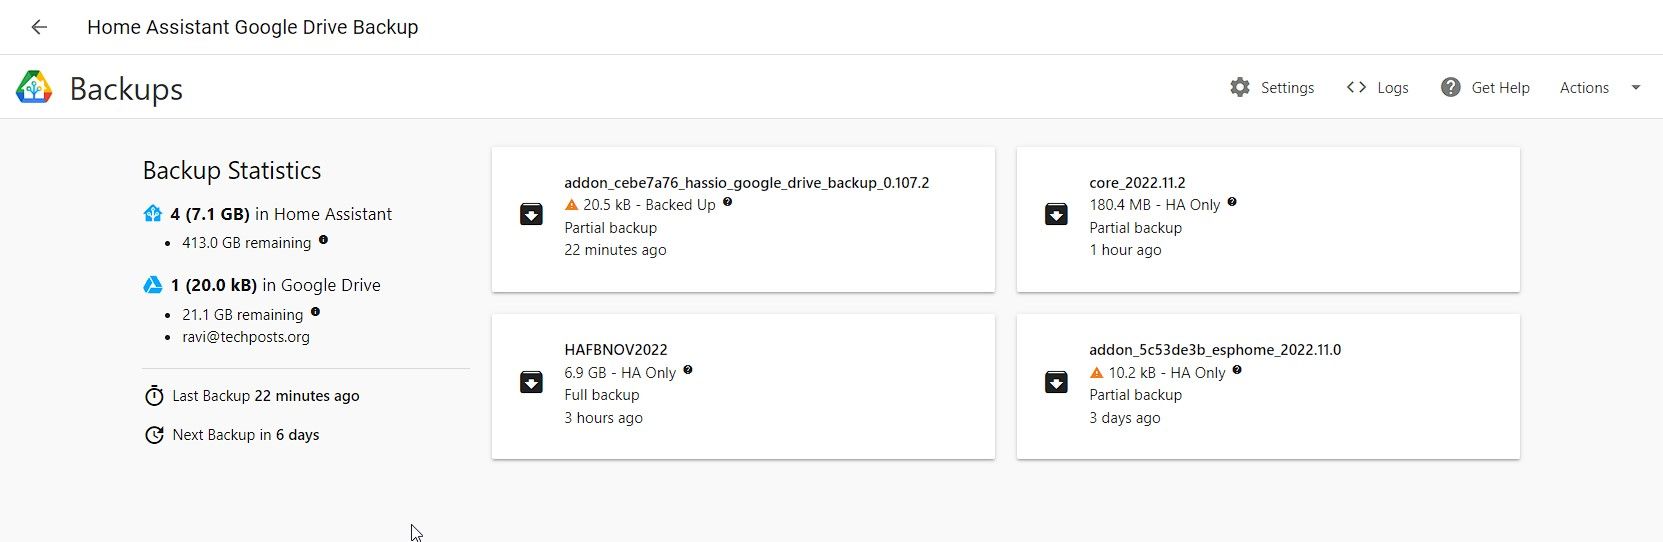


Once you have configured the Google Drive Backup for Home Assistant, you don’t need to worry about Home Assistant backups anymore. It also offers several customization features that you can explore and use.
You can install and configure add-ons, such as OneDrive Backup, DropBox Sync, or Nextcloud Backup, to store an additional copy of the Home Assistant backups in the cloud.
Steps to Restore Home Assistant Server Backups
If something goes wrong with your Home Assistant Server, such as damage to your Configuration.yaml file or if the servers start acting up, you can install the Home Assistant Server on a Raspberry Pi or Docker and then upload the last backup to restore the Home Assistant to its normal working state.
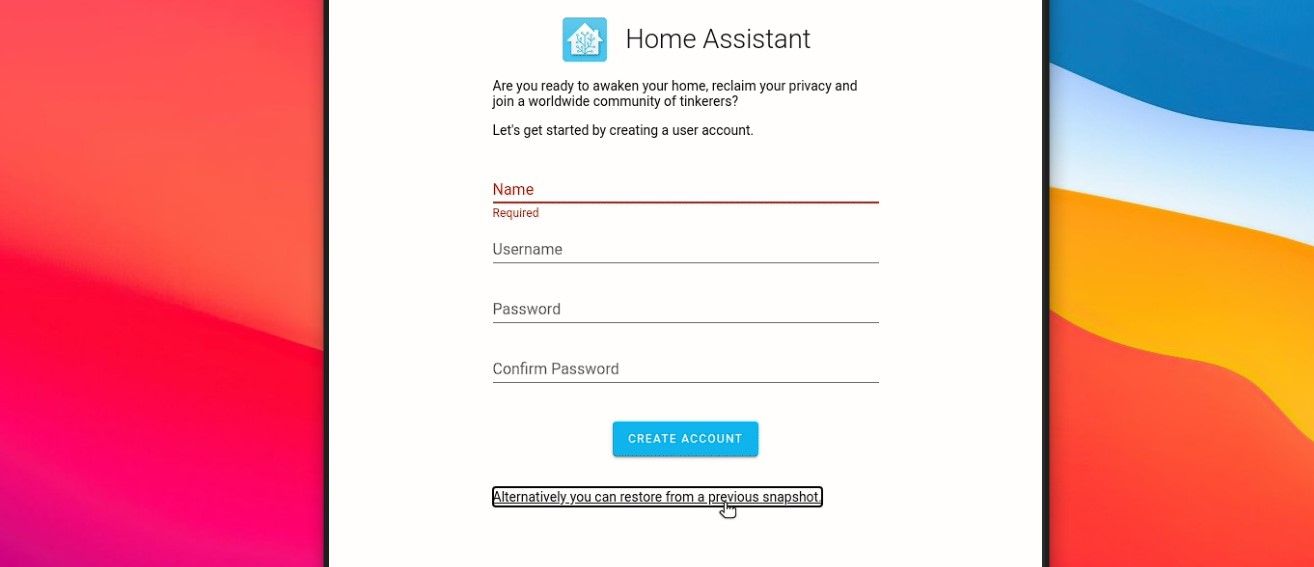
You can upload and restore the backup just after Home Assistant finishes the installation and before the initial setup where you create an account. Instead of signing up…
-
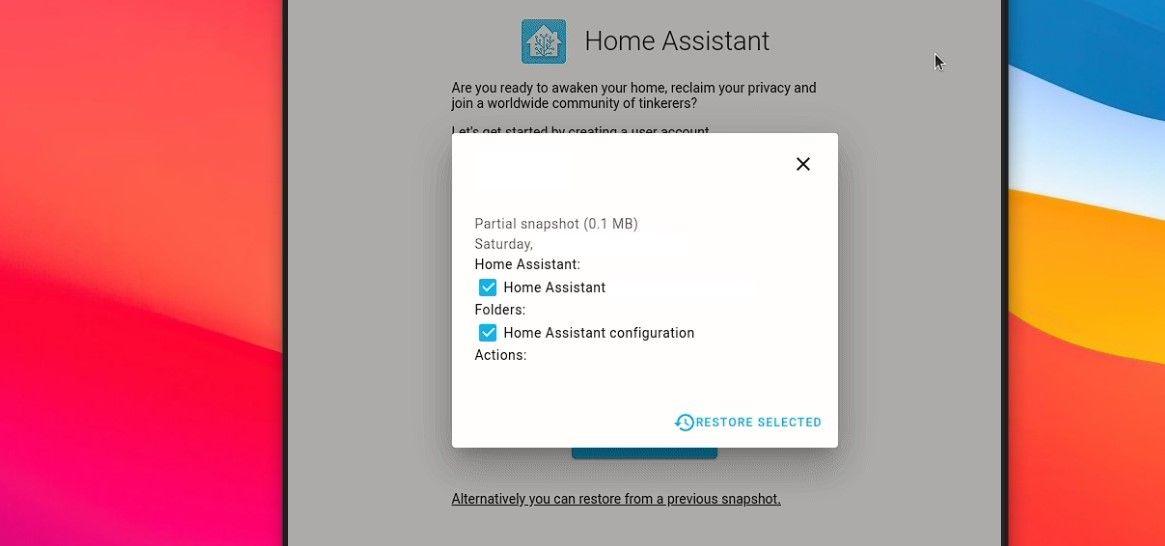
Click the Alternatively, you can restore from a previous snapshot option on the setup page. It will open the file explorer window.
-
Choose the last downloaded backup from Home Assistant or Google Drive and then click Restore Selected.


You may also upload the backup later, after the initial setup:
- Go to Settings > System > Backups.
-
Click on the three dots at the top and choose Upload Backup.
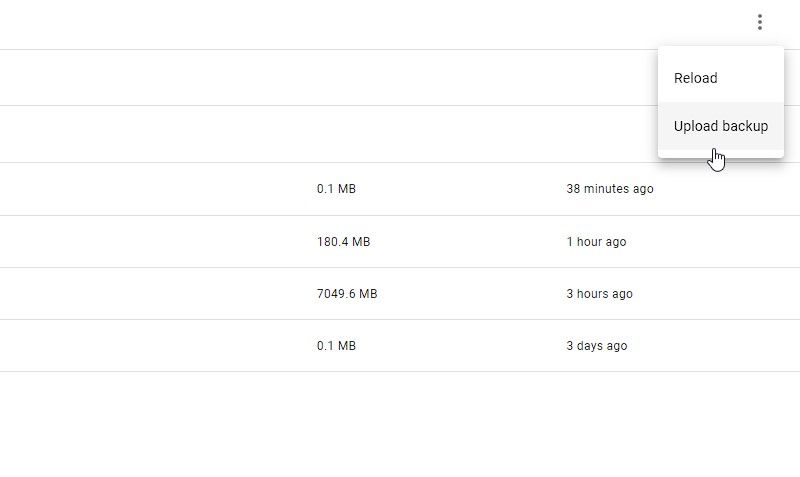
- Browse and choose the last backup you have downloaded from the Home Assistant Server or Google Drive to restore the server.

Back Up Now!
Backups are crucial, especially when you run a critical application, such as a Home Assistant server for your smart home. If you are using the Home Assistant server, you know the effort it takes to find the best configurations and settings to add and make your integrations, add-ons, smart devices, entities, automation, scripts, scenes, and so on work. We can’t even think of setting up the Home Assistant server from scratch. If you feel the same, back up now!