Isn't it annoying when almost identical apps use different key combinations to achieve the same outcome? Even worse, don't you hate it when a piece of software insists on using obscure keyboard shortcuts without offering an option to remap them? Wouldn't it be great to have absolute control over how your keyboard functions in every application? Well, that's possible, thanks to AutoHotkey.
With AutoHotkey, you can remap your whole keyboard or create custom shortcuts, both "globally" and for each application individually. If you wish, you can even have custom strings of text—or even whole templates—for each app bound to the same key combinations. You only need AutoHotkey and a text editor—even Notepad will do. Sounds interesting? Then let's hop right in.
Getting Started With Windows Spy in AutoHotKey
Nowadays, many keyboards come with software for creating custom shortcuts and macros. However, as we will see, AutoHotkey is more versatile since it's keyboard-agnostic.
With it, your "keyboard customizations" won't be tied to a particular keyboard. You'll be able to take your customization script to other computers and have your custom app shortcuts and shortcodes up and running in no time.
Since in this article we're hitting the ground running, if you'd like a proper introduction to AutoHotkey, check our quick AutoHotkey Guide for Beginners.
Start by downloading AutoHotkey from its official site. Then, install it like any other app. You don't have to run it afterward. It springs into action automatically when you run a script made for it. So, let's create such a script.
With AutoHotkey installed, right-click anywhere, on your desktop or inside a folder where you want to create your script. Choose New > AutoHotkey Script. Give your script-to-be a name and press Enter.

With AutoHotkey, you can create "global" shortcuts that will be active everywhere or app-specific ones that will work only inside an active application's window. To "target" a specific application, you must identify it in your script. AutoHotkey can help with that through its Window Spy.
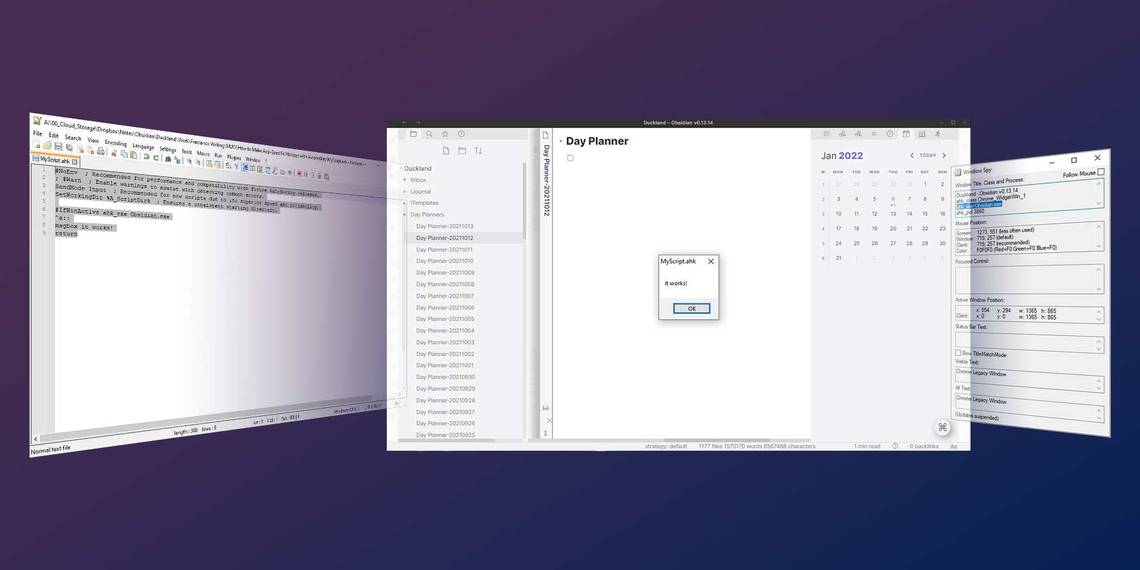
Double-click on your currently blank script to run it, and with it, AutoHotkey. Right-click on AutoHotkey's icon on the Windows tray, and choose Window Spy from the menu that pops up.

To find the identifiers needed to target an application, leave Window Spy on your screen, and click on your app's window. Then, notice the ahk_class, ahk_exe, and ahk_pid entries, at the top of Window Spy's window. In our case, we wanted to target the popular Obsidian note-taking application. Since other software could have a similar ahk_class and ahk_pid, we used its executable file as our target, using ahk_exe Obsidian.exe, as mentioned in Window Spy.

When you know your target, it's time to script.
Time to Make a Script in AutoHotKey
Right-click on your script and choose Edit Script to open it in your default text editor. As you will see, it will be pre-populated with some values that help with compatibility and performance. Ignore them, press Enter one or two times, and target your app using:
#IfWinActive APP_IDENTIFIER
Replace APP_IDENTIFIER with the actual target that you copied from AutoHotkey's Window Spy. In our case, this translated to:
#IfWinActive ahk_exe Obsidian.exe

When writing AutoHotkey scripts, you can use the following symbols for the modifier keys on your keyboard:
- ! for Alt
- + for Shift
- ^ for CTRL
- # for the Windows Key
Before creating your actual shortcuts, though, test if the script will indeed only work when your chosen application is active. The easiest way to do it is by using what AutoHotkey calls "a message box" or, rather, a "msgbox".

Type the following directly under the line where you targeted the application you chose:
        ^a::

msgbox it works!

return
If translated into plain English, this would look like:
- When CTRL + A are pressed together on the keyboard...
- ... show a message box on the screen that states "it works!".
- When the user acknowledges that message box, return to the previous state.
Run your script, press CTRL + A on your keyboard, and nothing should happen. That's because you've targeted a specific application but haven't yet switched to it. So, activate that application's window, press the same combination, and you should see a message box pop up stating that "it works".
Now, switch back to any other application and retry your key combo. Hopefully, nothing should happen. If so, this means your MSGBOX activates only in your targeted app, which is the desired result we want from this script.

If the keybind does "leak" into other apps, double-check your syntax, and ensure there is no typo in your selected target.
How to Make Custom Keyboard Profiles for Your Apps
AutoHotkey makes it easy to remap what the keys on your keyboard do, both individually and when combined. Would you like to swap the A and B keys? In AutoHotkey syntax, this would look like this:
        a::b

b::a
However, you probably don't want to remap individual keys, but to have multi-key combinations, with one or more modifier keys, perform specific actions.
To build on the previous example, if you want B to appear when you press CTRL+A and, vice versa, A to pop up when pressing CTRL+B, try:
        ^a::b

^b::a
Of course, this is merely an example. In real life, pressing multiple keys to type a single character is the very definition of counterproductive. In contrast, assigning text strings to key combinations can significantly speed up text entry. To have your name, email address, or any other piece of text typed when you press a key combination, you can use AutoHotkey's "send" command. This "tells" AutoHotkey, as its name states, "send" the string of text that follows it to the active window. In action, it may look like this:
        ^+O::
send Odysseas
return

In the above script:
- We begin by "telling" AutoHotkey that it should do something when we press Shift + CTRL + O at the same time.
- That "something" is sending the string "Odysseas", which happens to be this writer's name, to the active window.
- Finally, with "return", we state the equivalent of "that will be all, thanks, AutoHotkey!".

Try experimenting with different key combinations and having AutoHotkey send various text strings to your chosen application. You can have multiple rules in the same script.
Using keyboard combinations to enter text strings may be helpful for instantly entering your name and email address. However, it isn't intuitive when typing. After a while, it becomes hard to keep track of what dozens of shortcuts do. That's where text expansion can help.
Instead of mapping specific key combinations to text strings, AutoHotkey allows you to define shortcodes. Then, when it detects that you typed one of them, it can automatically replace it with a longer text string. It's as simple as:
:*:MUO~::Make Use Of
- The ":*:" at the beginning of the line states that this is a text expansion rule.
- Then comes the shortcode, which in our case is "MUO~".
- As with shortcuts, "::" are the logical equivalent of "=" in this scenario.
- The final piece of the puzzle is the actual string of text with which we want to replace "MUO~".
With this rule, whenever we type MUO~ in our targeted app, AHK will jump in and replace it with Make Use Of.
After you're done defining rules for an application, you can target another one in precisely the same way. Use "#IfWinActive APP_IDENTIFIER" again, this time targeting another app's window, and type your rules for it directly underneath.
Repeat as many times as you wish, creating app-specific profiles of shortcuts and shortcodes.
Since AutoHotkey scripts are basically text files, here's a nifty idea: incorporate other scripts in your own, and also make them app-specific! Check our list of cool AutoHotkey Scripts. Choose any that you like, but instead of using them as standalone scripts, open them in a text editor.
Copy their contents and add them under an app-targeting section of your script. Save and re-run your script, and theoretically, those scripts should work as part of your own when the app you've targeted is active.
Making Your Keyboard Smart With AutoHotKey
As you will find in the long run, creating such scripts is a process, not a one-time affair. As your demands and the ways you are using your software change, so will your scripts.
By continuously extending and tweaking your scripts, you may soon feel like how hackers are depicted in tech-illiterate series. By pressing half a dozen keys, and obscure combinations of them known only by you, you can a wall of text appear on your screen as if by magic.