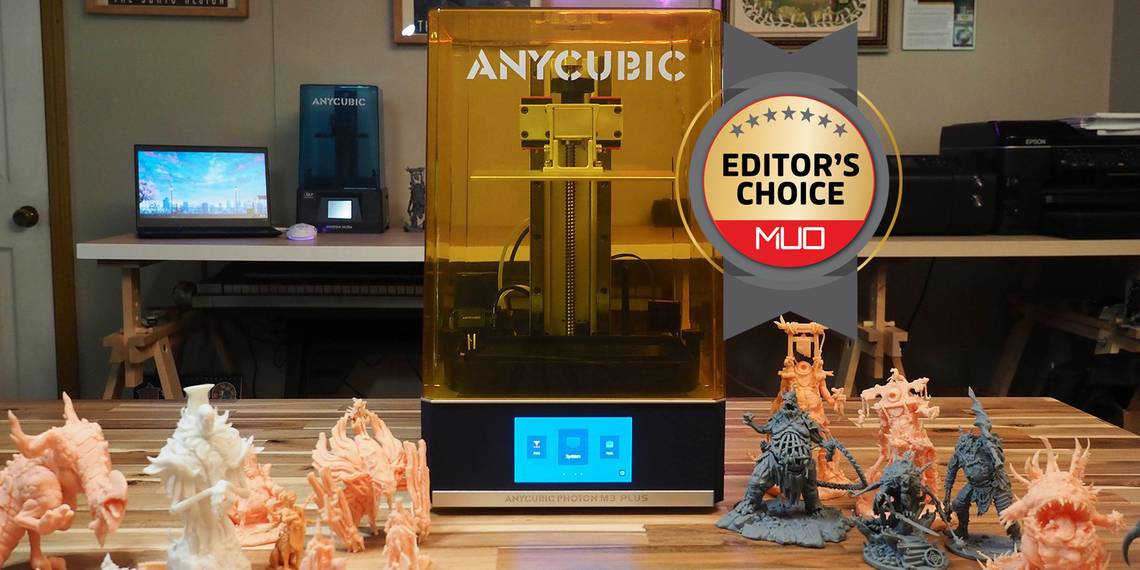
Anycubic Photon M3 Plus


The Anycubic M3 Plus marks a step-up for printing enthusiasts. With the integration of Anycubic Cloud and smart resin filling, you can better manage short and long-term projects. While similar to the Anycubic Photon Mono X 6K in some respects, the M3 Plus distinguishes itself by offering more control and management over the entire printing process. If you're looking to upgrade or build a small printer network, the M3 Plus offers good print quality and a larger build plate while expanding on options.
- Anycubic Cloud Connectivity
- Smart Resin Filling
- Anycubic LighTurbo Light Source
- 9.25’’ 6K monochrome screen
- Brand : Anycubic
- XY Resolution: 5760 x 3600 px (6K)
- Build area: 197 mm (L) x 122 mm (W) x 245 mm (H) | 7.8 (L) x 4.8 (W) x 9.6 (H) inches
- Light Source: Anycubic LighTurbo (Parallel matrix light source)
- Layer Thickness: 0.01 ~ 0.15 mm
- Printer Size: 360 mm (L) x 290 mm (W) x 475 mm (H) | ~14.17 (L) x 11.41 (W) x 18.7 (H) inches
- Large 5" touchscreen
- Laser engraved build plate for better adhesion and print removal
- Faster max print speed
- Multiple connectivity types (USB, Wi-Fi, Ethernet)
- 34μm accuracy
- Anycubic Cloud app bugs and glitches
- Auto-feed unit can overfill vat
The Anycubic Photon M3 Plus provides an opportunity to further interconnect your 3D printing network while also managing your resin flow. Whether you're a devout resin fan or someone looking to break into the hobby, these are both meaningful upgrades to consider. However, does the Photon M3 Plus do a good job at both while keeping to its modest price point?
Anycubic Photon M3 Plus Design and Technical Specifications

For those keeping up with Anycubic's resin printer releases, you'll first notice that the Photon M3 Plus shares some commonalities with the Anycubic Mono X 6K. Notably, the Photon M3 Plus shares the same printer size of the Mono X 6K at 360 (L) x 290 (W) x 475 mm (H). Also, it shares the same albeit sizeable build volume of 197 x 122 m x 245 mm; with an overall weight of around 26 pounds.
For those looking for improved print quality, there's still the Mono X 6K's 9.25-inch 6K Monochrome Screen with 34μm (microns) accuracy. â¨To help keep this protected, Anycubic has included an applicable anti-scratch film for the screen. So while you won't see any improvements there, the M3 Plus does have a few advantages over the Mono X 6K.
In terms of max printing speed, the M3 Plus boasts 100mm per hour versus the 80mm per hour of Mono X 6K. In part, this seems to be due to the newly utilized matrix light source called Anycubic LighTurbo (Anycubic Light + Turbo). With a UV light uniformity of over 92 percent, there's more printing precision and faster print speeds utilized through its matrix LCD beads.
As for its resin vat, Anycubic has opted to go with a heavier, metal vat versus the more common plastic variants of late. To keep it secured flush with the screen, there are two heavy-duty screws. Once loosened, you only have to pull forward on the vat before lifting it free.
While it features a fairly standard pour spout, there's also a dual-sided max fill line to help keep you from accidentally overfilling it. With the vat, Anycubic has included a more opaque FEP that appears to be dual-layered. As a consumable, it’ll still need to be changed out after many prints; it felt like it took a good amount of abuse across several longer prints before noticing any real effect on it.â¨
Anycubic M3 Plus Touch Screen

For those tired of tiny touch screens, the Photon M3 Plus 3D printer is equipped with a 5-inch LCD touchscreen. Once powered on, there are colorful main categories and an overall responsive touch interface. Navigating between menus is quite smooth; there are considerably fewer extra taps required to make all your selections.
However, a downside is all the sub-menus from the main categories have smaller text than I would have liked. While Anycubic included additional color themes for the screen in its latest firmware update, the option for more visual adjustments wasn't included. Given the additional size, it's a bit puzzling; Anycubic seems to have put more focus on the on-screen button selections.
Leveling and the Anycubic Photon M3 Plus Build Plate

Like with the Anycubic Photon Ultra, there's a very similar build plate albeit one scaled up in size. When leveling the Photon M3 Plus build plate, Anycubic kept with its streamlined process by including a pre-sized leveling paper and concise instructions on the procedure. You'll want to put firm pressure on the build plate when it descends and rests atop the leveling paper and make sure to tighten its screws in a cross-directional pattern.
While in the past, build plates would come slightly off level and require some sanding, I was able to immediately level the M3 Plus and move on to further installation of supplemental devices onto the unit. Similarly, the M3 Plus also utilizes the laser-engraved checkered pattern to improve adhesion on the build plate.
While the Photon Ultra offered great adhesion, the M3 Plus managed to offer an even easier print removal due to the large surface area to remove from. As a result, actual scratches to the build plate only occurred after many more prints.
When compared to another larger format printer like the Phrozen Sonic Mighty 4K, the build plate is only slightly bigger (around 1/8" more). So if you're looking to squeeze in a little more, the M3 Plus covers you there.
Smart Resin Management with the Photon M3 Plus

While the Anycubic Photon M3 Plus bears many resemblances to the Photon Mono X 6K, one of the major departure points is the inclusion of a smart resin filling option. With the installation of an auto-feed unit onto the printer base, Anycubic's 1 KG resin bottles can be utilized as an on-demand backup to save your prints. To get the auto-feed unit and the resin bottle bracket secured in place, you'll have to uncover a hidden wire and do some additional tightening with Anycubic's assortment of Allen wrenches.
In truth, the most tedious part of the installation process comes with the installation of the air and feeding line. You'll need to make sure to match them appropriately to both the bottle cap and the auto-feed unit. And you'll need to pull them through a small groove at the back of the printer. When pulling them through, you'll also want to make sure they're given appropriate slack.
Otherwise, you might cause an indirect clog in the flow of the line. While the bracket on the back of the M3 Plus does a good job at holding a 1 KG resin bottle, the tubing for the auto-feed unit and the wire to power it does need to be given appropriate spacing. Once hooked up and actively printing, the unit feeds every five minutes automatically when the needles detect insufficient resin.
For those wanting to use non-Anycubic resin, Anycubic advises you to pre-screen before printing. The red light should go off normally when the resin reaches both of the needles. If it doesn’t, that resin can’t be automatically fed.â¨â¨You can adjust the auto speed rate; it seems as if it ultimately overfills the vat.
With the smart resin filling, you're able to adjust the speed rate prior to printing. However, once you're printing you're unable to change the rate. Instead, you can only toggle the auto-feed functionality on or off.
In terms of speed, the lowest speed setting is 20% whereas the unit maxes out at 100%. While the fastest setting can quickly empty out the contents of a full resin bottle to ensure the safety of a large print, it's also much more likely to create resin splashes and mess against the auto-feed unit and the dual linear rails.
However, there's a downside to using Anycubic's smart resin filling. Regardless of what speed setting I chose, leaving the auto-feed system enabled for the entirety of a print (presuming you have sufficient resin in the bottle) always resulted in the resin vat being filled above the max line. So upon the completion of a print, you'll need to empty your entire vat out to avoid spilling all over your screen.
â¨â¨â¨So what’s a good use case for it? Overall, I found it most useful when letting it run during the initial printing hours. If you do a fair amount of overnight printing, it's best to disable the function before you leave your printer unattended. So while it's a useful feature, it's not an entirely unmonitored one.
Using Anycubic Cloud

Anycubic now offers a cloud service named Anycubic Cloud to allow you to upload and manage your printing over Wi-Fi and Ethernet. To use Wi-Fi, you’ll need to attach the included antenna first.â¨â¨ Afterward, you'll be able to access the Anycubic Cloud workspace after you've downloaded the app for either Android or iOS.
To add your printer, I first needed to do a firmware update on the M3 Plus. Otherwise, it wouldn’t detect my machine’s number or read the on-screen QR code. For use with Anycubic Cloud, I was also given a camera (not included) for testing with the app that installs very similarly to the auto-feed unit via a covered wire and two screws.
Sadly, you're unable to see through the camera unless you're printing via the Anycubic Cloud app. So when initially positioning it, you'll need to anticipate your limited field of view. To keep it protected when you're not printing, there was also a small lens cover to avoid any accidental resin exposure.
To add files to your Anycubic Cloud account, Anycubic’s slicer—Photon Workshop—allows you to slice a file for either USB, remote printing, or to send off to Anycubic Cloud.â¨â¨ Once you’ve sent it to the app, you can look at your print file list. When selecting a file to download to your printer, Anycubic Cloud will prompt you with a warning to make sure you’ve prepped everything before sending your build plate to the resin.


After your print is sent, you can then get some information on your print such as the current completion process, your print settings, and access to the camera. So if you ever wanted to remotely monitor your resin prints and avoid messier clean-ups due to missed support failures, the Cloud app serves as a great resource. However, there are some issues with the Anycubic Cloud app.
For a while, I had an issue where the camera just wouldn’t connect. It'd either tell me the printer was offline, the camera couldn't connect, or it'd crash. To solve it, I'd have to fully disable Wi-Fi on the M3 Plus to reset it.
Another bug that occurred was jobs would terminate at the very start. If any issue occurs when downloading to the printer, you can receive a false termination notice. These end up logged in your termination statistics, so I had two logged at 0% completion.
Despite the bugs, the Anycubic Cloud app opens additional avenues for those looking to minimize their print downtime. As long as the printers are readied with resin, you can send files to them from anywhere. If you're needing to get a model ready for printing from afar, this can greatly simplify any communication required with any help.
While there’s some bug fixing that needs to be done here—I think it’s a great foundation for more serious print enthusiasts and anyone looking for more commercial applications for their printer.â¨
Printing With the Anycubic Photon M3 Plus

In terms of slicing software relative to the printer, the M3 Plus has some options. If you're wanting to use Anycubic Cloud, you're gated to using Photon Workshop. However, Lychee Slicer does have a Photon M3 Plus profile, so if you prefer to check and support your models, you can export them prior to slicing.
For print settings, I found very similar success running my print settings from the Phrozen Sonic Mighty 4K. If you don't have a grasp of what setting ranges work best, Anycubic Workshop and Anycubic Cloud do a much better job at providing guidance for suitable parameters. If you're monitoring your print via Anycubic Cloud, you can also check your live print settings and see if any are outside the normally suggested parameters.
So rather than having to access third-party resources, the M3 Plus has tried to simplify and make its tools more successful. When you consider this ease of access relative to the build plate, it helps to reduce more common initial failures. While it's still advisable to run optimization tests when using new resin, I find the M3 Plus's resources to be considerably more beginner-friendly.
6K Quality Prints With the Photon M3 Plus

While the M3 Plus includes facilities to simplify parts of the process, print quality still matters. Now when comparing the likes of a 4K printer to a 6K printer, there’s an overall added smoothness to your prints. It might not be immediately visible to the eye, I did notice it after carefully studying for slight variations.
The quality difference may not be significant enough for everyone; it’s a quality step-up that’s inviting for first-time purchasers.
Beyond that, the improved light source provides quality results with a variety of resins. While the auto-feed unit does encourage more use with Anycubic's resins, you shouldn't feel limited to that.
Maintenance Costs and Upkeep

Since the Anycubic Photon M3 Plus utilizes a monochrome screen, you can expect around 2,000 working hours before needing a replacement. The anti-scratch screen protector also intends to keep your screen protected from other potential hazards. However, careful management and upkeep should help maximize your usage.
You'll also still need to replace the FEP around as signs of degradation appear and after around fifty prints. With larger-sized printers, there are potentially higher failure risks depending on what models you're printing. As such, you'll want to be more careful about any failed resin bits that might stick to the FEP.
Should You Buy the Anycubic Photon M3 Plus?
If you’ve recently purchased Anycubic’s Photon Mono X 6K, the auto-feed unit and Cloud connectivity alone aren't worth the upgrade. However, if you like the Mono X 6K and have been in the market for a similar machine with more features, the Photon M3 Plus offers further optimization.â¨â¨
As an alternative, those who enjoy the M3-exclusive features can purchase either the standard Photon M3 and M3 Max based on their size needs. As Anycubic Cloud helps with multi-printer management, you can certainly adjust your quality needs there. Obviously, you'll want to weigh costs into account here.
Ultimately, the Photon M3 Plus takes the strengths of the Mono X 6K while pushing forward. There are still some bugs to be worked out and optimization to be done, but it does open up more areas for 3D printing with Anycubic.