Few things are more frustrating than losing access to a document that you've been working on for hours. Whether the file has been corrupted, deleted, or otherwise lost, it can feel like an enormous waste of time and effort.
Fortunately, files that you've created using Microsoft 365 might not be as lost as they first appear. You can apply several techniques to bring your work back from the brink and avoid starting afresh.
Recover Lost Office Documents
Here are some tips on how to avoid disaster if it seems that you've lost an important document.
1. Use Document Recovery
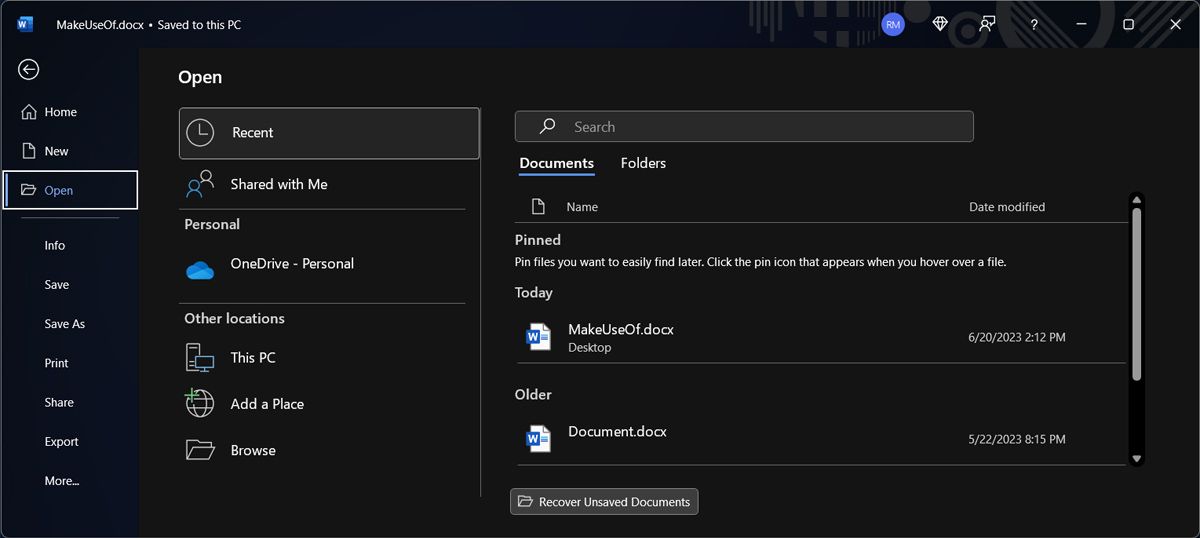
Microsoft 365 comes with built-in features to help you recover your documents in the event that the software closes unexpectedly. This is the simplest method of getting your work back, so attempt this quick and easy procedure to see if it's successful before you try any more complex methods.
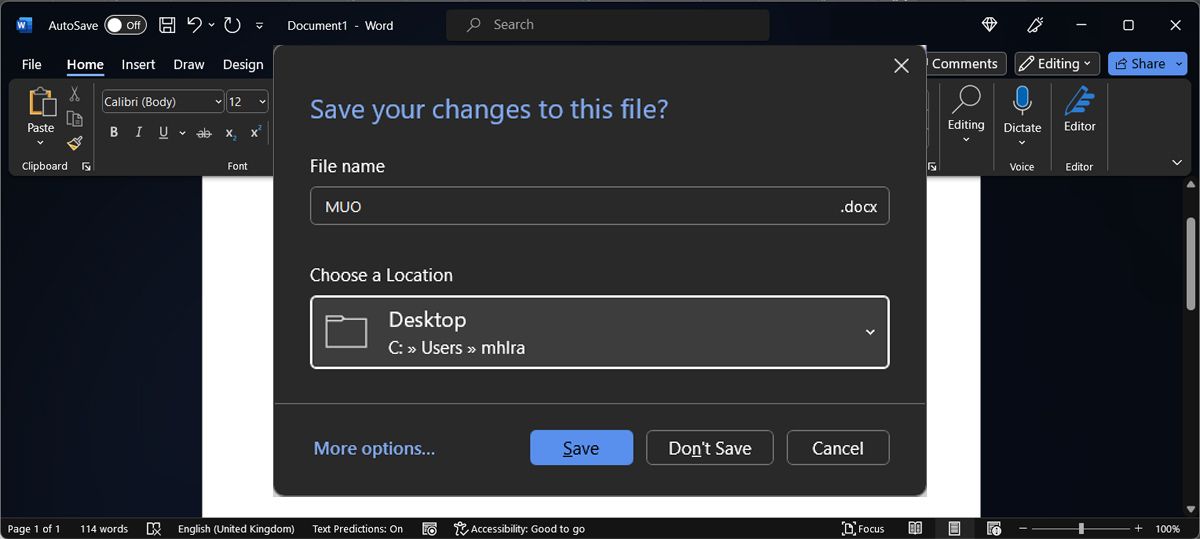
In older versions, Microsoft 365 would inform you that it would temporarily save a recent copy of the file even if you click Don’t Save. While the message has been removed, the feature is still available.
Even if you accidentally click Don’t Save, Microsoft 365 will temporarily hold a copy of the file. While we’ve used Microsoft Word as an example, the process is the same for every app included in the Microsoft 365 suite.
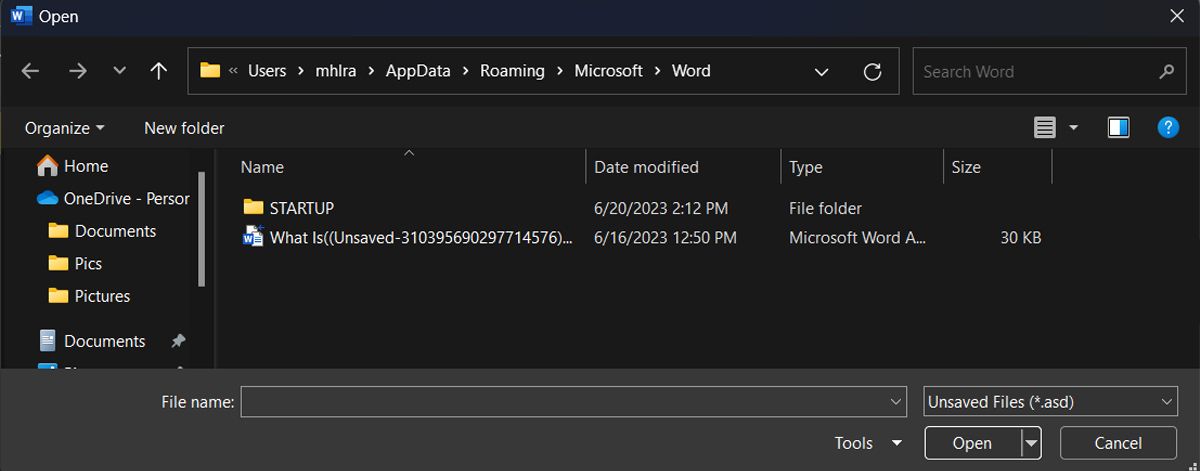
You'll be presented with a window displaying Microsoft’s UnsavedFiles folder. Depending on the Microsoft 365 version, your documents might be presented as ASD files—automatic backups used by the Microsoft 365 suite.
If you didn’t name the document before closing Word, it might be difficult to identify it. So, you'll have to use the date they were last modified or trial and error to determine whether or not your document was rescued.
The process of identifying the documents is easier if you've named the documents, and you're using a more recent Microsoft 365 version.
2. Reveal Temporary Files
Documents that have been corrupted or deleted sometimes leave behind temporary versions that contain most, if not all, the content of the original. These temporary files are typically hidden from the user, but it's easy to uncover them once you know how.
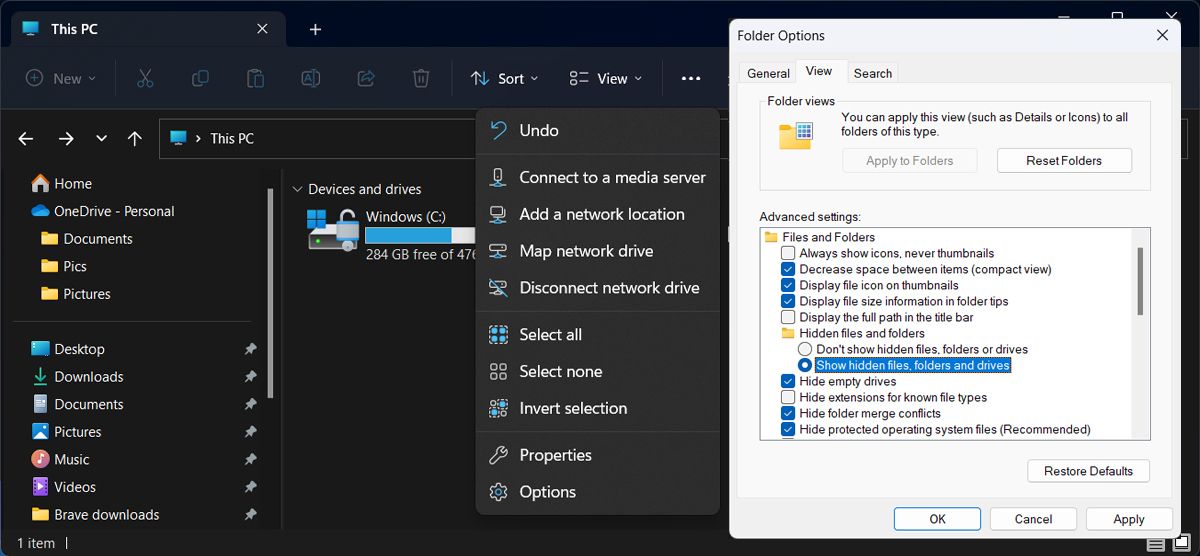
Launch File Explorer and head to the folder where you’ve previously saved the document. Click the three-dot icon from the top-right corner and select Options. This will bring up the Folder Options menu. There, select the View tab and check the Show hidden files, folders, or drives option. Click Apply > OK to save the changes.
Now, search for a file that has the .TMP extension. Once you've found a file that matches your expectations in terms of file size and date modified, rename it and replace the extension with .docx for versions of Word post 2007 or .doc for earlier iterations. Open it up and see whether it's the file you were looking for.
If your computer doesn’t show the file extensions, take a quick look at our guide on how to reveal file extensions on Windows.
3. Check the Recycle Bin
This may seem obvious, but it's easy to overlook in a panic. Unless you've recently emptied it, your Recycle Bin will contain all files that have recently been deleted.
That includes documents you've removed manually, as well as temporary files like the ones detailed in the above section of this article, so make sure your File Explorer Options are set to Show hidden files, folders and drives when you check in.
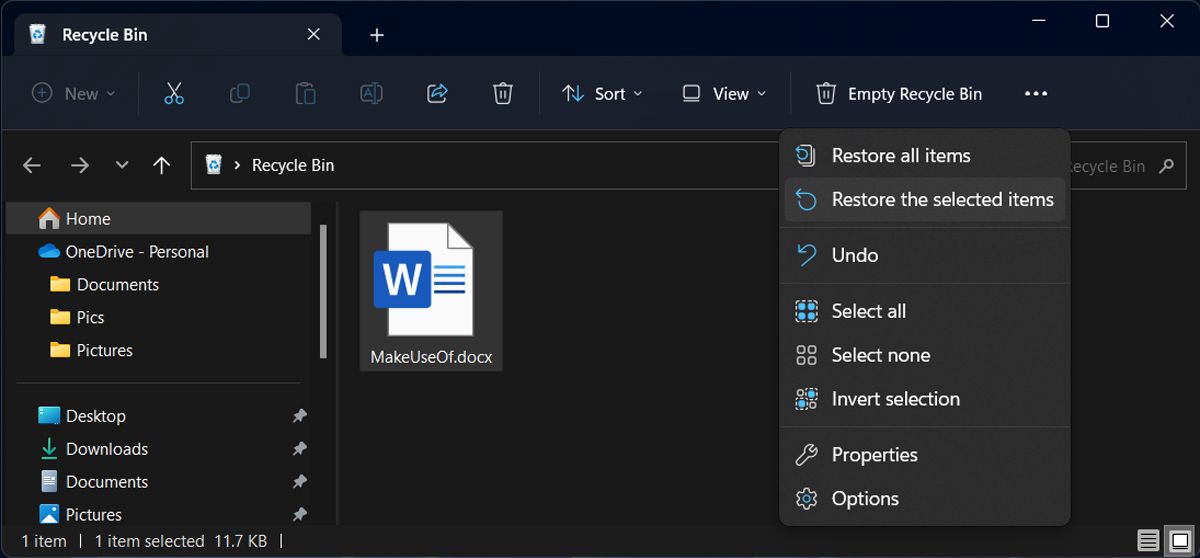
The Recycle Bin can be a real lifesaver for users working with Microsoft's online services like OneDrive and Microsoft 365. If you're using a personal account, deleted files can be recovered by heading to the Recycle Bin and using the Restore function. However, if you're on an enterprise account, you'll likely have to speak to an administrator in order to have the files recovered.
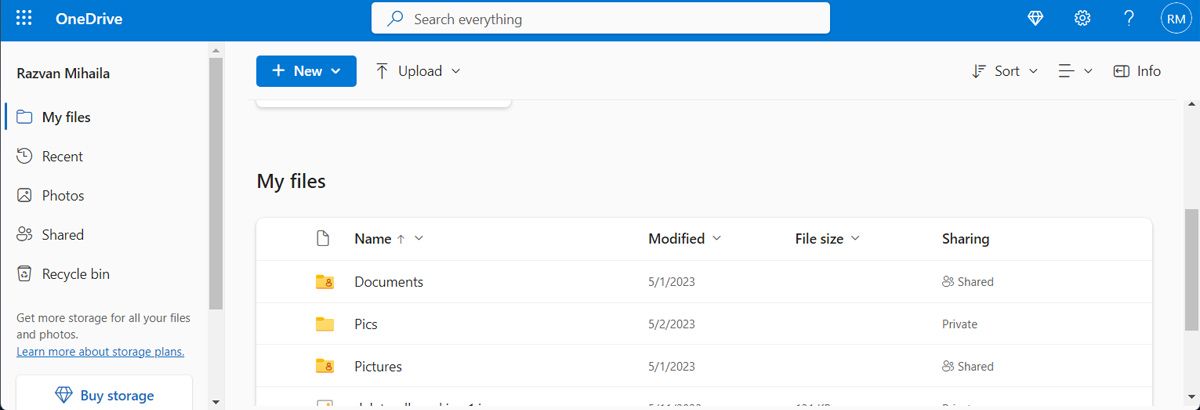
On OneDrive, you can’t check for lost documents within its folder or even in the desktop app. Instead, you’ll have to look online. Go to OneDrive and sign in. You’ll find the Recycle Bin in the left pane. Open it and check if the document you’re looking for is there.
4. Use a Third-Party Utility
Sometimes, Microsoft 365 recovery tools are not enough to get your work back. In this case, you should use a third-party app to recover your documents. If you’re not sure which one would be best for you, we’ve put together a list of the best data recovery software to help you.
Prevention Might Be Easier Than the Cure
Before you find yourself in a situation where your document is gone, and you're tearing your hair out to find a solution, go through your Microsoft 365 settings and make sure that you're protected to the best of the software's abilities.
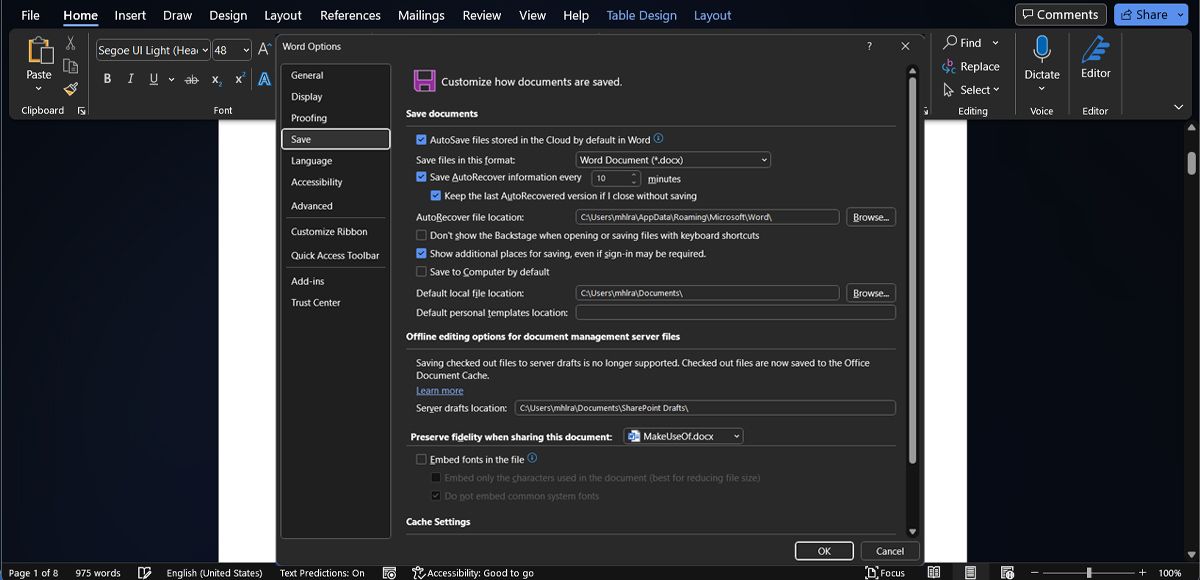
Open up a Microsoft 365 program and navigate to File > Options. First, head to the Save section and make sure that the Save AutoRecover information every ___ minutes dropdown is set to a small amount of time, and that the Keep the last autosaved version if I close without saving checkbox is ticked.
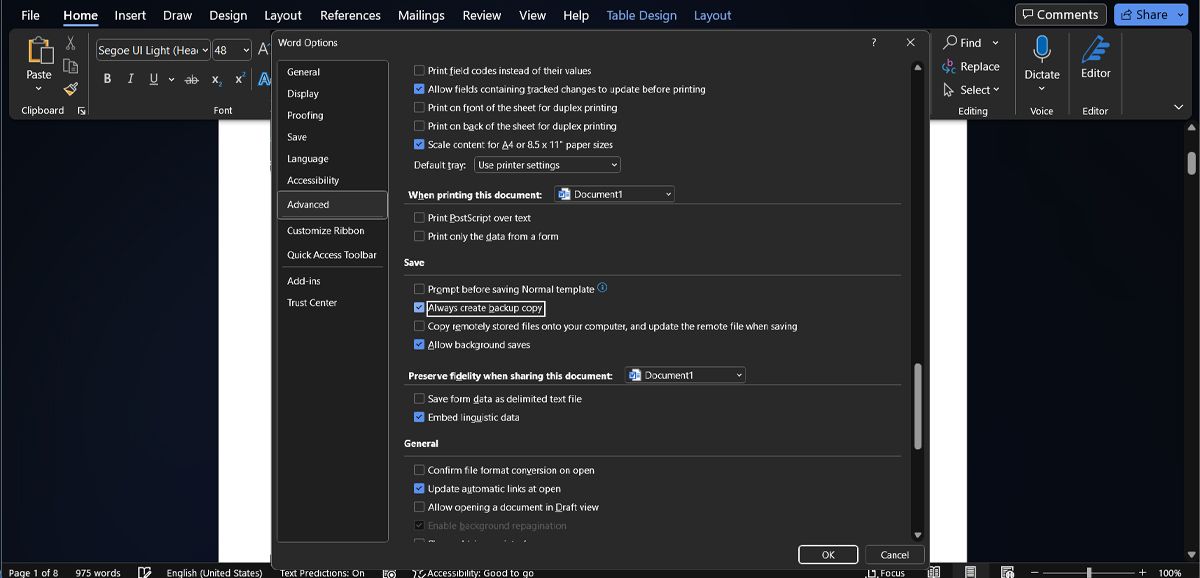
Next, head to the Advanced section and find the Save heading. Here, you're going to check the box labeled Always create backup copy.
With these options enabled, you're giving yourself the best chance of having a backup of your work, or a version that you can recover, if something goes awry. All it takes is a few clicks, but it could save you lots of time and effort further down the line.
Don’t Lose Important Files
If you’ve lost an important document, try Microsoft 365's built-in features to recover it. If this doesn’t work, it’s time to move on to software that knows where to search for your documents. While this may increase your chances, there’s no guarantee you’ll recover your work.
So, if you’re working on something important, it’s wise to back it up on a cloud storage service. There are plenty of affordable options for you to choose from.

