You’ve probably seen lower thirds on almost every YouTube video you’ve watched, those banners asking you to subscribe or follow their socials, or adding in fun facts about the video.
Lower thirds are easy to create and it adds an air of professionalism to any video when done right. In this tutorial, we show you how to create a simple lower third graphic and how to animate it in Adobe After Effects.
What Is a Lower Third?
Lower thirds are various graphics that appear within the lower third of the video screen in videos and on television. They don’t have to take up the entire bottom third of the space, but any graphic that appears in this bottom section qualifies as a lower third.
Lower thirds can be closed captions, information banners, logos, or interactive messages. Typically, it gives information to the viewer, but it could be for entertainment value, too. If you don't want to make a lower third graphic yourself in After Effects, you can find animated graphic elements using Jitter.
How to Create a Lower Third in After Effects
Start by creating a new composition. Go to Composition > New Composition and set the video size; the default is 1920 x 1080 px. Click OK when you’re done.
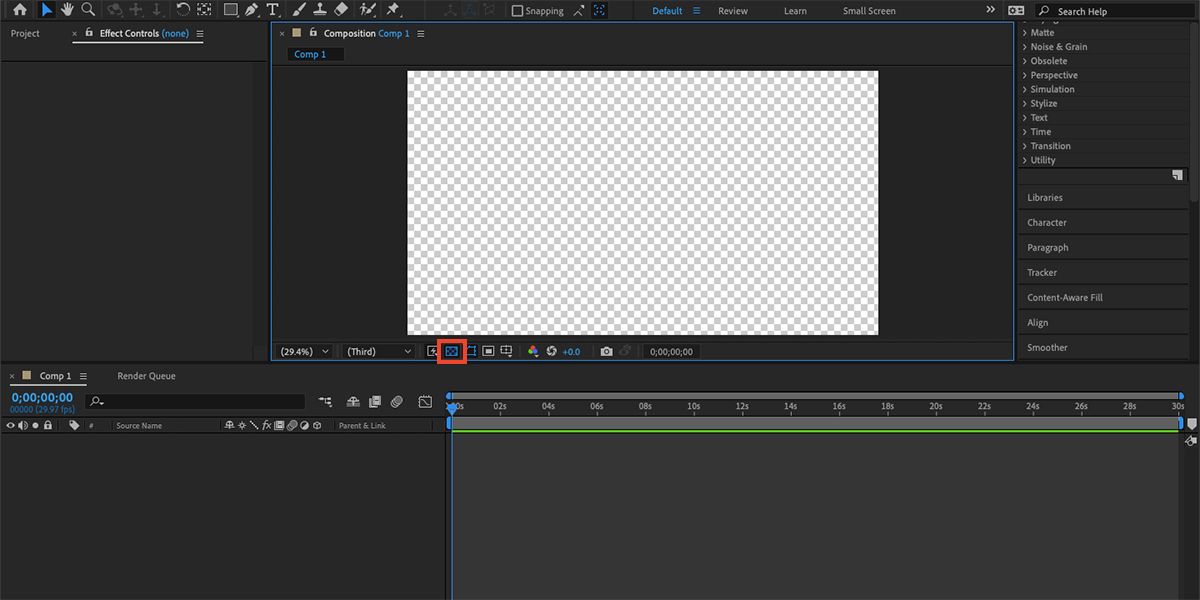
Toggle on transparency by clicking Toggle Transparency Grid in the composition panel. Since the lower third overlays on top of video footage, it needs to be rendered with a transparent background so the footage can be visible, but you can design with a colored background and toggle the transparency later.
Go to Layer > New > Solid to add a solid color. Choose a color for your lower third graphic. Click OK. Your entire composition will have a solid color which also appears as a layer in the timeline. You can change the color of this graphic at any point by selecting the graphic and going to Layer > Solid Settings.
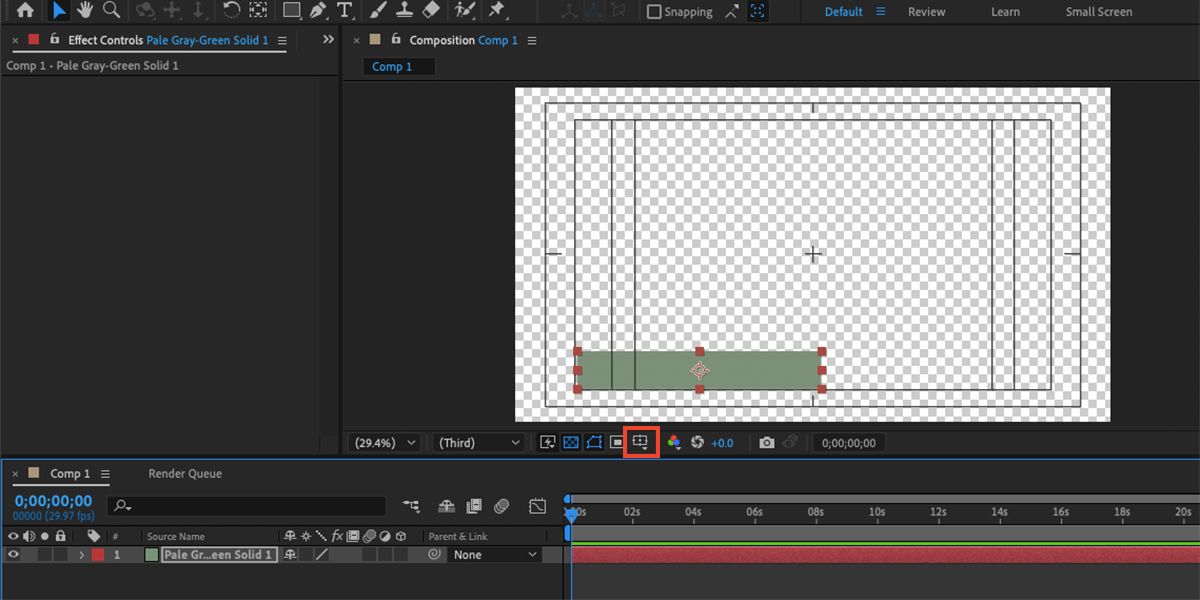
Click and drag the corners to resize the solid color to a more suitable size. Once it’s the size of a banner graphic, move it to—you guessed it—the lower third of the screen.
Switch on the Title/Action Safe guides by pressing the apostrophe on your keyboard (‘) which helps you line up your lower third, so it won’t be cut off. It doesn’t have to be centered, so place it where you prefer within the lower section of your composition but keep it away from the safety guidelines.
How to Animate a Lower Third in After Effects
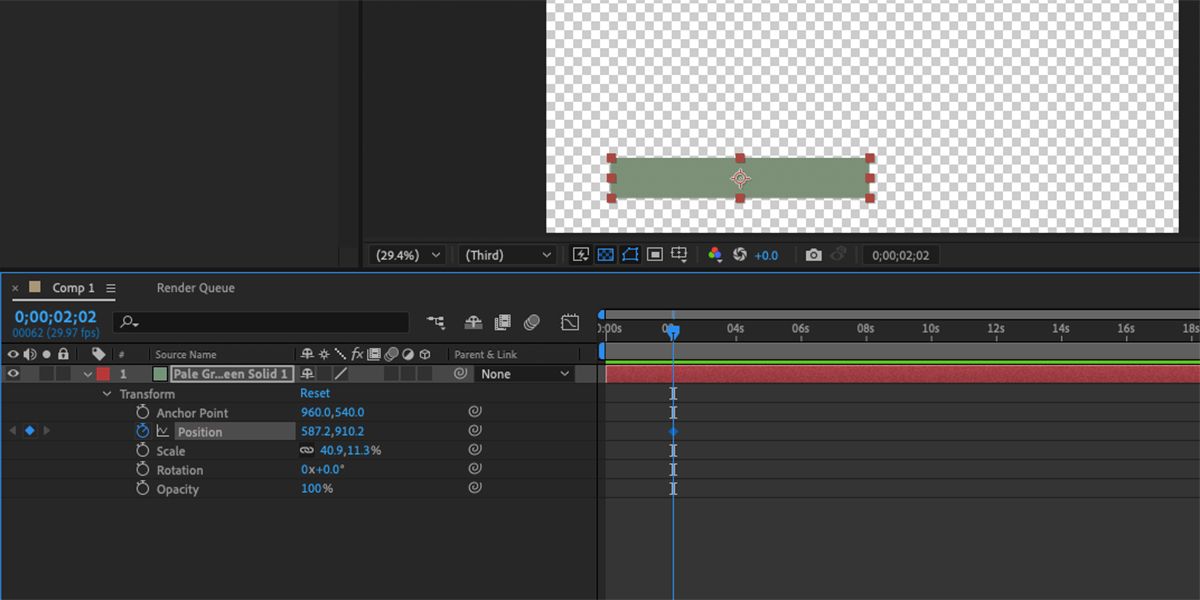
A lower third needs to be animated to transition smoothly in and out of the frame. On the timeline, open the solid layer’s properties and open Transform. We’re going to use the Position option to animate the lower third banner on and off the screen. It should be a relatively simple transition so as not to distract the viewer from the rest of the video content.
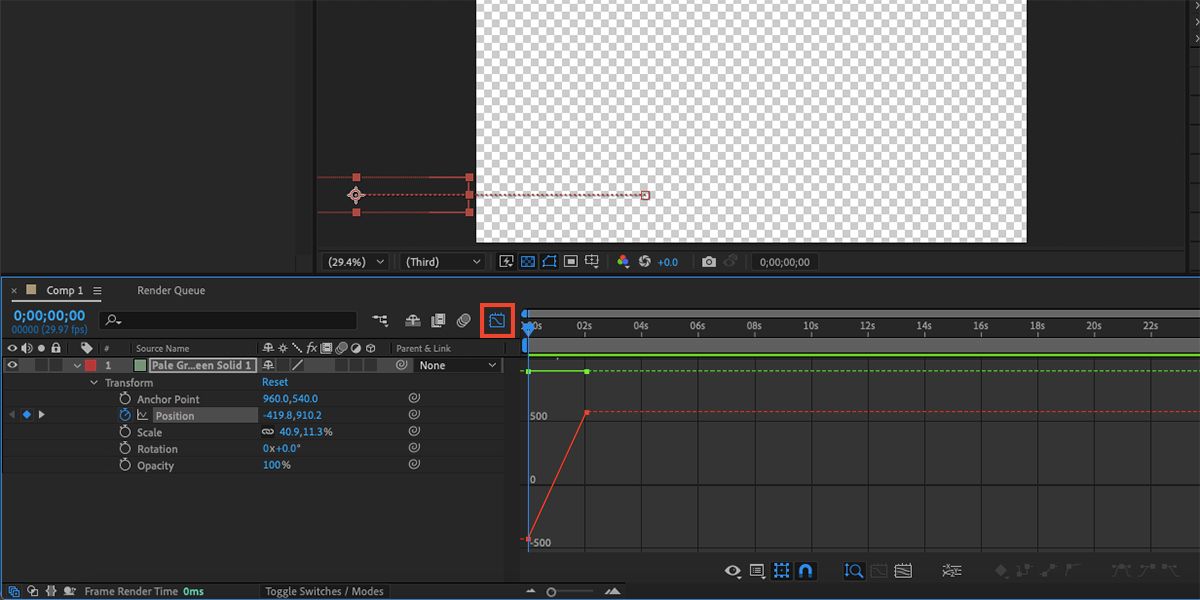
Move the time indicator to 00:02s and select the Stopwatch next to Position to activate the Position keyframes. Working backward, this adds a new keyframe on the timeline to indicate the final position of the graphic.
Then move the time indicator back to 00:00s and change the X-axis next to Position, or you can click and drag the graphic out of frame. Move your lower third entirely out of frame to where you want the graphic to enter from.
Now you have two keyframes in the timeline. Highlight the keyframes by clicking and dragging over them to select both at once. Then click Graph Editor at the top of the timeline. This gives you a visual representation of how the keyframes move your animation.
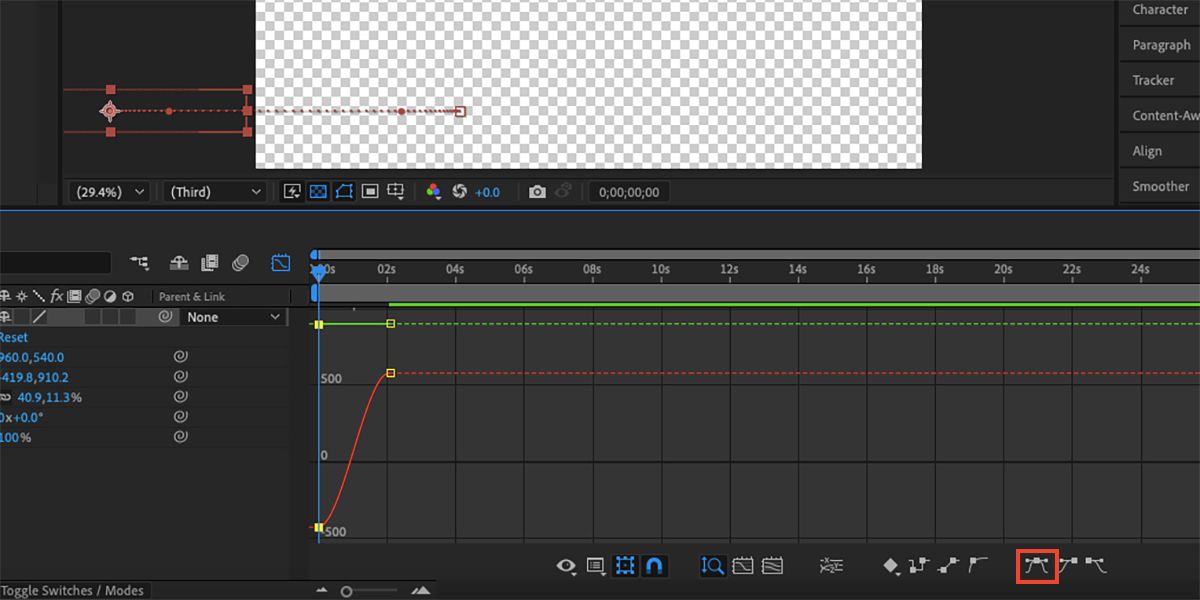
In the graph, highlight any keyframes you wish to change the settings for. On the right, underneath the timeline, you’ll find options for how the movements react. Here you’ll find Easy Ease. Easy Ease adds a subtle curve into each movement, so it isn’t as abrupt. An Easy Ease keyframe changes to an hourglass on the timeline.
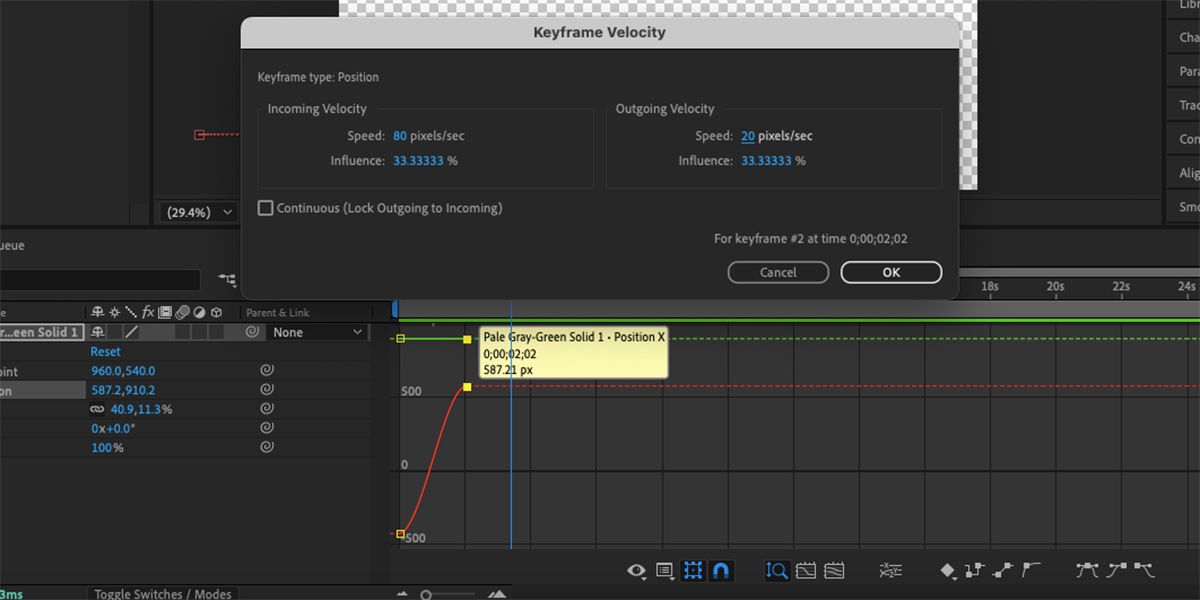
You could also right-click on a keyframe and choose Keyframe Velocity. Here, you can input amounts for both the incoming and outgoing velocity. An incoming input of 80 and an outgoing input of 20 will bring the graphic in quickly but settle it slowly.
To preview your keyframe changes, move the time indicator to 00:00s and press Spacebar to start and stop the playback. Once you’ve set your entrance keyframes, select them all. Copy the keyframes—Ctrl + C (Windows) or Cmd + C (Mac)—and paste them a few seconds later in your timeline—Ctrl + V (Windows) or Cmd + V (Mac).
Rearrange the pasted keyframes to be the reverse of the original order. This creates outgoing movements for your lower third in the opposite way, so the banner moves out of the screen instead of coming in.
Add Details to Your Lower Third
Many YouTube vloggers use a lower third graphic to encourage people to subscribe to their channel or follow their social media handles. So let’s do that.
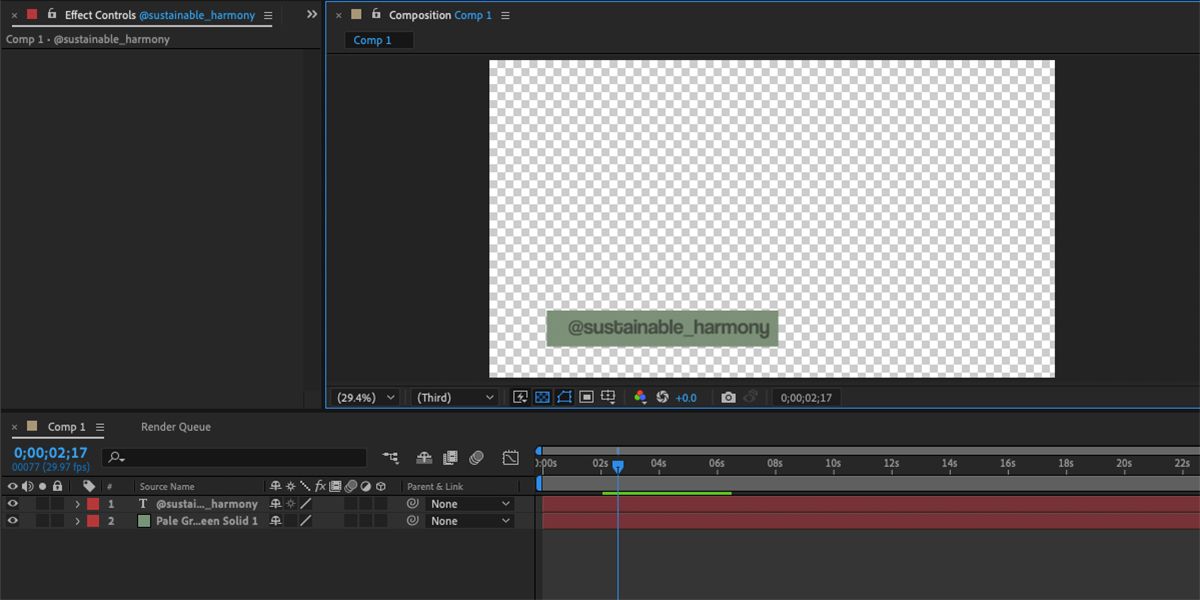
Select the Type Tool—Ctrl + T (Windows) or Cmd + T (Mac)—and type your social media handles. If it’s not already open, go to Window > Character to open the Character panel. Then highlight the text to change the typeface, color, or size.
Once your text is formatted how you like, use the Selection Tool (V) to drag the text on top of the solid color. Position it however you want; it doesn’t have to be centered if that’s not your style.
Since you’ve already set the Position animation for the solid color, you can easily attach the text to move with the same attributions.
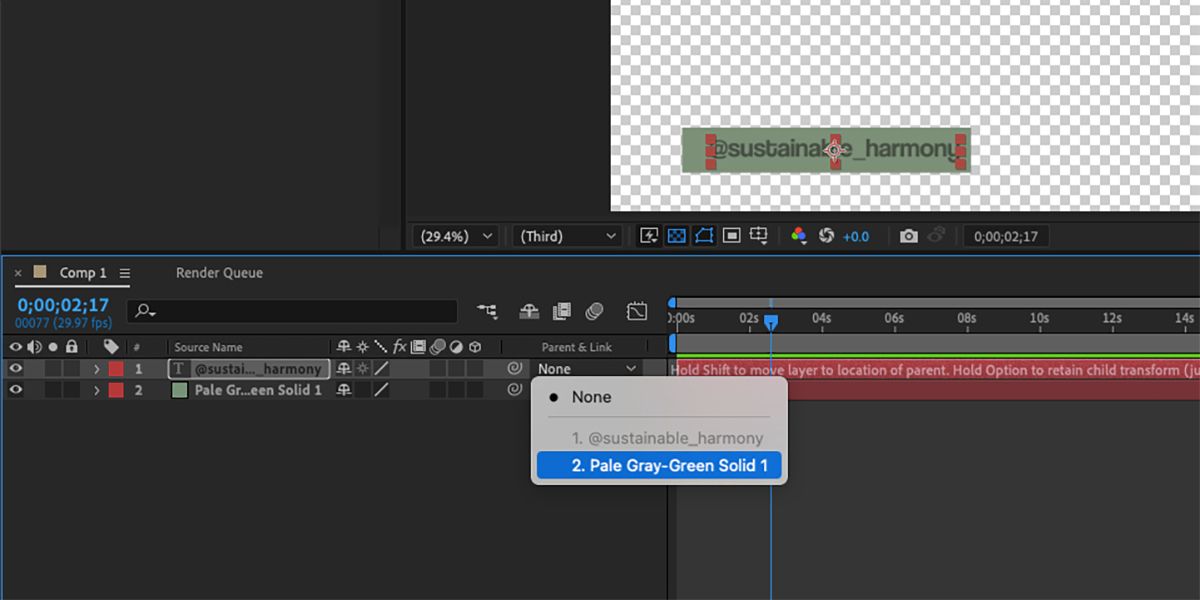
If you want the text to stay on top of the color block and transition with it, then change the text’s parent background to the solid color layer. This keeps the text and the solid color as separate layers, but groups them together for animation purposes. You don’t need to add keyframes to the text layer.
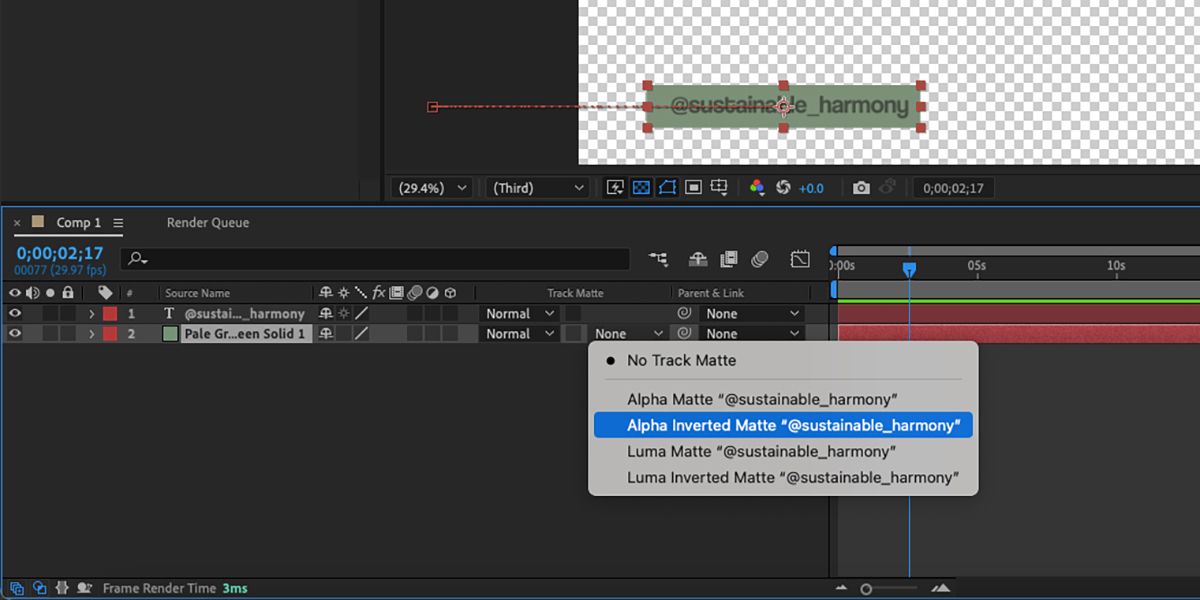
We’re also going to use the Track Matte feature. Right-click Source Name above the layers and choose Columns > Modes.
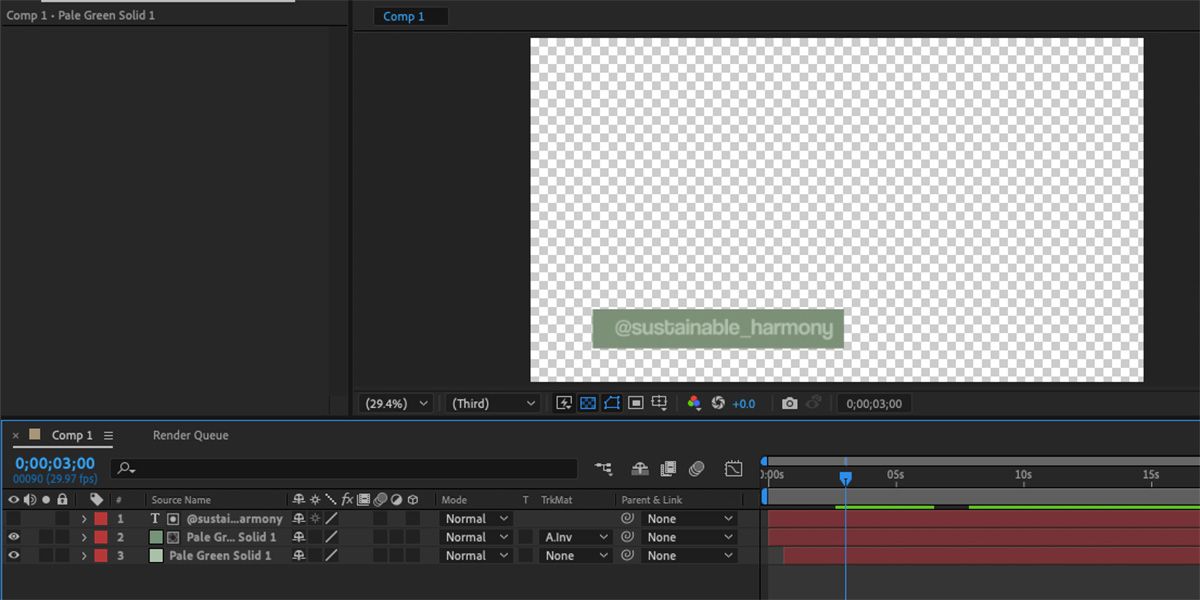
On the solid color layer, click Track Matte. You can choose any of the options for various effects, but we’re going with Alpha Inverted Matte. This inverts your text color, which—if you’re using a transparent background—means the text is transparent. Press Spacebar to preview the new effect. You can make a similar masked text animation using Canva.
Select the solid color layer and copy-paste it (Ctrl + C and Ctrl + V for Windows, or Cmd + C and Cmd + V for Mac). Select the lower color layer, then go to Layer > Solid Settings to change the color to an accent color. Switch the Track Matte to No Track Matte on this layer.
You can add other elements to your lower third in the same way, or you can leave it as is. You can even import Illustrator graphics to animate in After Effects or go the extra mile and sync your lower third to react to an audio track for visual excitement.
Render your animation with a transparent background, then add it as a layer when editing any video you want to use it on.
Create a Professional Lower Third Graphic With After Effects
Creating a lower third graphic is simpler than you’d think. It started with a rectangle of color, and if you followed along with this tutorial, you now have a cool animated banner to add to your videos in After Effects.

