Podcasting is an excellent way to share your ideas with the world. And while you can edit your audio using several platforms, Adobe Audition is the go-to option for many creators. You’ll find many tools to help you adjust volumes, add sound effects, and do much more.
You’ll need to purchase an Adobe Creative Cloud subscription to use Adobe Audition. Once you’ve done that, you can edit as many episodes as you like.
This article will show you how to edit your podcast in Adobe Audition. The tips we mention will apply to the 2023 edition of the platform, which was released late in 2022.
1. Changing Your Microphone Output
If you have an iPhone, you can record your podcast outside of Adobe Audition, such as with the Voice Memos app. But if you’ve got an external microphone, you’ll get much crisper audio if you record directly on your computer.
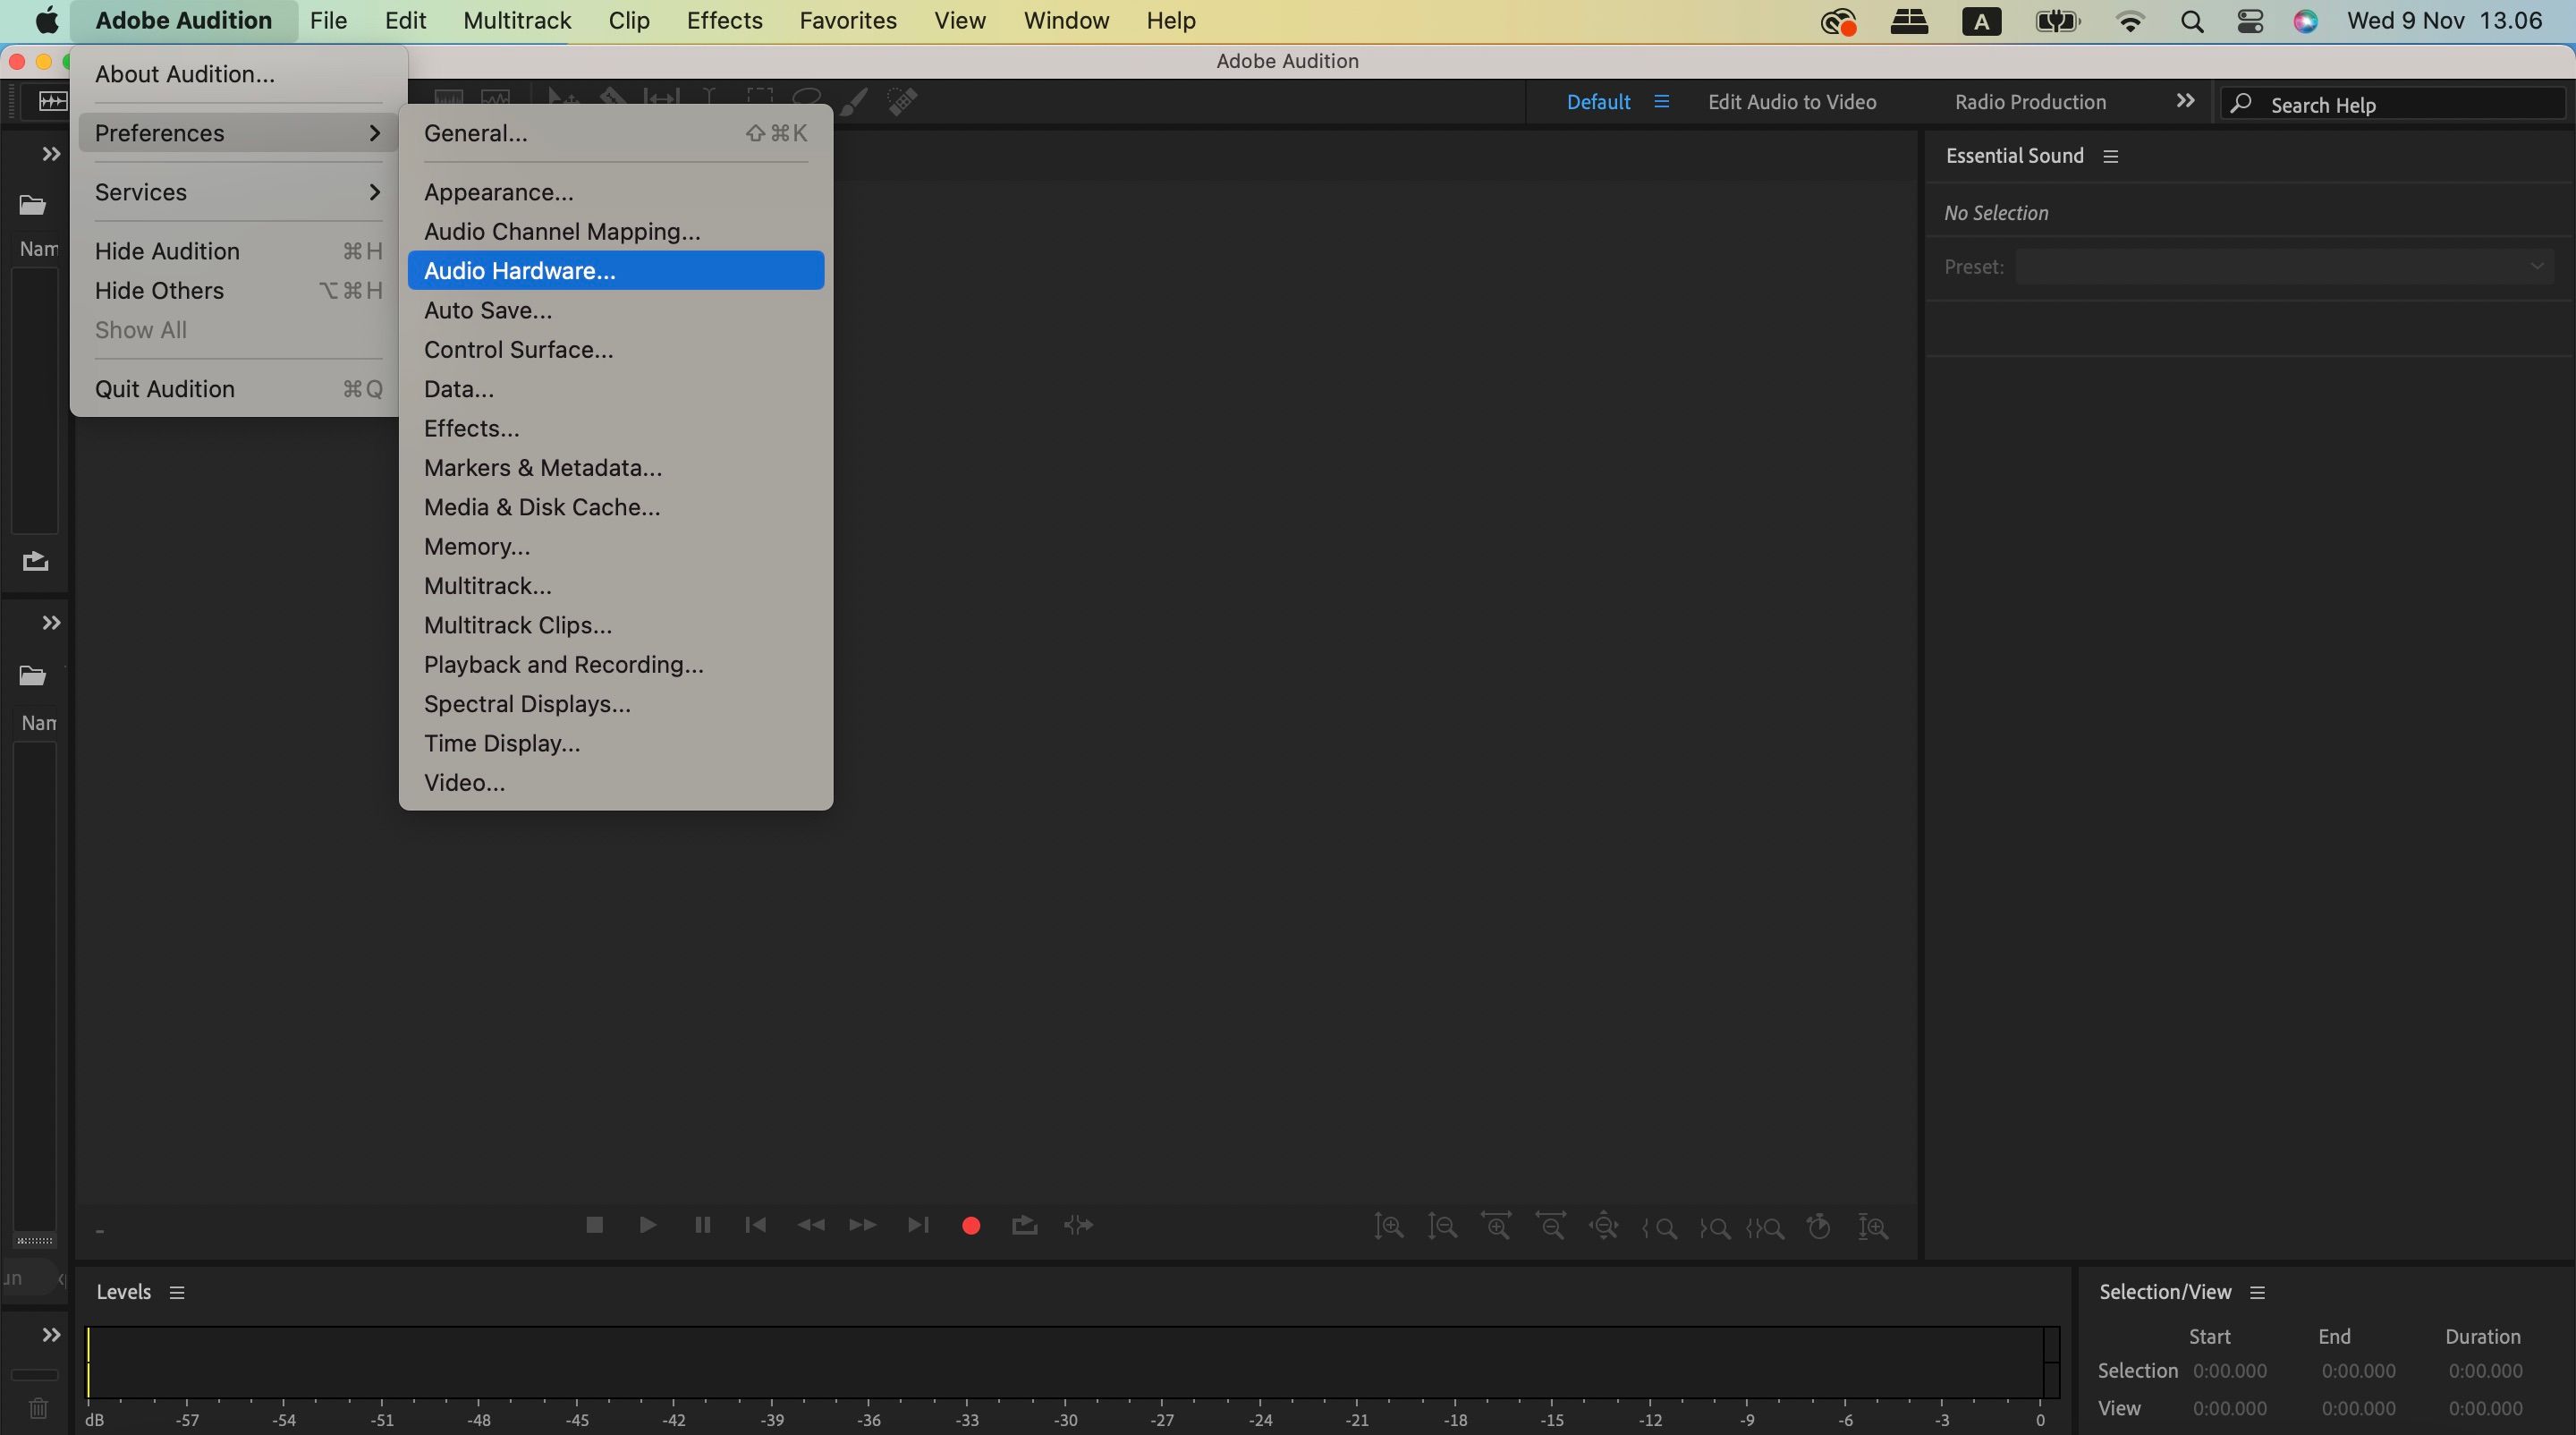
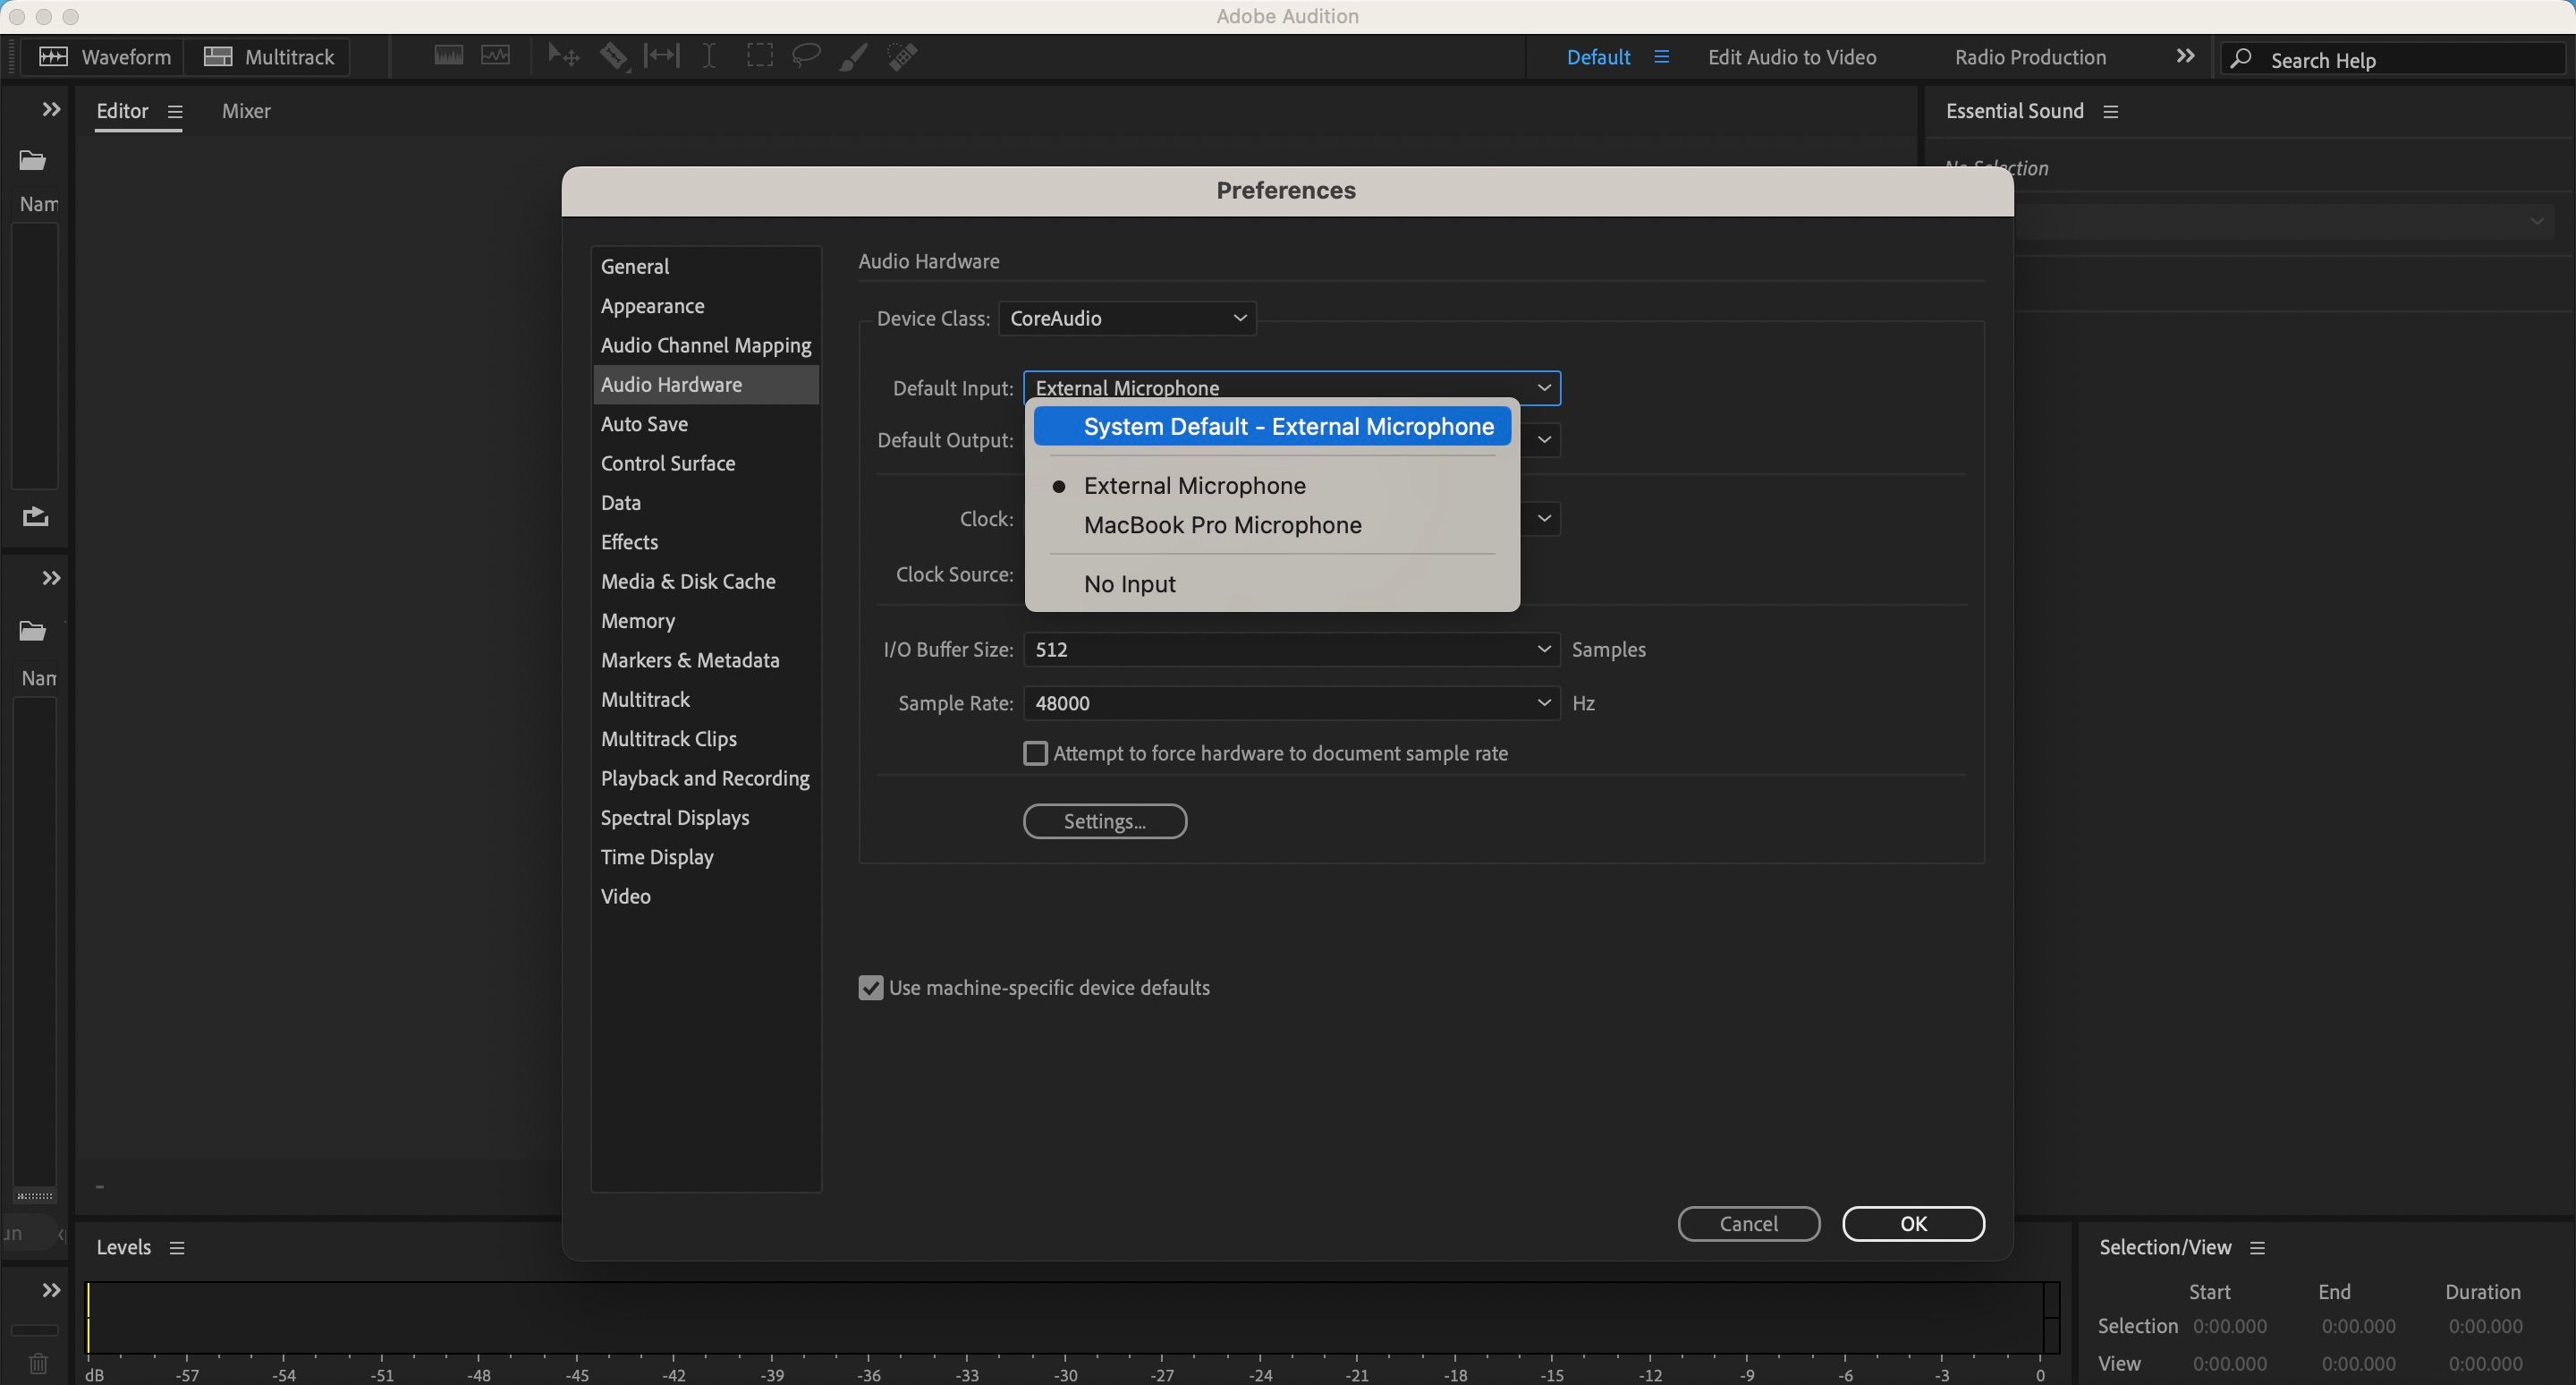
Before you start recording in Adobe Audition, you’ll need to change your microphone input. Go to the Adobe Audition option in the top toolbar before selecting Preferences. In the Preferences section, go to Audio Hardware > Default Input.
Expand the dropdown menu and choose your external microphone’s name (e.g. RODE NT-USB). Click on the OK button in the bottom right once you’ve completed these steps.
2. Choosing the Settings for Recording Your Audio
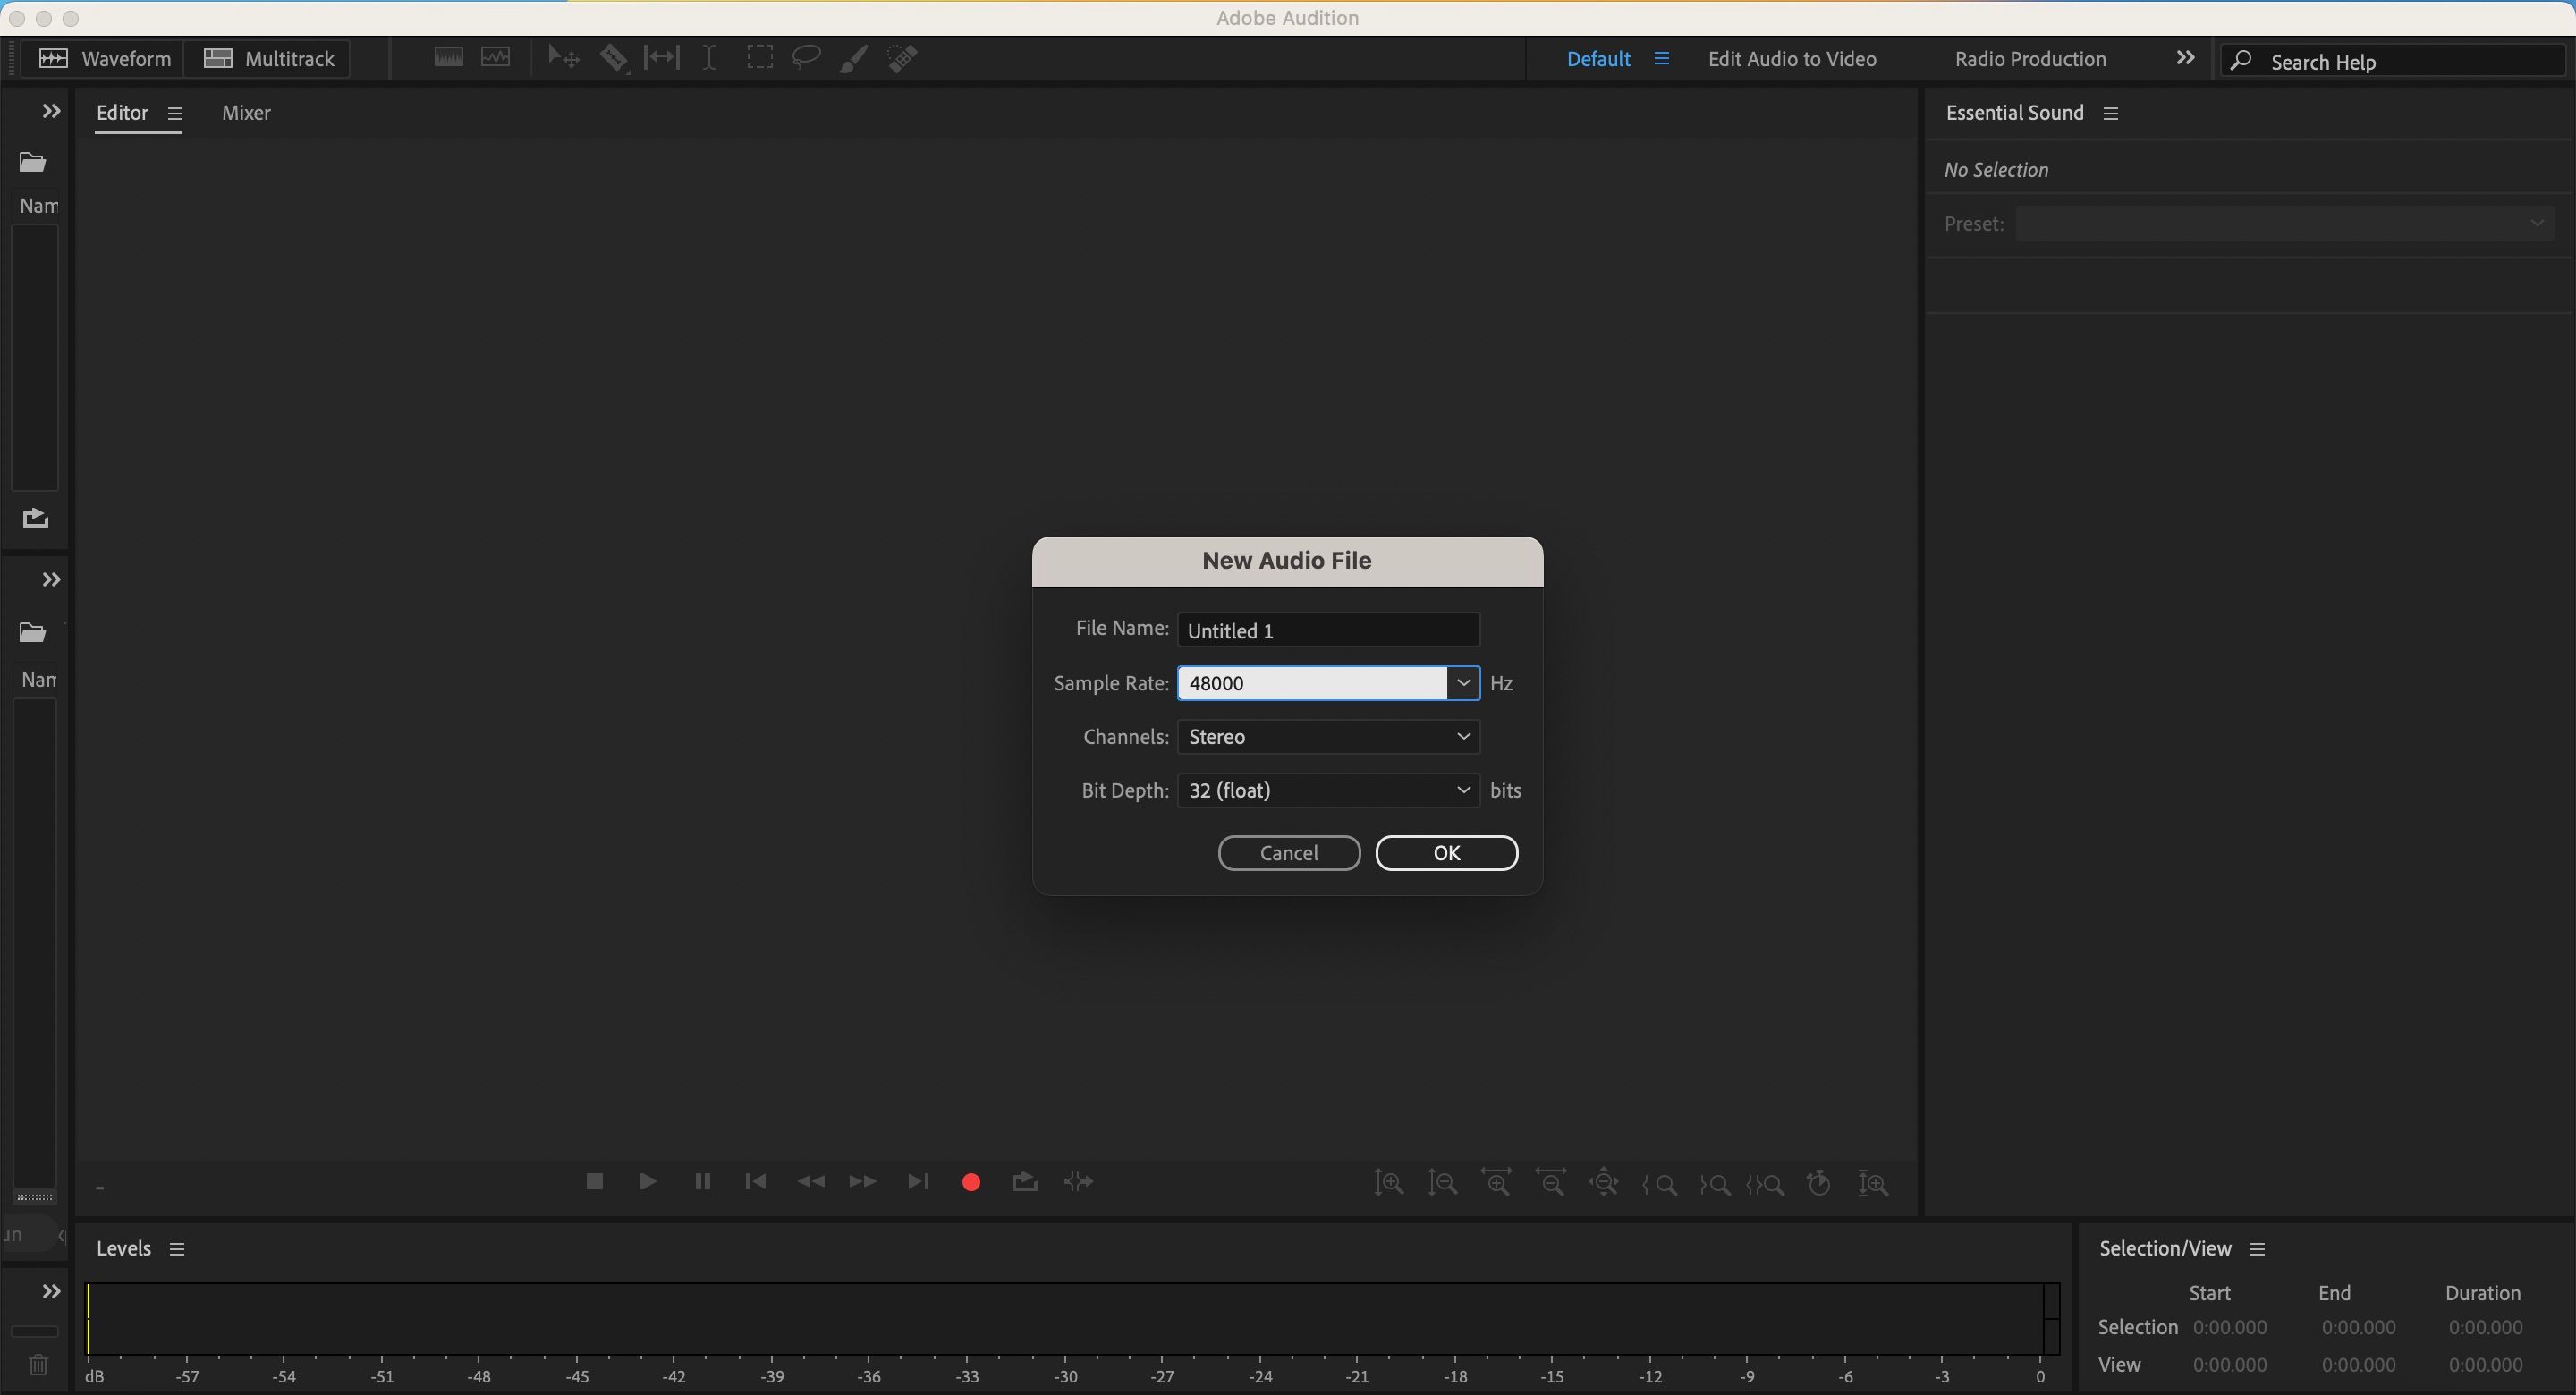
Once you’ve changed your computer’s microphone input settings, you’re almost ready to begin recording your episode. Hit the red circle on the main screen; when you do, you’ll see a popup window with multiple options.
When you expand the Channels tab, you’ll see options for how your sound will play. Mono will play the same audio in both ears, whereas Stereo will sound slightly different in both ears when a user listens through headphones.
You’ll also see a Sample Rate tab. Many podcasters record at 44,100 Hz, and you should consider doing the same. As for the Bit Depth section, 32 (float) is the best option for recording high-quality podcast audios. You will see 24 by default; expand the dropdown menu to change it.
When you’ve finished changing your settings, click on the OK button. After that, you’re ready to begin recording.
3. Cutting Out Unwanted Parts of Your Audio
When recording your podcast, there isn’t a universal rule for how long it should be. The most important thing is that you get your point across; ideally, you’ll do that as briefly as possible. Once you’ve finished making the voiceover, editing it before moving on to the next steps is a good idea.
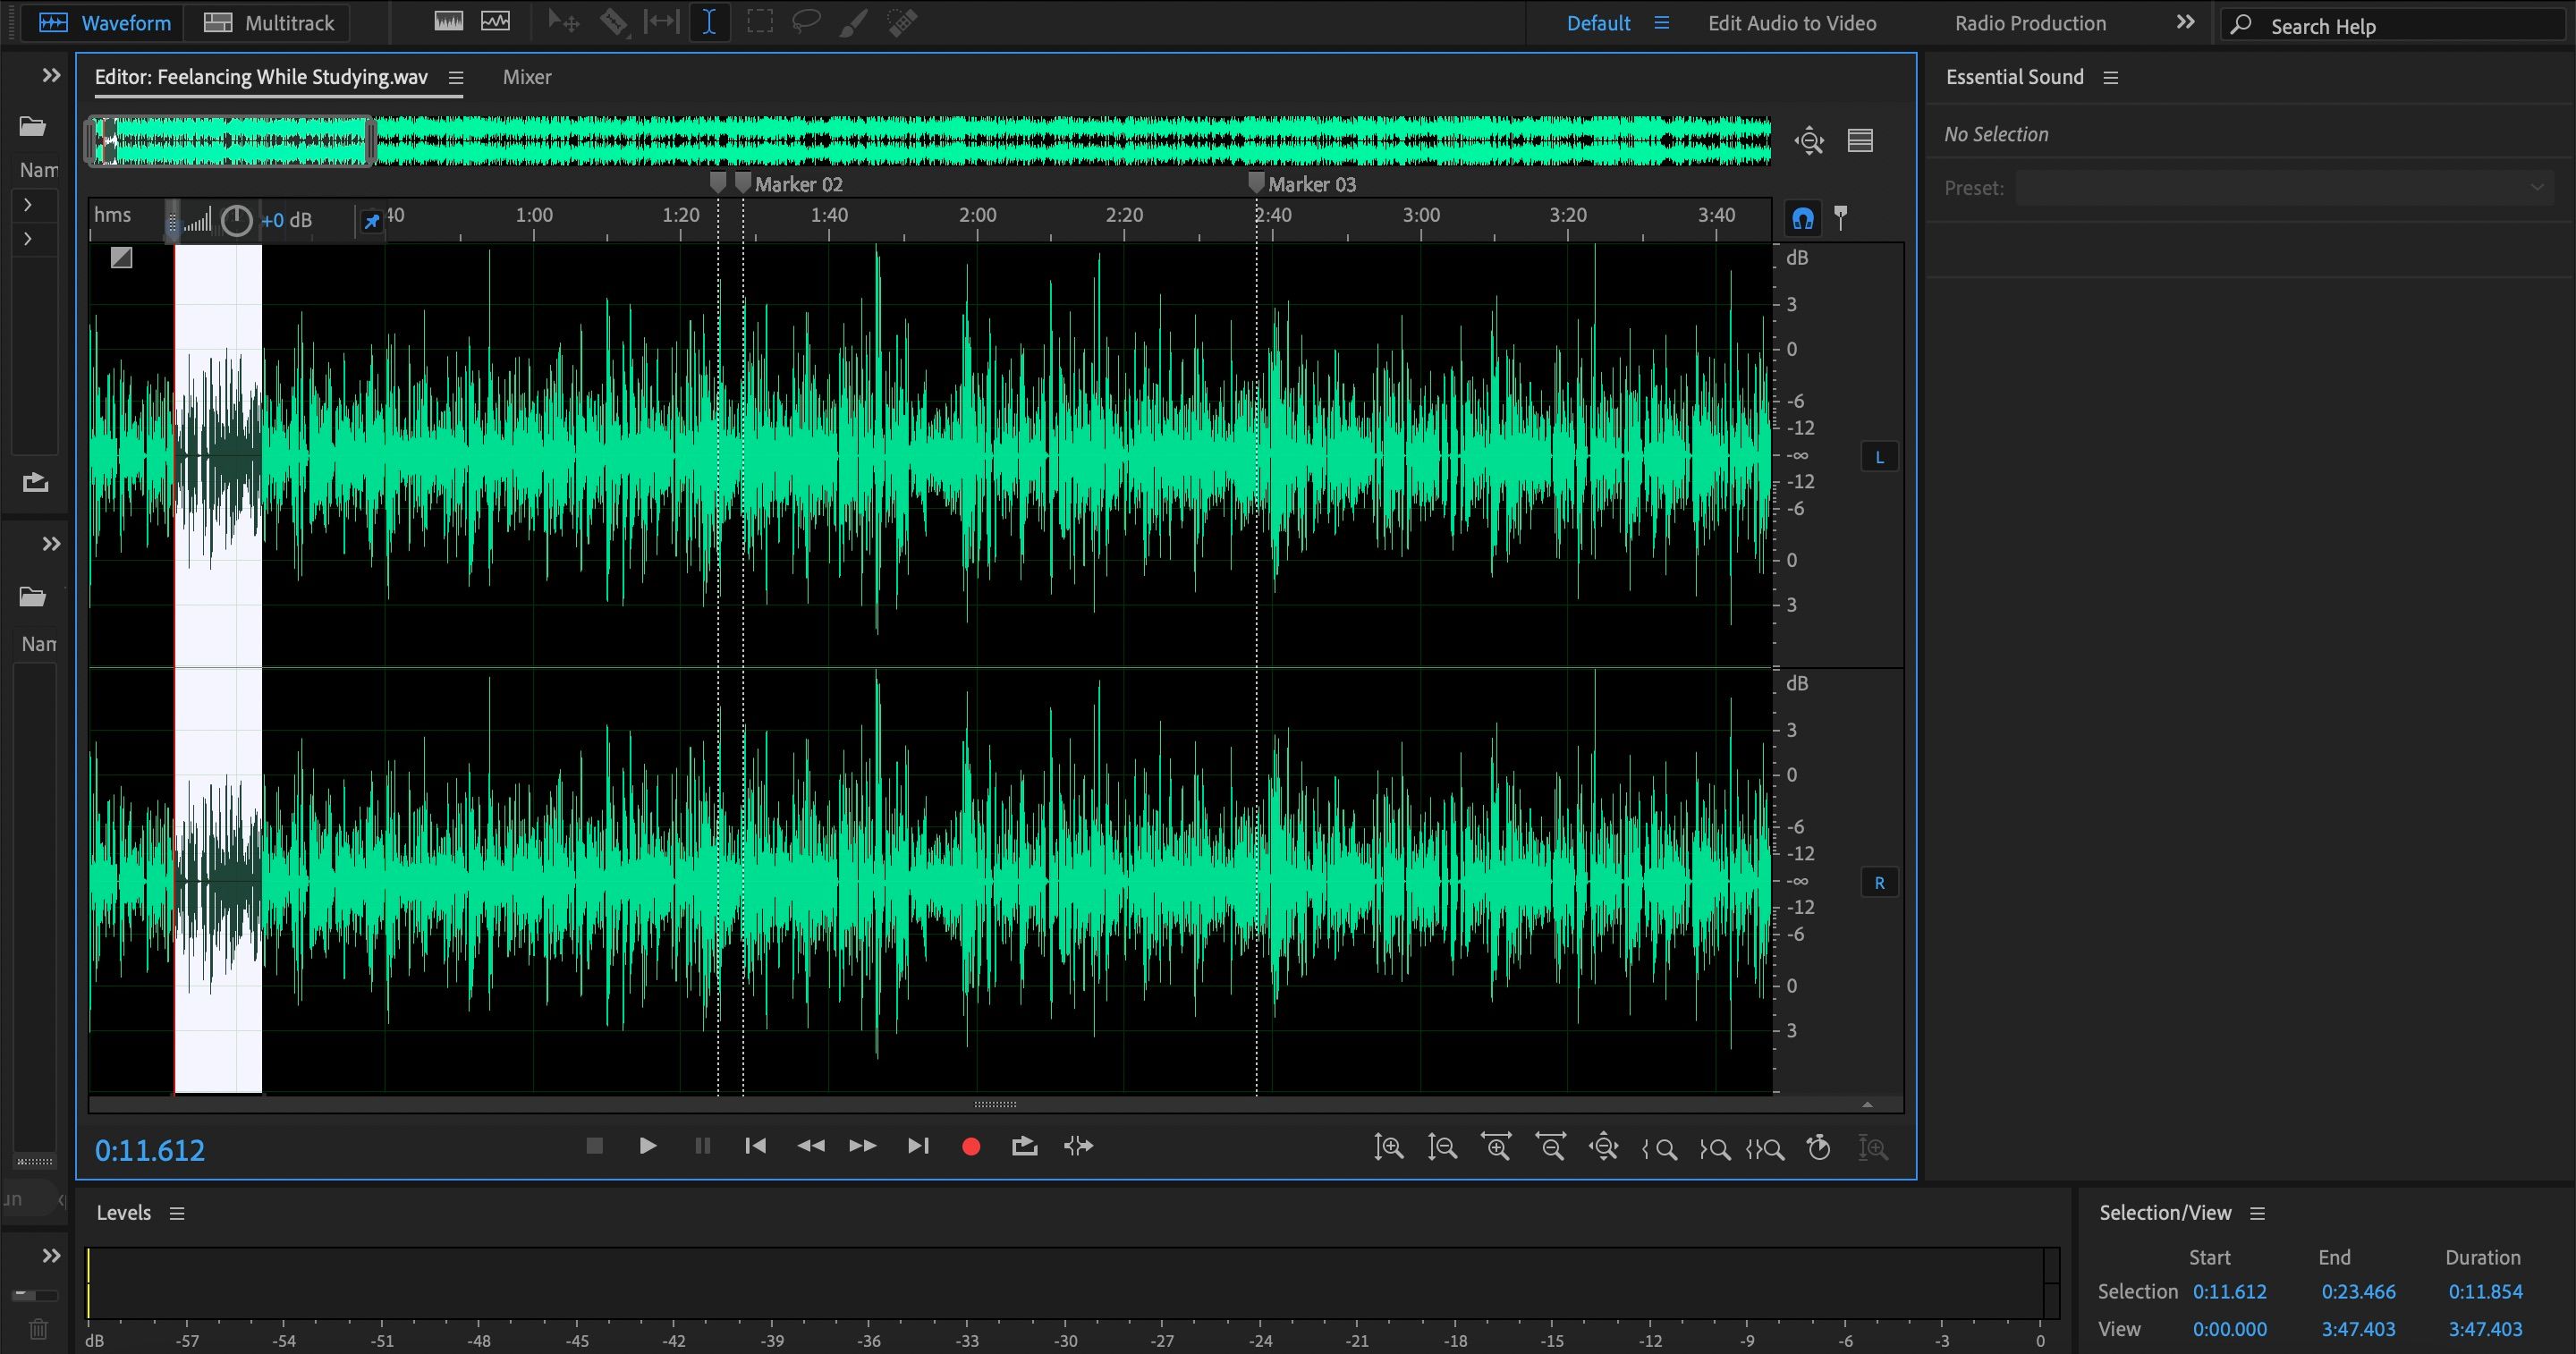
You will almost certainly have unwanted sections, such as when you say “erm” and “uh”. On top of that, you might have sounds that aren’t too pleasant to the listener—such as sniffing and breathing. Getting rid of these is simple; highlight the section on the audio wave you want to remove and hit the backspace key on your keyboard.
Removing smaller soundbites is sometimes tricky in the default view. Use the magnifying glasses to expand your audio and get to those—without getting rid of parts you’d like to keep.
4. Editing the Sound Volumes of Your Audio
Considering that podcasts are audio-based, your sound’s volume is an essential thing to keep in mind. It’s not uncommon for podcasters to feel like they’re not loud enough after listening to their recordings again. Luckily, fixing this issue is not too much of a challenge.
To edit the decibels (dB) of your overall audio, you can use the dial known as Adjust Amplitude toward the top of your screen. Turn the dial to the right to increase the overall dB, or type how much you’d like to raise the volume.
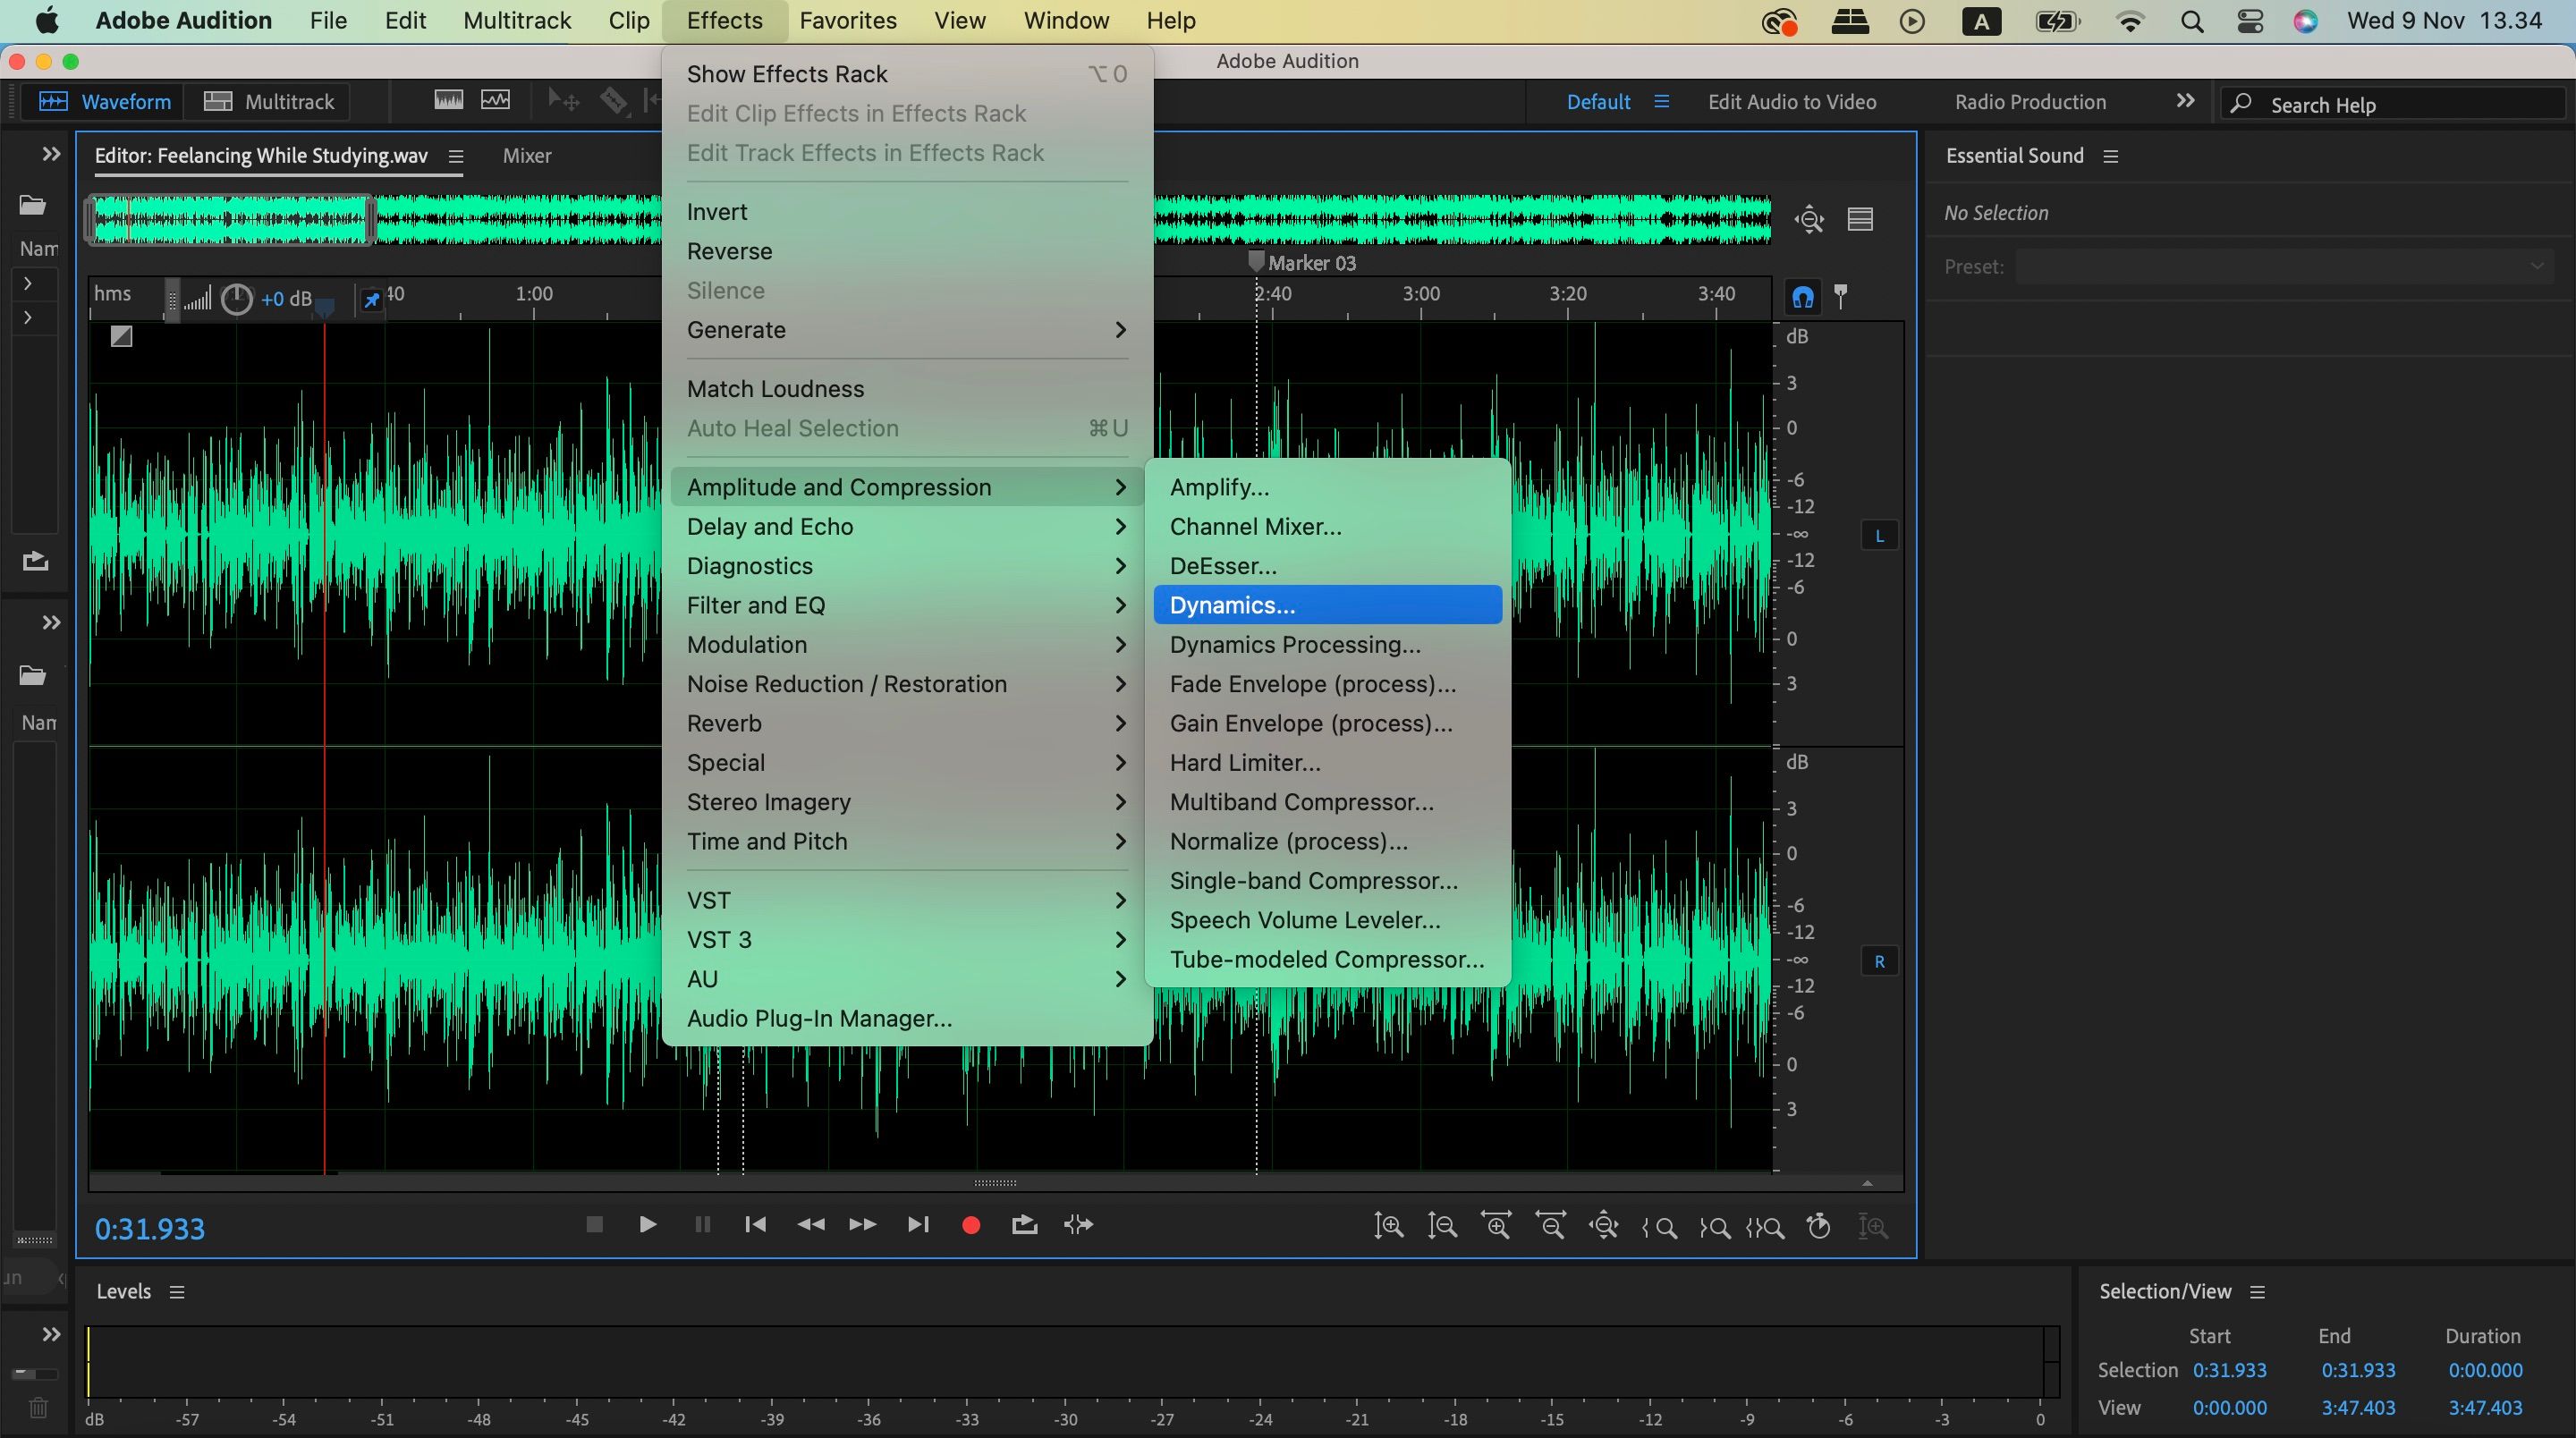
Adobe Audition also has more advanced tools to help your audio sound crisper. To access these, go to Effects > Amplitude and Compression. Then, click on Dynamics. Here, you can limit the maximum dB your audio is allowed to reach. Moreover, you can use the Compressor and Expander tools to adjust how your voice sounds.
You will find plenty of other editing tools in the Effects dropdown menu. There isn’t a universal rule about which ones are better; experiment with them to determine which ones work best for you.
5. Where Should You Save Your Audio Files?
Once you’ve edited your voiceover recording, you have not yet finished making the podcast. However, saving the edited file is a good idea.
You can choose whether you want to save your file on your computer or an external hard drive. Keeping a copy in both places is wise, but there are better ways to store your files than on a desktop.
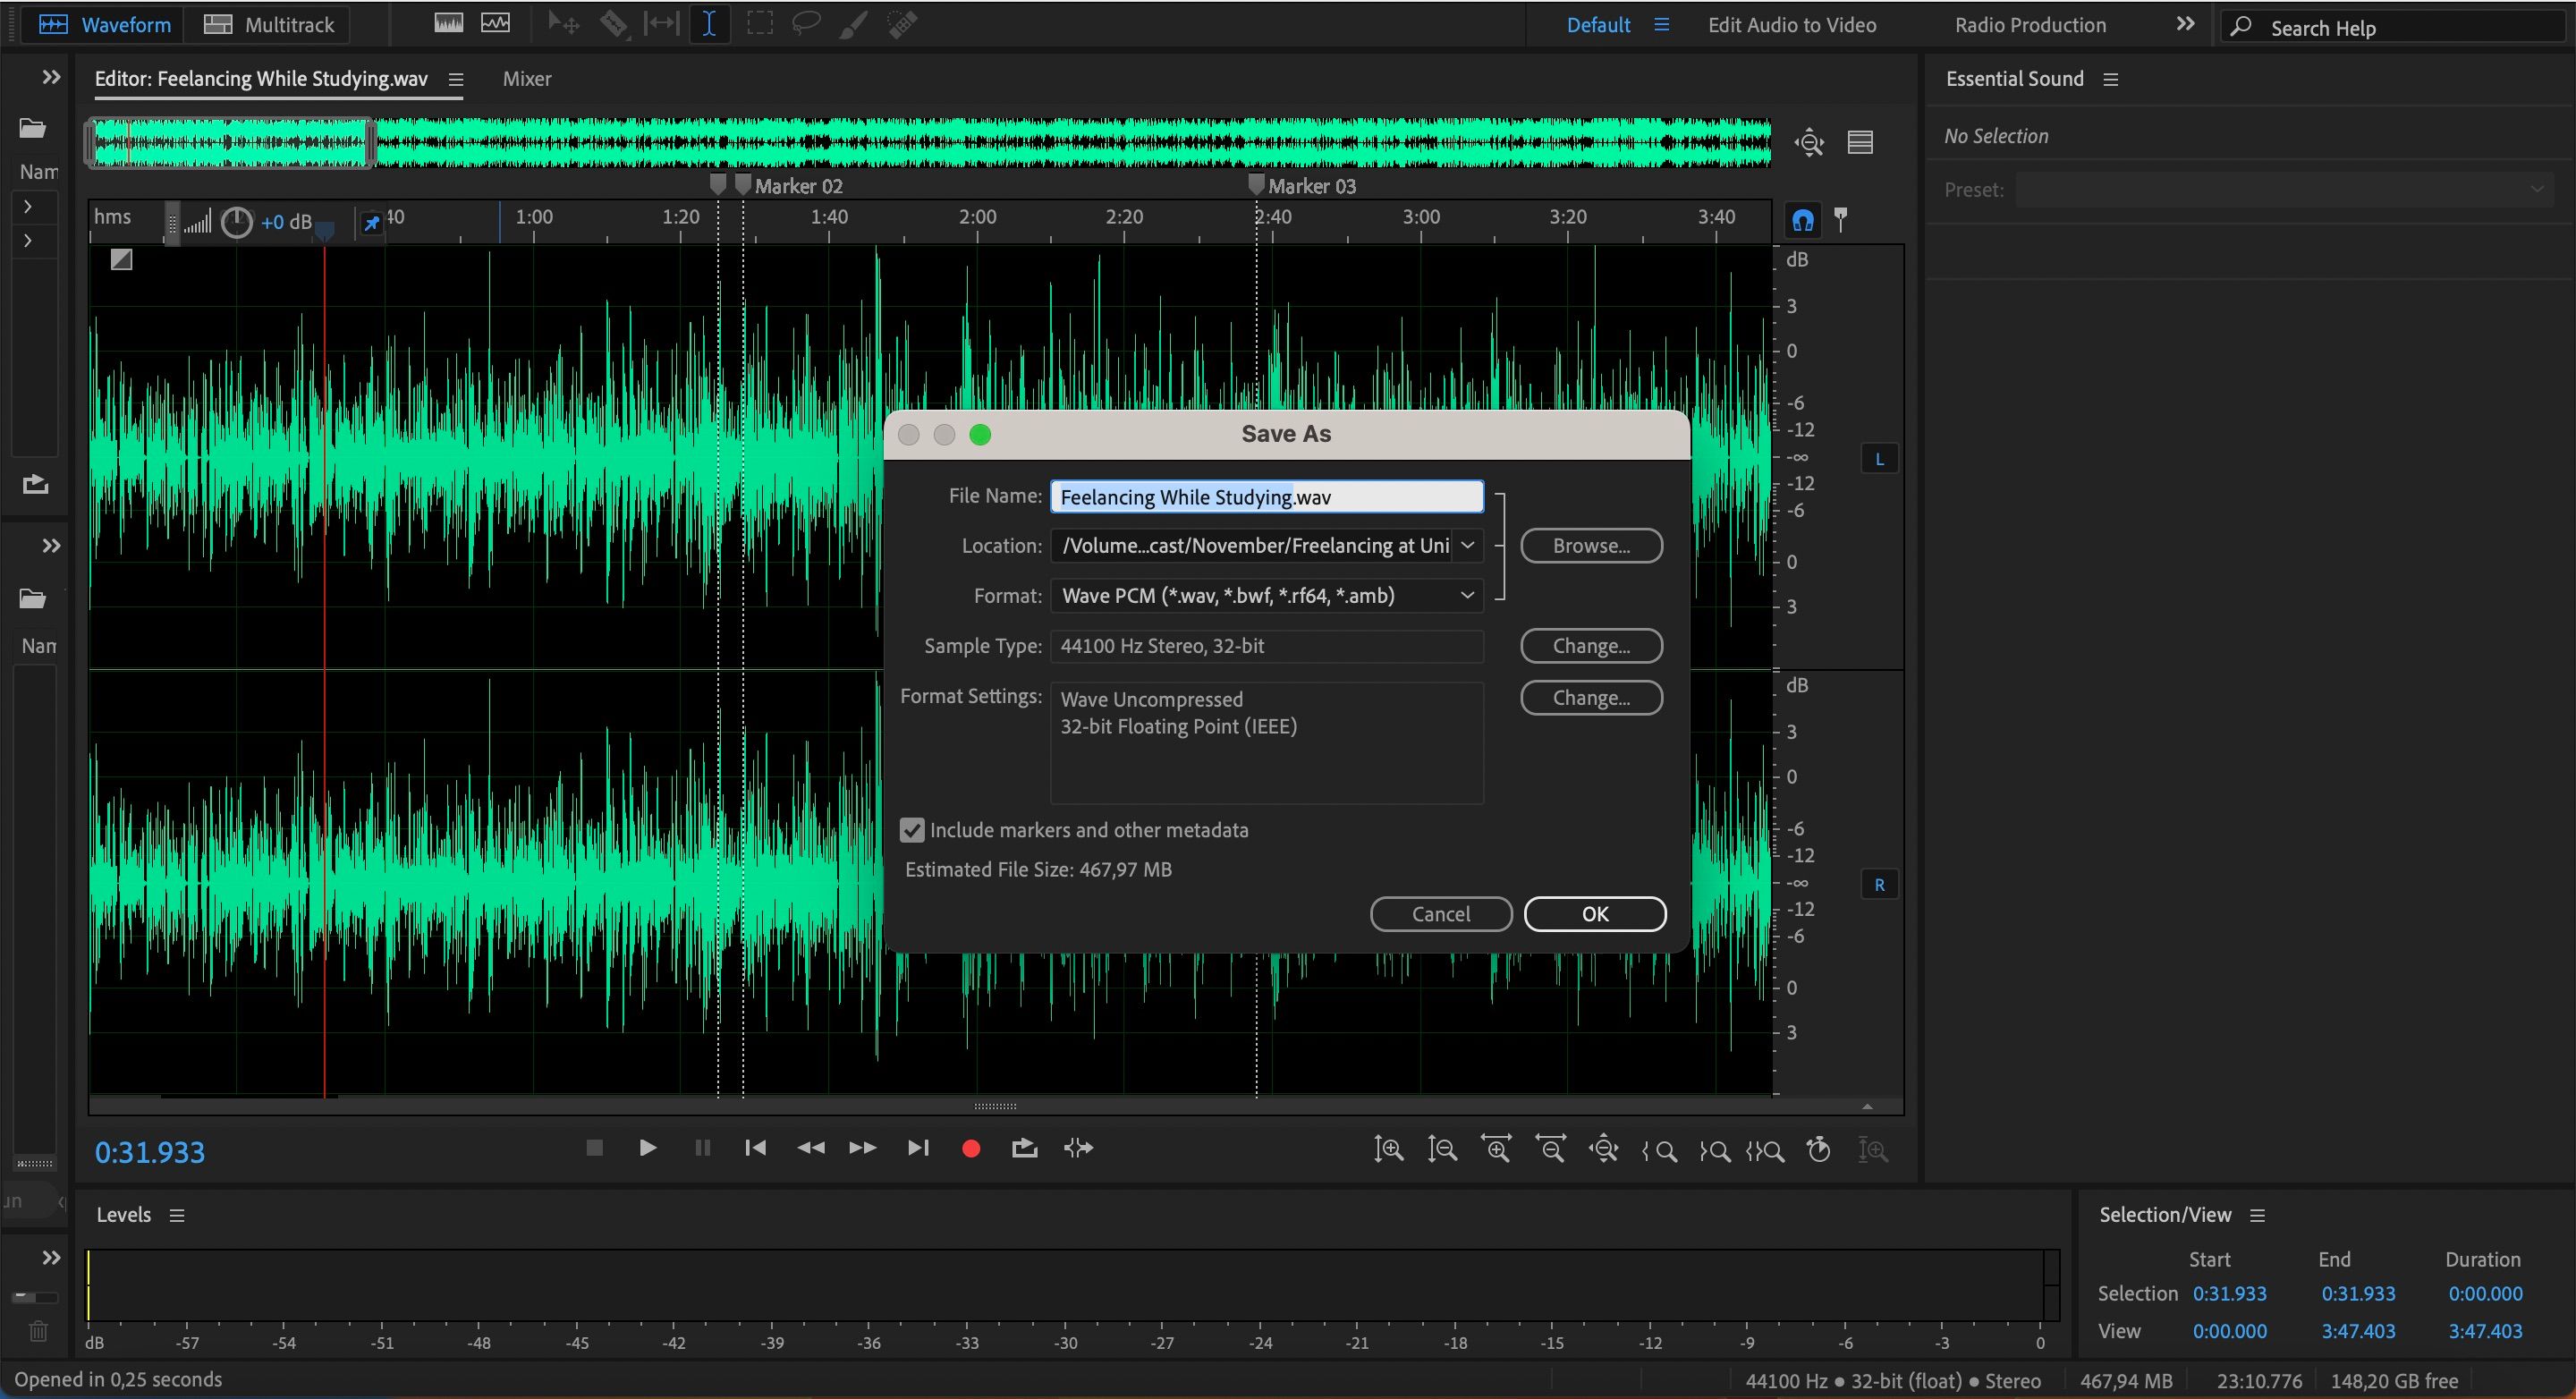
To save audio files, go to File > Save As. Go to the Browse button to choose your preferred destination folder.
You will also need to pick the format for your audio file. Since we’re not finished editing yet, pick .wav. When you choose this format, your file will have better sound quality for the next steps.
6. Adding Sound Effects and Music to Your Podcast
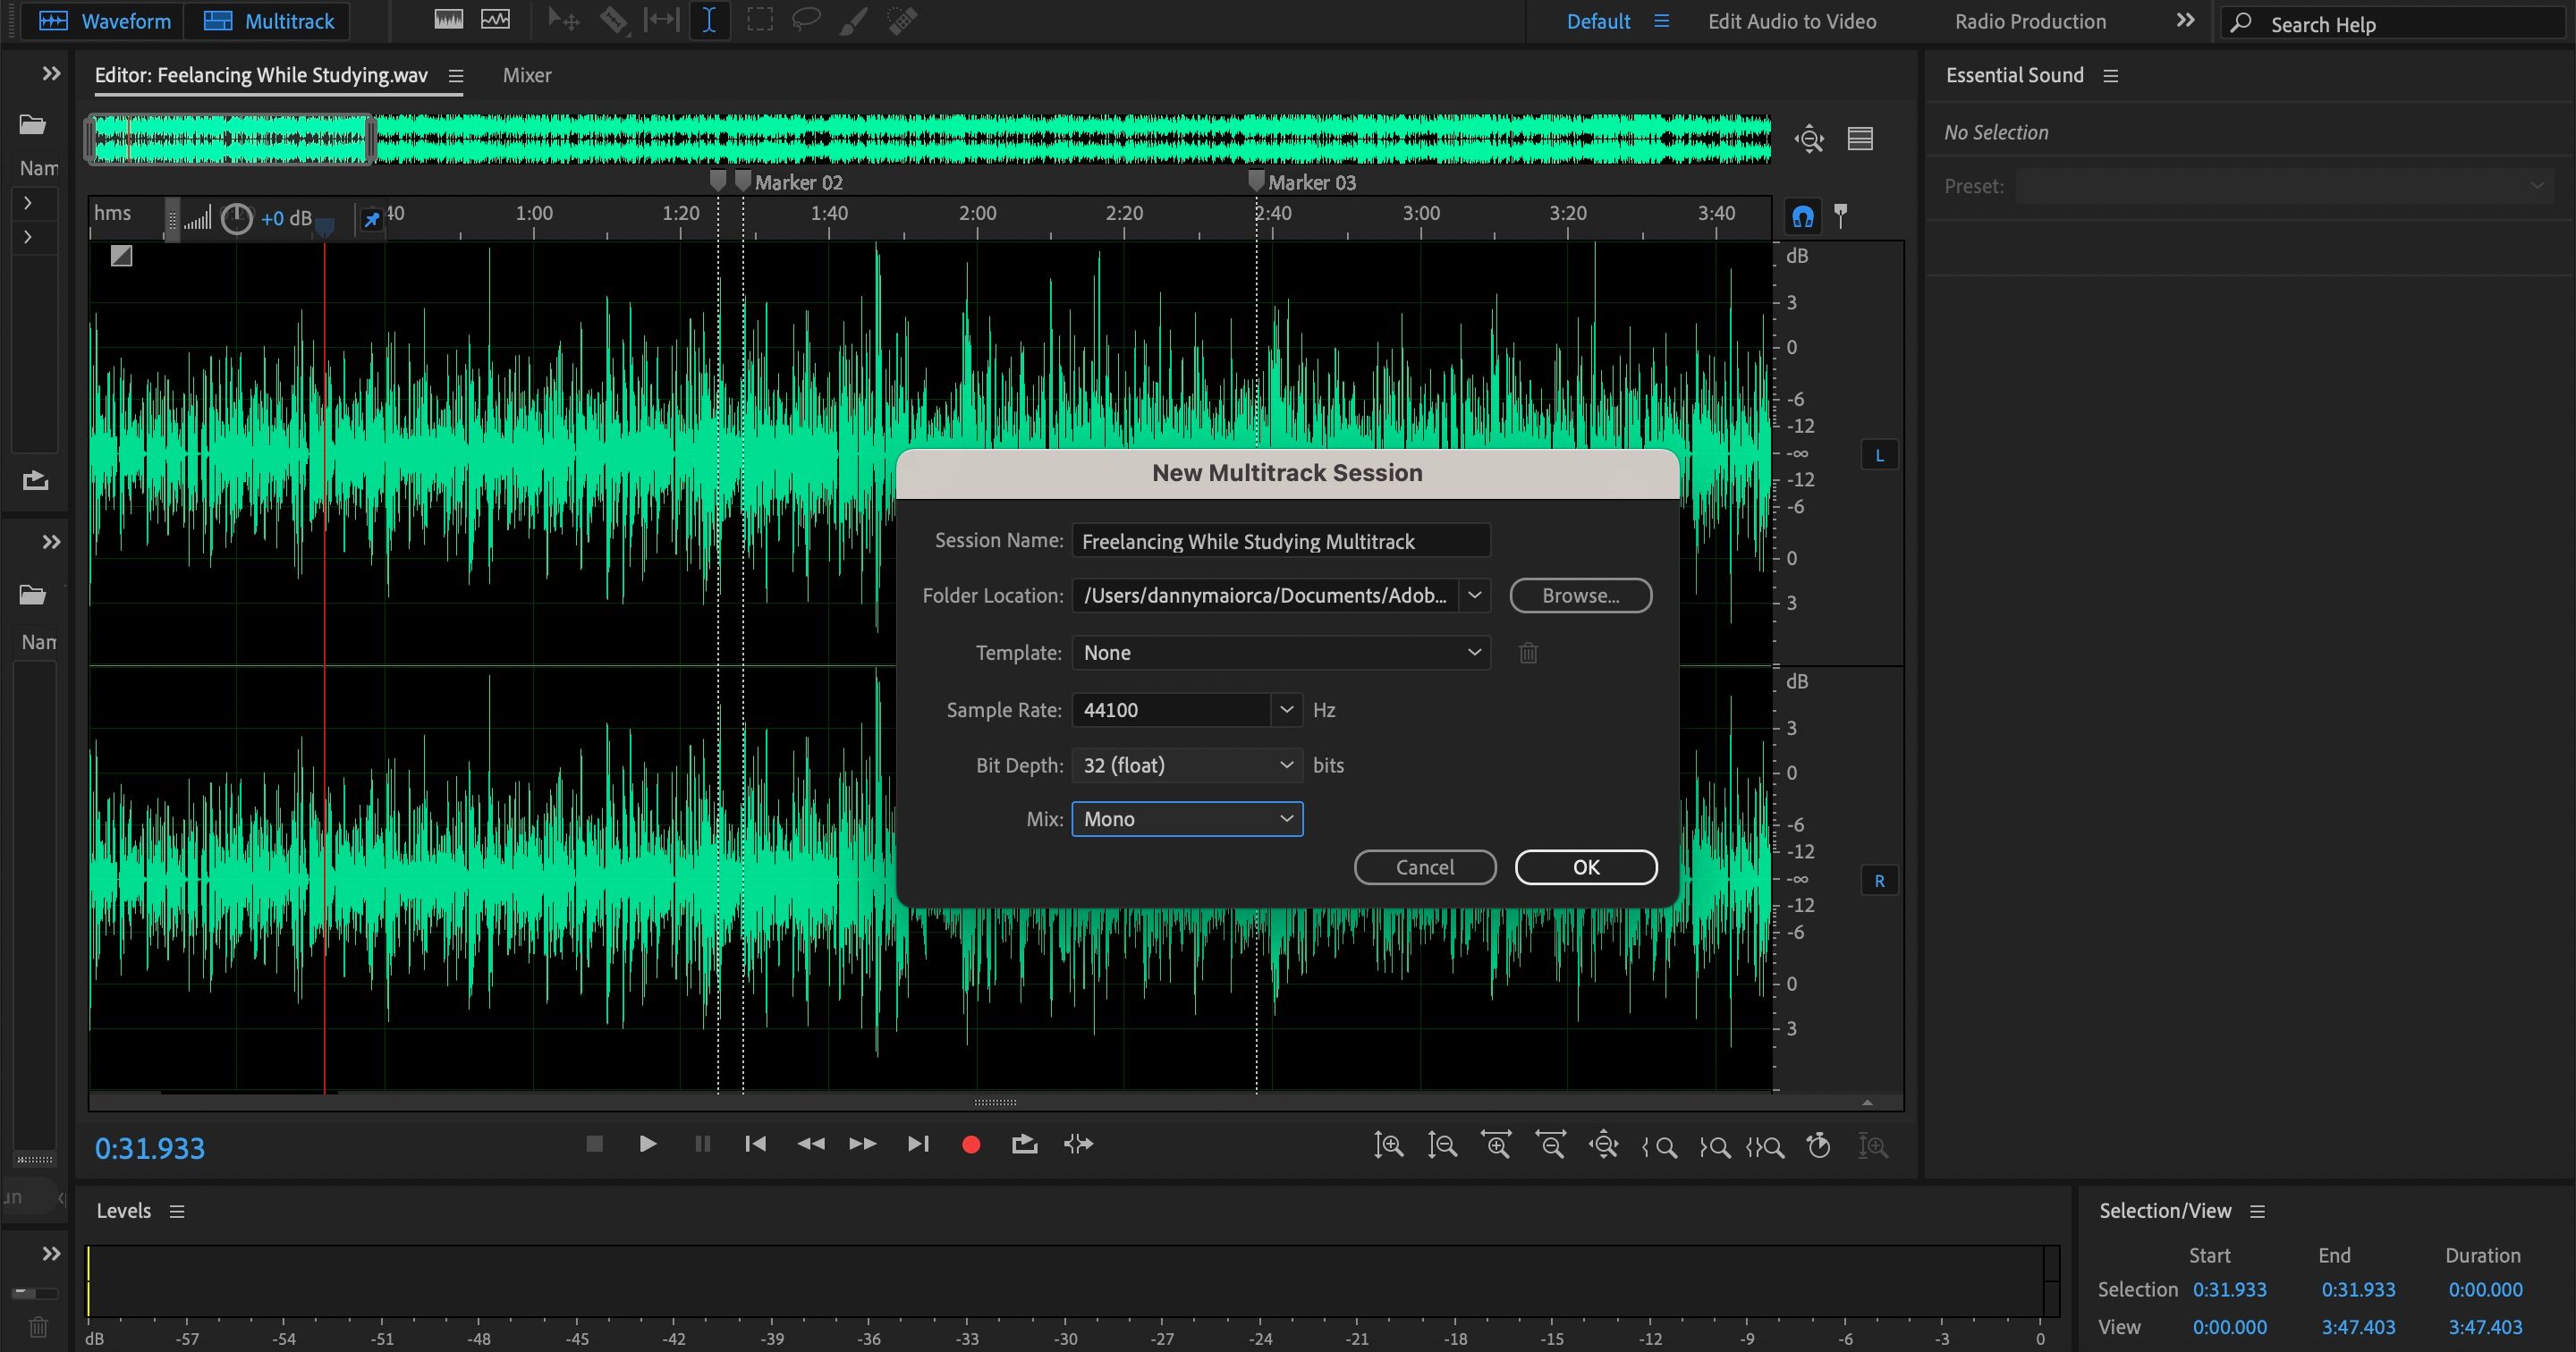
Many podcasts include music and other sound effects, and adding these in Adobe Audition is pretty simple. First, you’ll need to create a new multitrack session—which will allow you to include multiple forms of audio in the same project.
To create a new session of this kind, go to the Multitrack tab next to Waveform; it’s in the top left-hand corner of your project screen. Enter your session name and choose the Sample Rate, Bit Rate, and Mix options that suit you; you don’t need to worry about the Template menu.
Press OK once you’ve chosen your options.
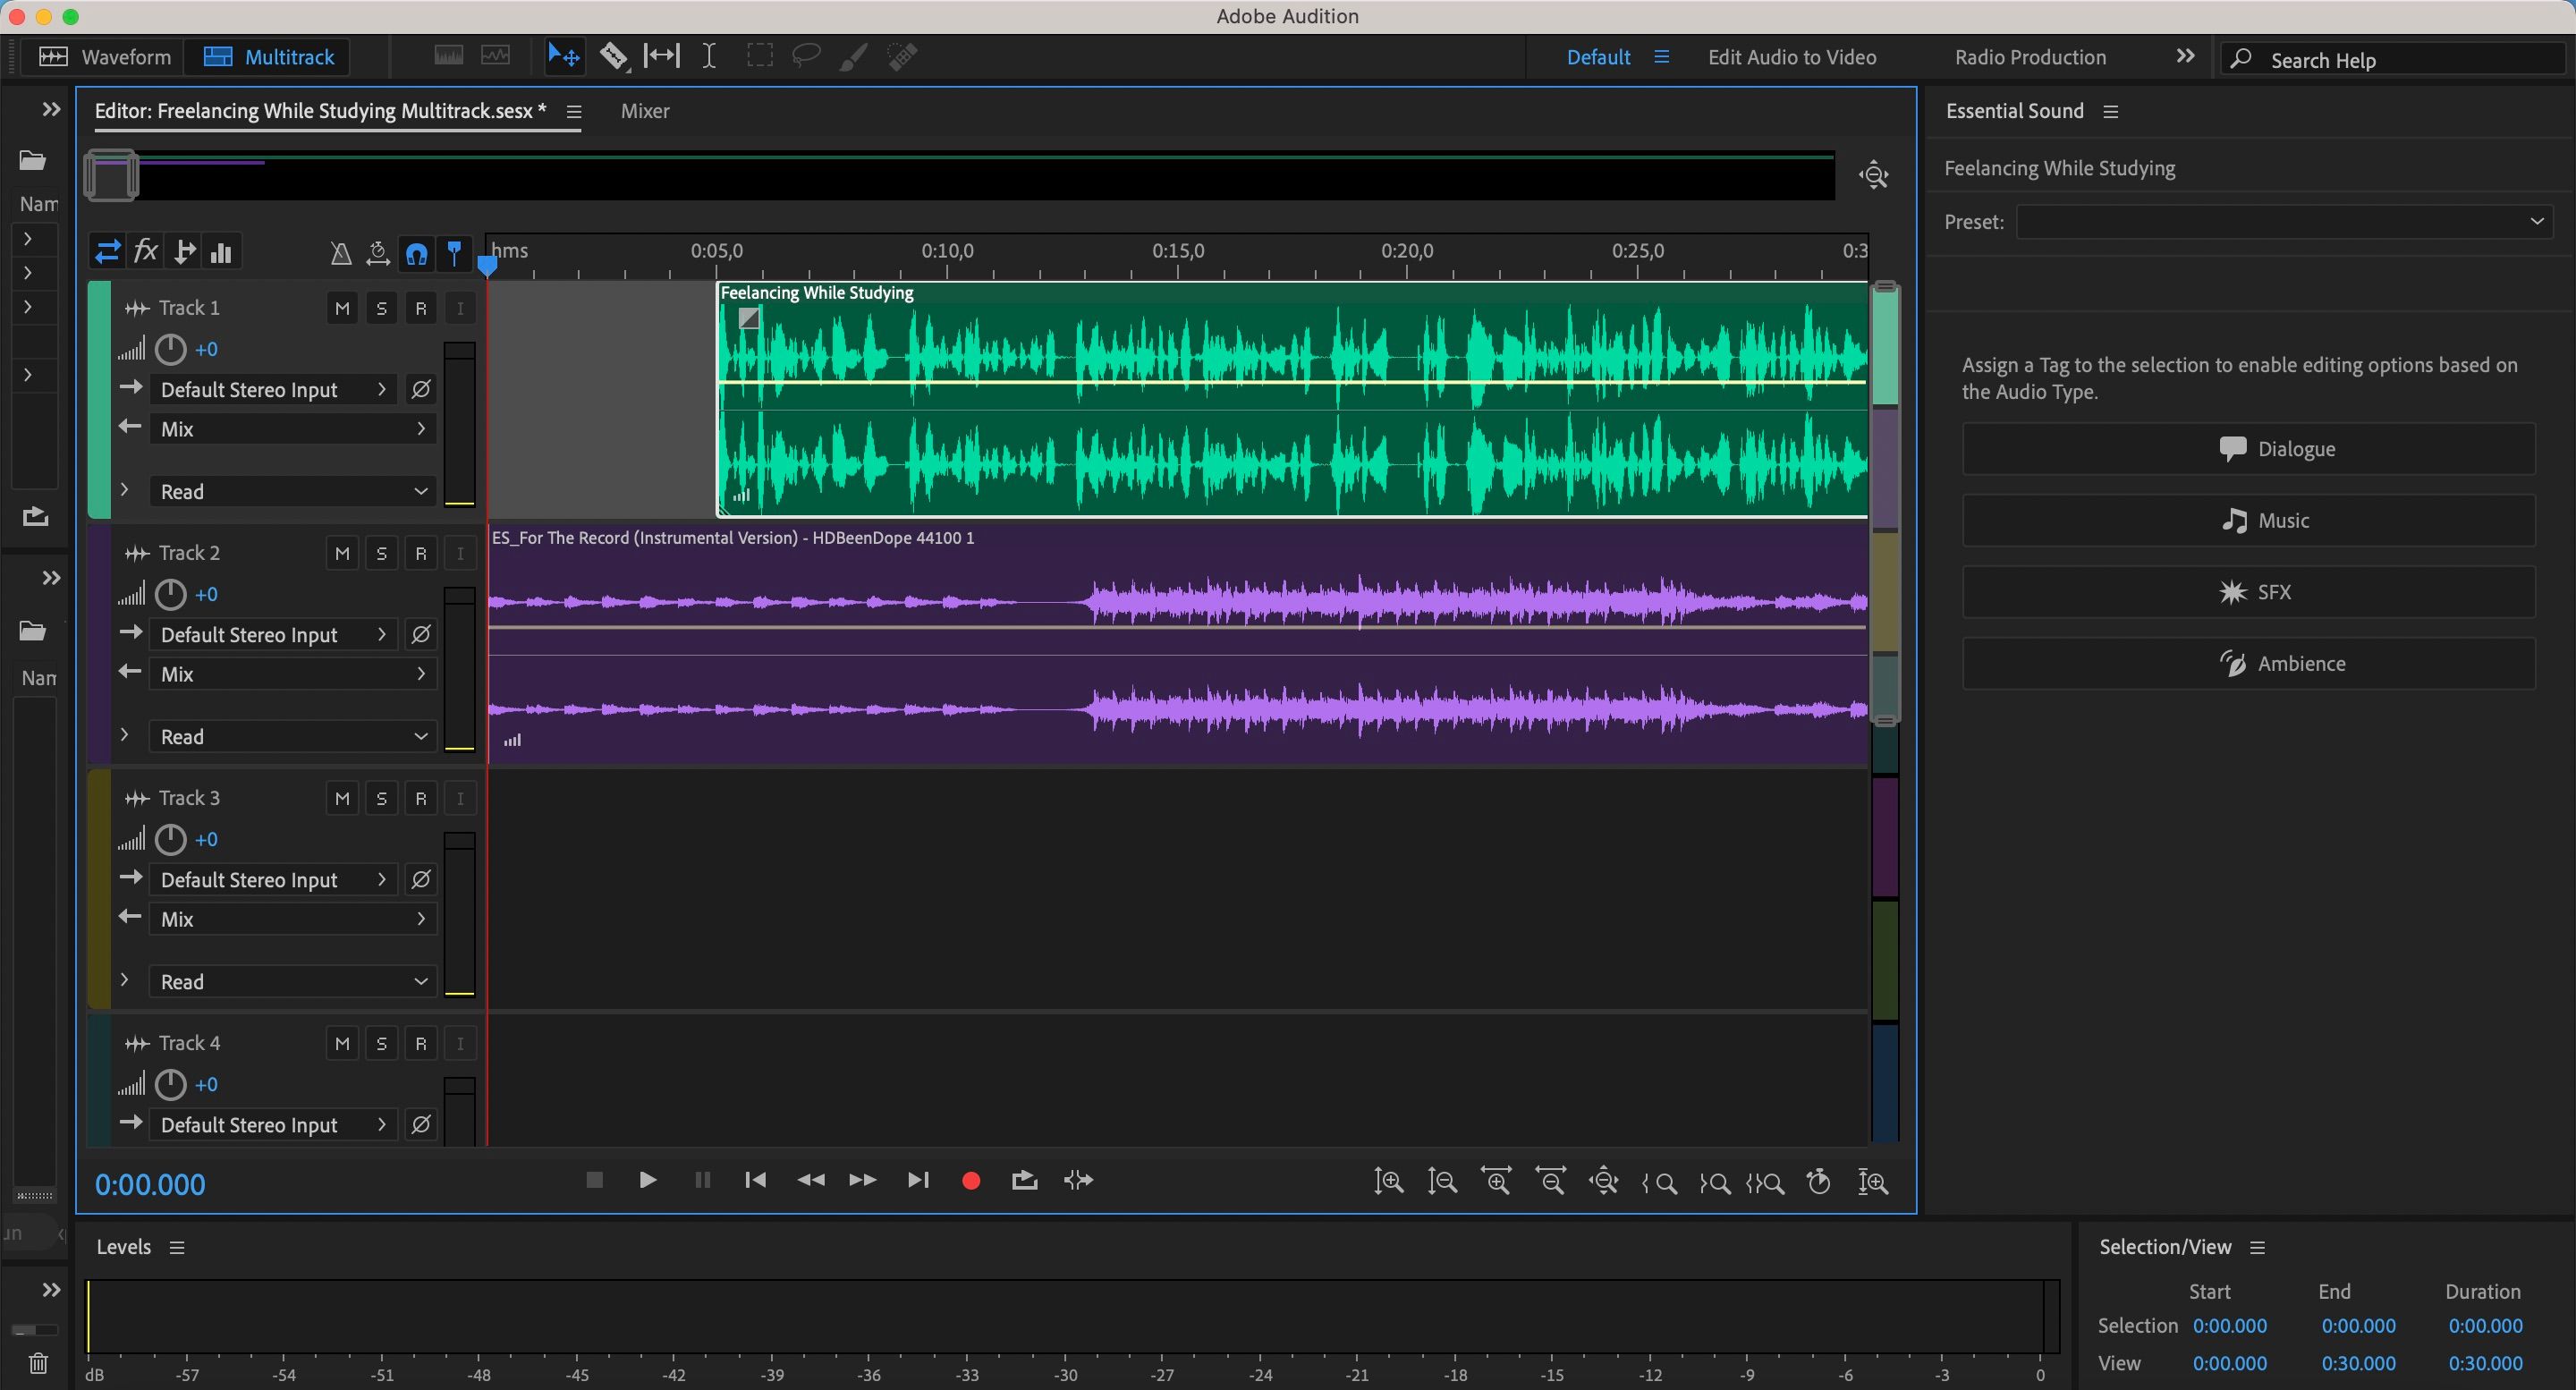
In your multitrack session, import the files you’d like to form your podcast with. Place them on different lines. As you can see below, we’ve put our voiceover on the top tab—with the music for the episode’s introduction on the second one. Here's where you can find royalty-free sound effects for your YouTube videos, and you can use them for podcast episodes too.
You can cut files by using either the razor tool (press R on your keyboard for both sides of the audio you’d like to remove) or hitting backspace. Alternatively, you can drag the front and end of your audio inwards.
To lower the decibels in a clip, drag the yellow bar down. If you wish to increase it, do the opposite.
7. Mixing Down Your Podcast
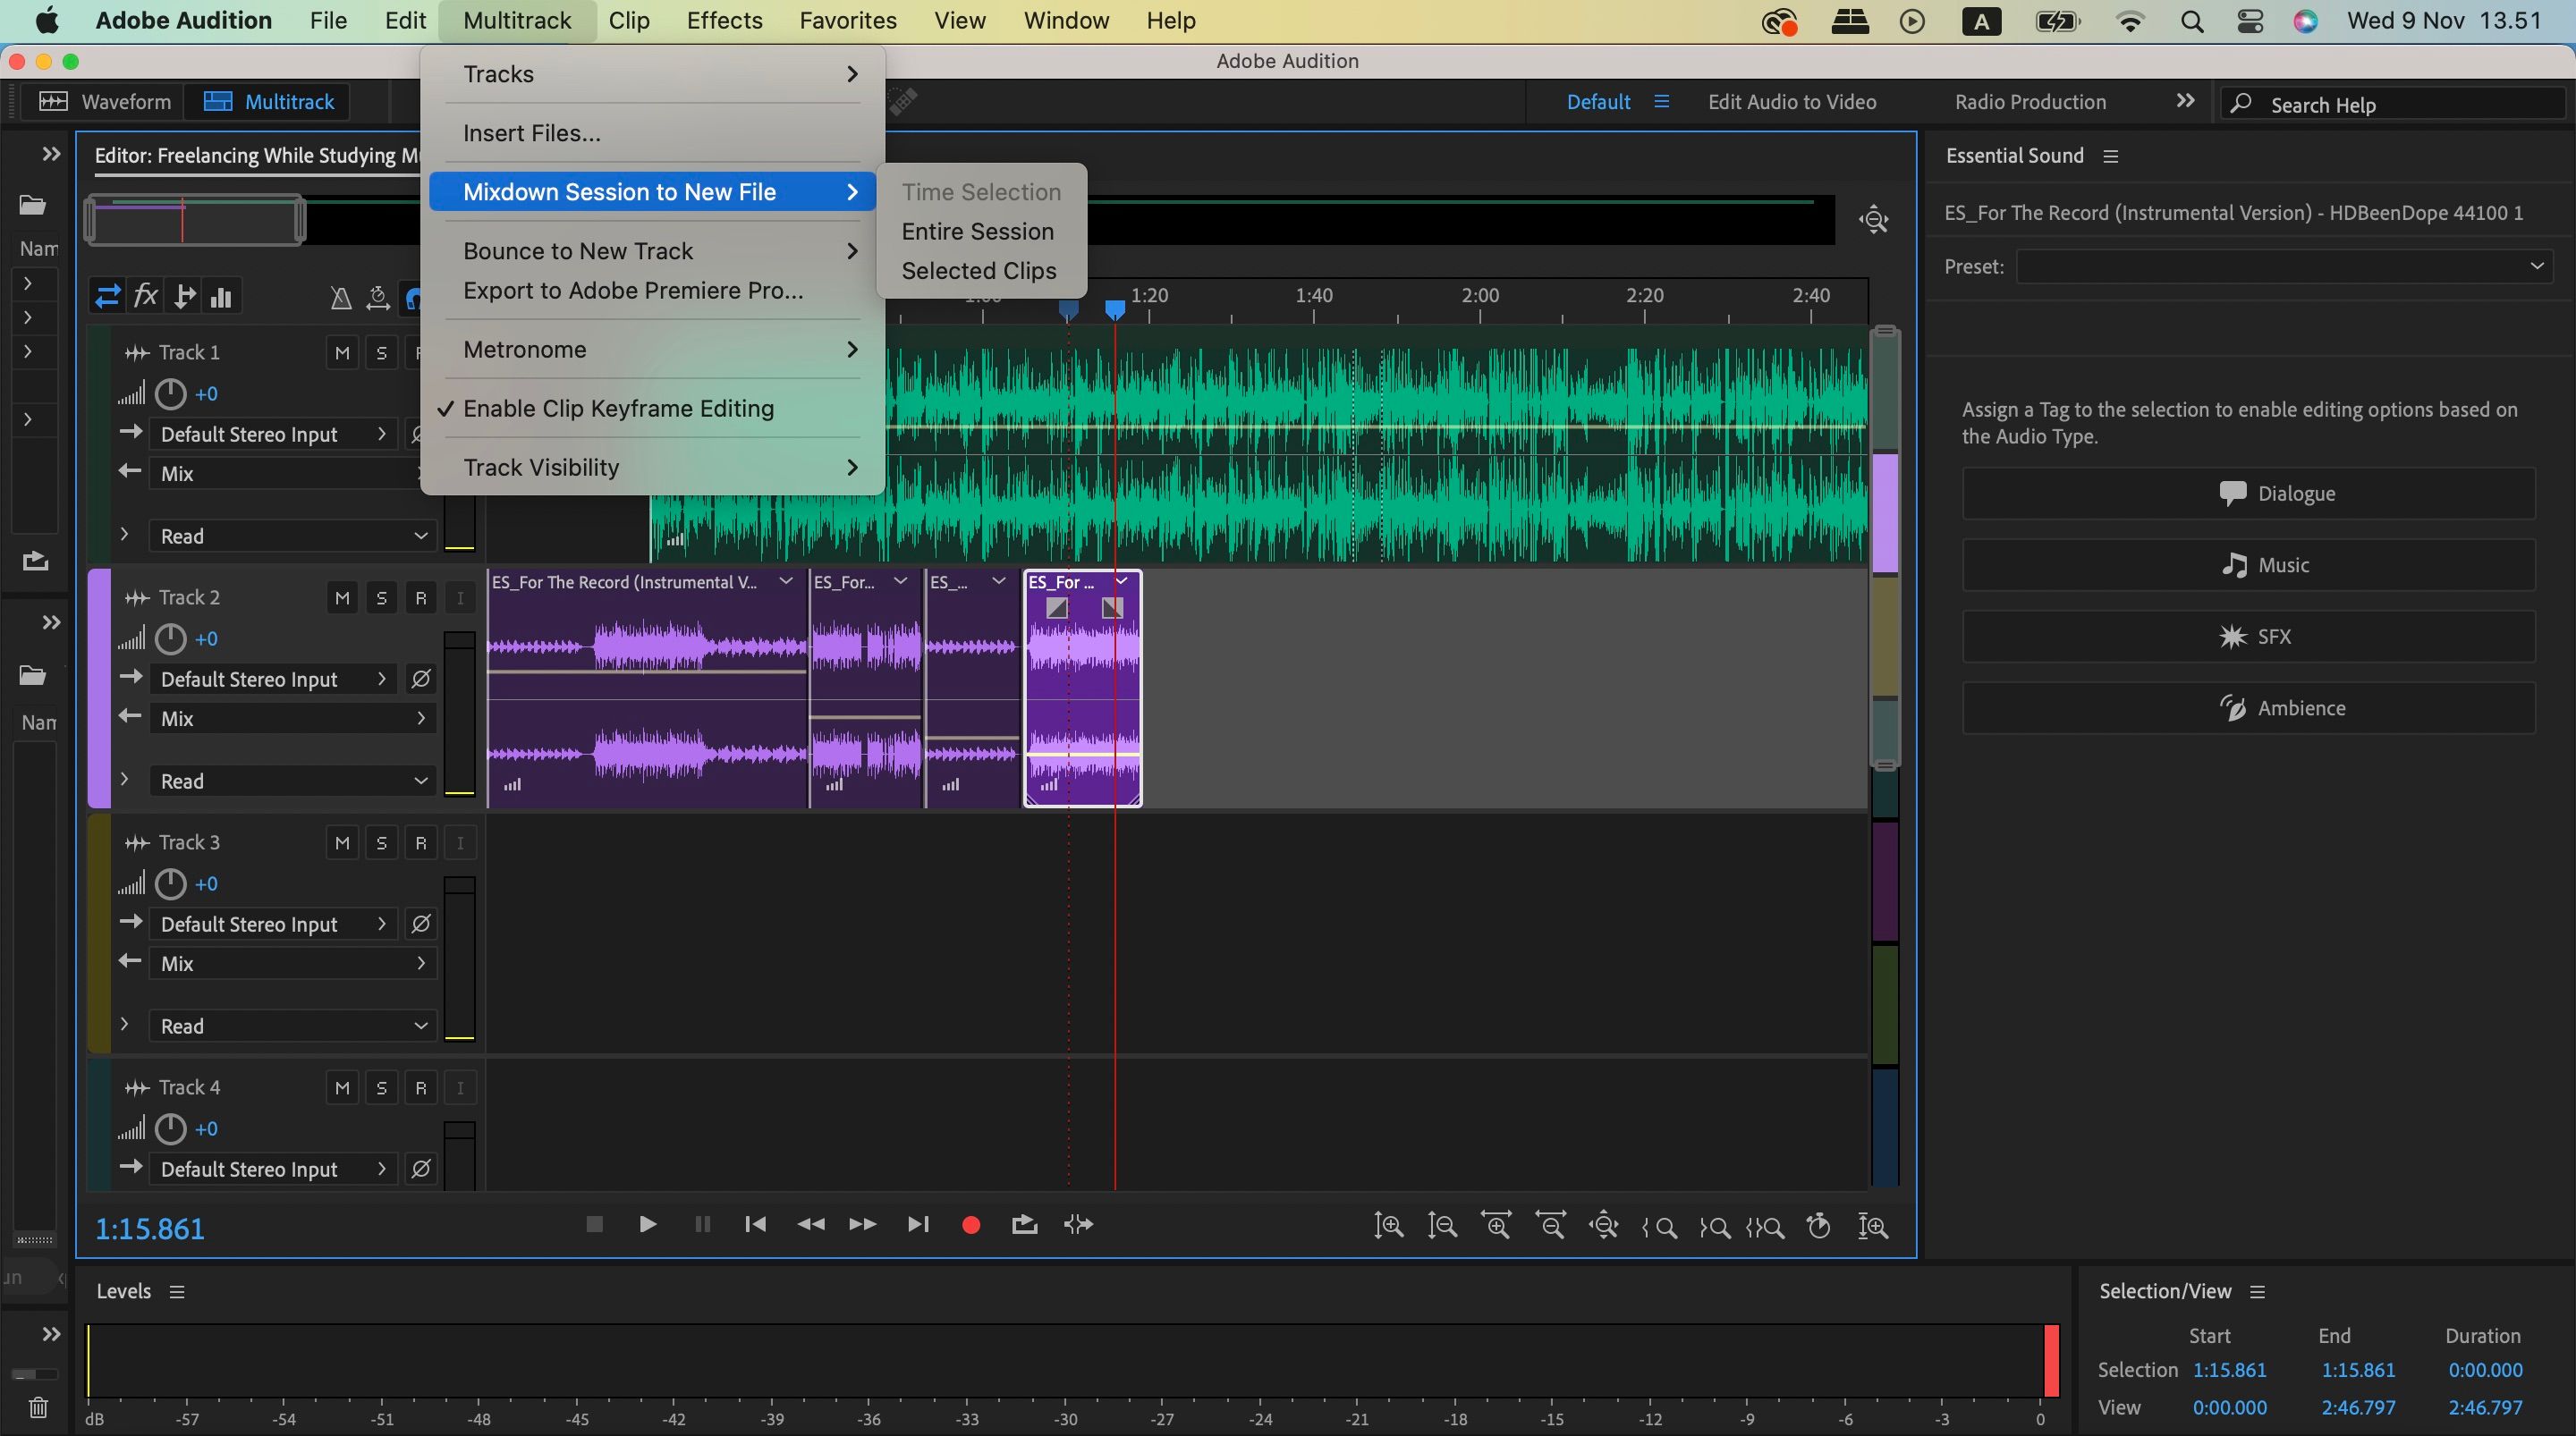
Once you’ve finished editing your audio files, you’re ready to mix your multitrack session down. You will receive one combined piece of audio once you’ve done this, and it’ll be ready to publish.
Go to Multitrack > Mixdown Session to New File > Entire Session.
8. Exporting Your Edited Audio From Adobe Audition
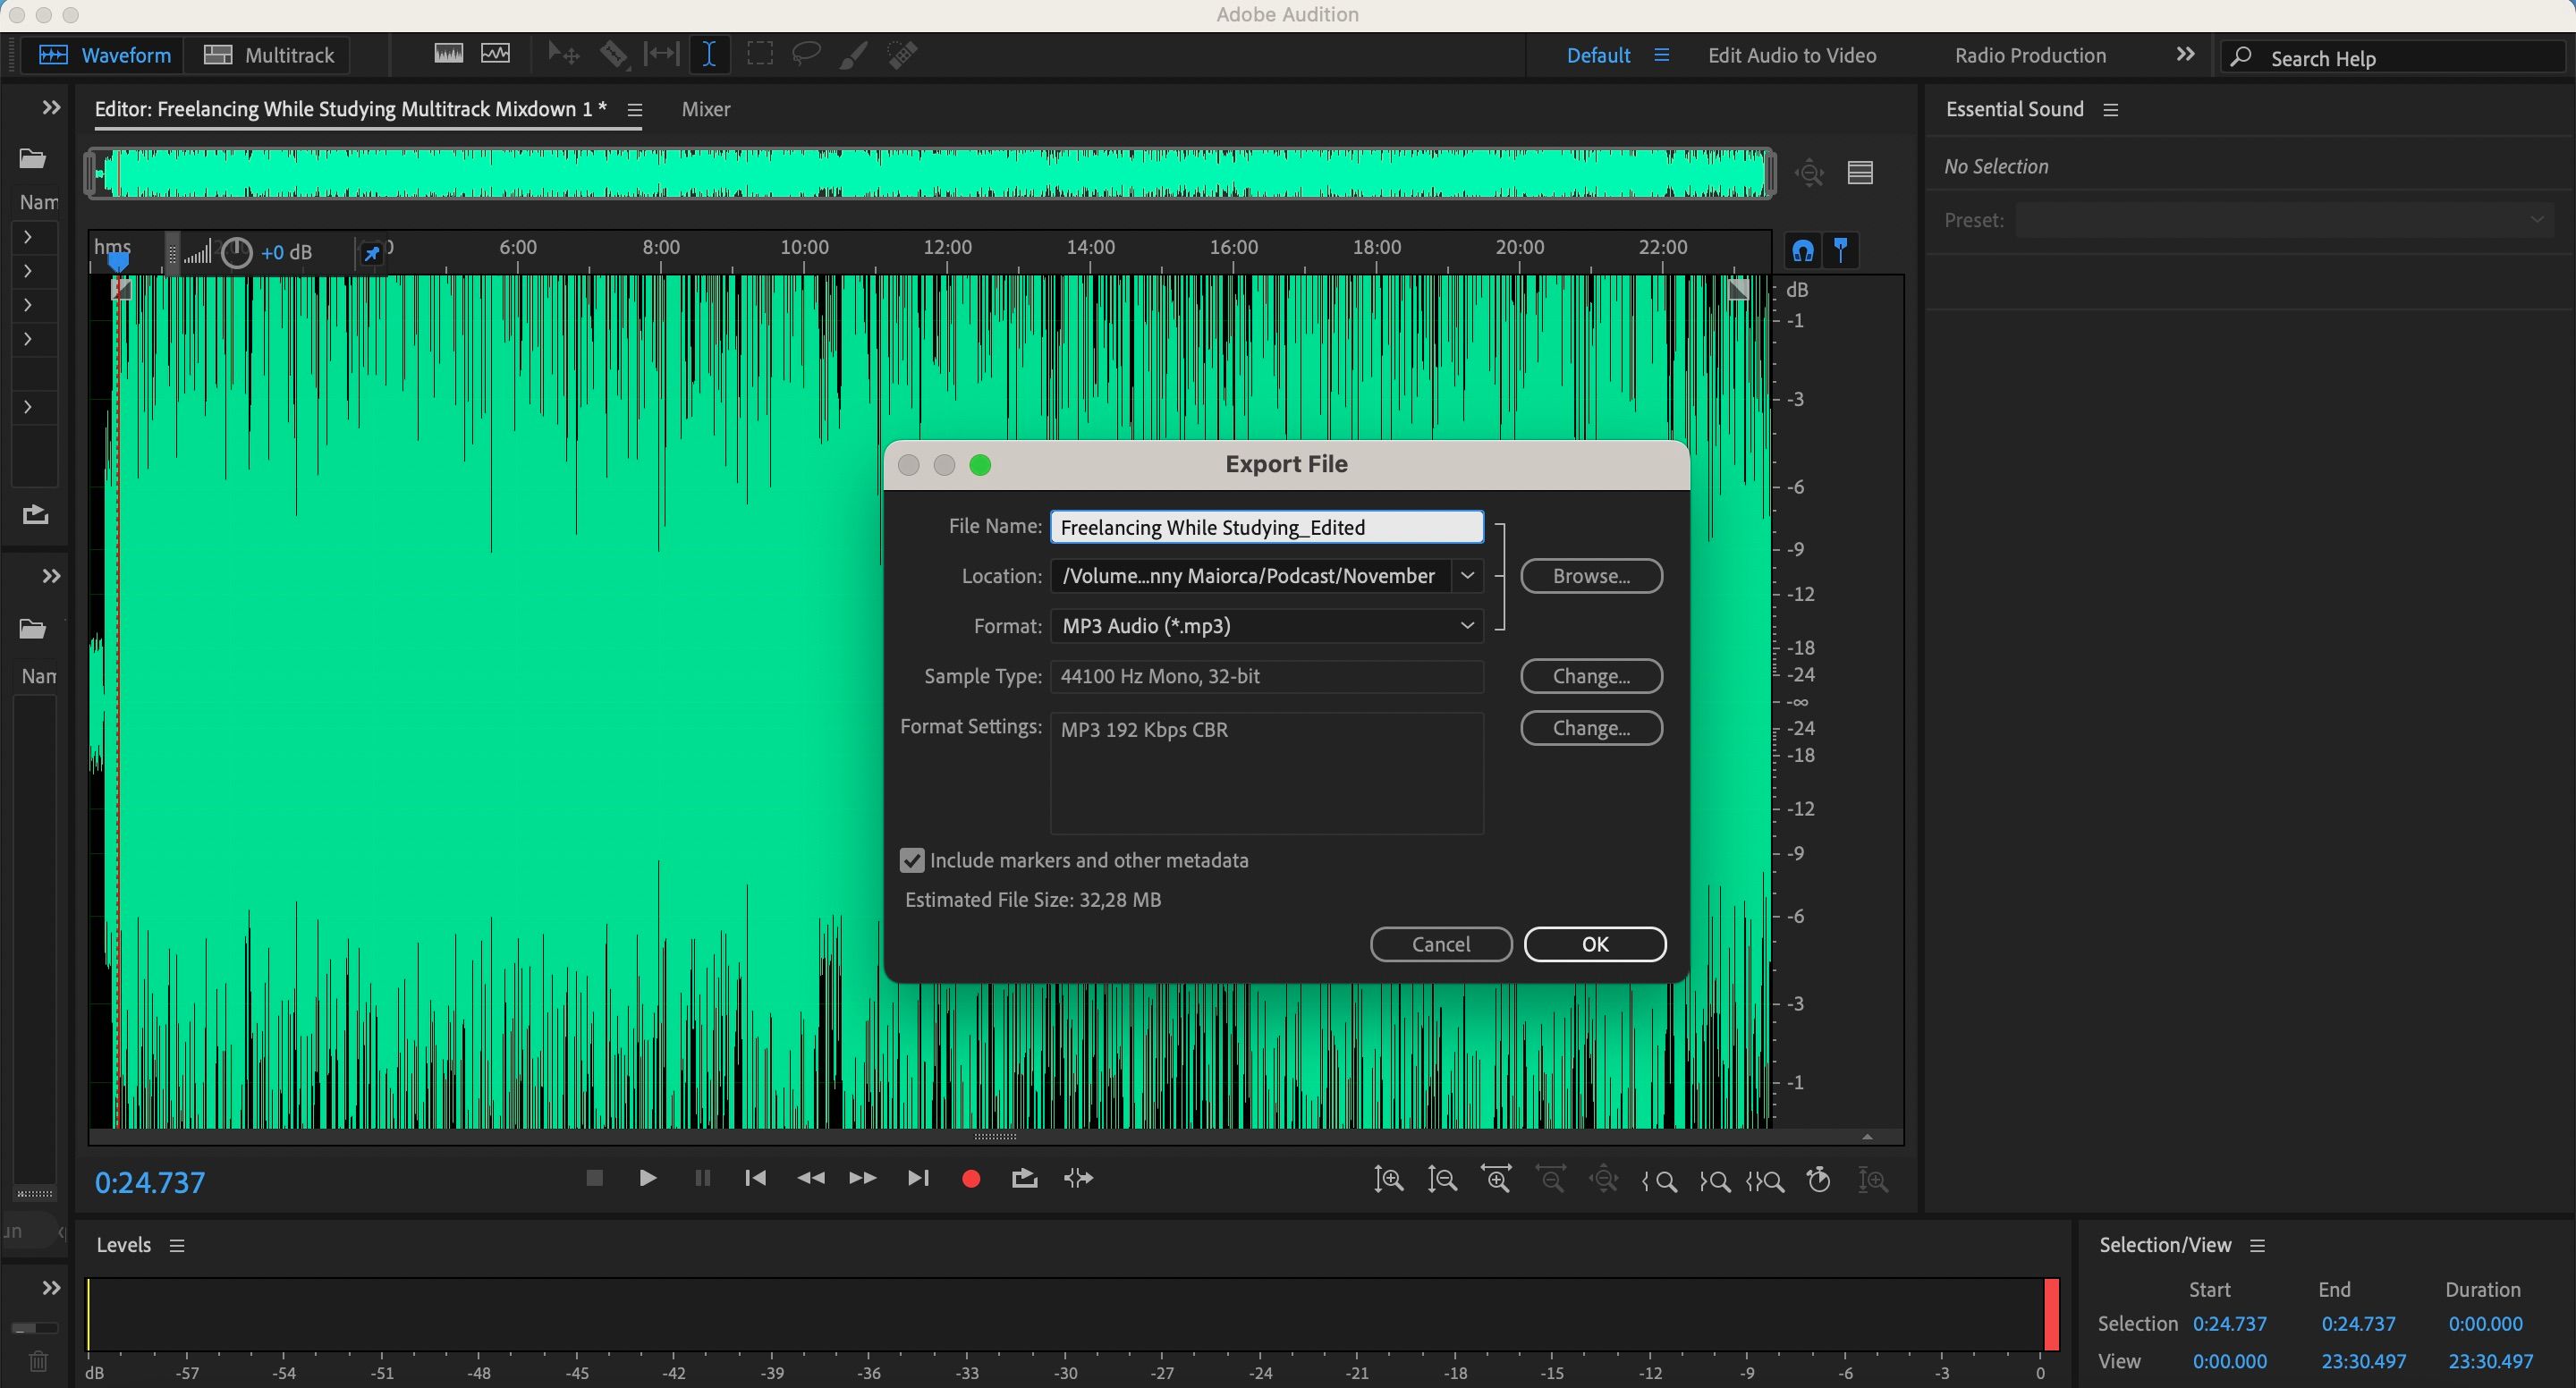
When you have your completed audio file, you can export it from Adobe Audition. Go to File in the top toolbar before clicking on Export > File.
Give your file a name and choose .mp3 as the format for the completed version. Again, you can click on Browse to choose where to save the edited podcast episode.
When everything looks good to you, press OK. The file will save to the place you chose. From there, you can upload it to your preferred podcast hosting platform.
Adobe Audition: Perfect for Editing Your Podcast Episodes
If you’re a beginner podcaster, this guide has given you everything you need to know about recording and editing your podcast episodes in Adobe Audition. How long it takes depends on the length of your podcast and how much you want to refine things.
Your editing speed will increase as you become more proficient with Adobe Audition. These tools are easy to find and use, so the learning curve shouldn’t take too long.


