Have you spent hours laboring over an art piece only to find that someone’s stolen it as soon as you uploaded it online? It happens, unfortunately. But we’ve got your back.
Here are four ways to add your artist signature to your artwork in Procreate. It will let others know that the art belongs to you.
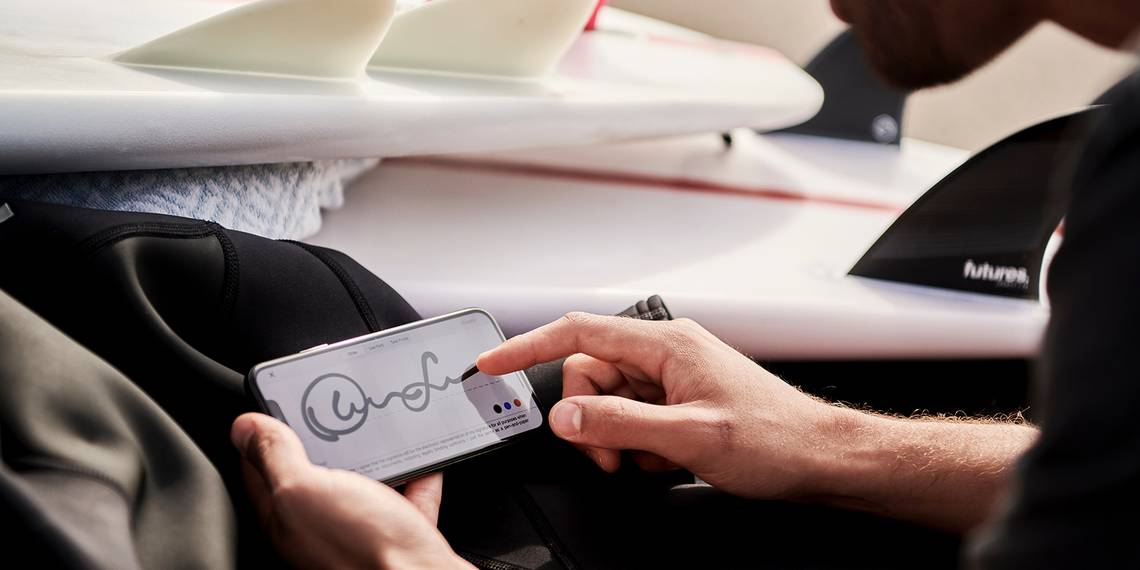
1. Write Your Signature
This technique is the simplest and most intuitive way to add your signature to your finished Procreate art piece. Signing artwork is traditional and authentic. You’ll find it on any traditional art or even digital prints.
Once you’ve finished your art piece in Procreate, open a new layer and find a brush that is easy to write with. The best writing brushes can be found under Sketching, Inking, or Calligraphy. You can download and install a Procreate brush or even create your own.

Choose a color, then sign your name. We think the best placement for your signature is in the bottom right or left corner, but it depends on the composition of the piece you’re signing. You can write or sign your name in a larger size, for ease, and then use Procreate’s Selection tool to resize, move, or rotate your signature.

The biggest plus of this technique is that it’s always authentic to you. It also gives each artwork an extra touch of personalization by having your name written in your own handwriting. It’s customizable each time you do it; perhaps you want to write edition numbers for prints or write a personalized message for the new owner of the art.
The downside to this method is that it can be frustrating to get your handwriting to look consistent—or neat—each time you write your signature. Using an Apple Pencil isn’t quite as fluid as signing your name in a real pen—sometimes it glitches or the loops might not be as tight as you want.
2. Create a Procreate Signature Brush and Stamp It
Most Procreate brushes are used in a sweeping motion rather than a stamping motion. But nothing’s stopping you from using brushes as stamps. You can create a brush out of your signature or artist mark, so all you’ve got to do is stamp it on your art when you’ve finished the piece. Easy.

To create a custom brush, create an artboard that is 3000px x 3000px. Delete the background layer by unchecking the box next to its name. Choose a brush or font and set your color to white.
Draw or write your artist name in your chosen style. Edit anything that may need changing and make sure that you’re happy with what you’ve drawn. Then go to Actions > Share > PNG > Save Image.
Go back to the canvas and click the Brush tool. To create a category for homemade brushes, click the blue icon with a white plus—you may have to scroll through the list of brush categories to see it. With the homemade category chosen, click the white plus on the gray background to create the brush.

In Brush Studio, go to Shape > Edit > Import > Import a photo. Since your brush drawing was saved without the background, the image will appear totally white in your photo gallery, but it should be the most recent saved image and easy to find. Choose your image and hit Done. Then you can further tweak your brush preferences.
In Brush Studio’s Stroke Path, turn the Spacing up to its maximum, and keep Jitter and Fall Off set to None.
Under the Apple Pencil properties, set Opacity to None. And under Properties, switch on the toggle for Use stamp preview. In Brush behavior, set the minimum size to None, but the maximum size can go pretty high. Generally, all the other settings are down to personal preference. Click Done and you can use your new stamp brush.

This technique takes some time to create, but once you’ve made the brush, it will be quick and easy to use on all of your art. You can change the color, size, and opacity of your brush which makes it convenient for any circumstance.
3. Use Procreate’s Canvas Information Feature
Inserting your signature via Procreate’s Canvas Information feature isn’t quite the same as signing your artwork. This technique adds your artist name and details as metadata to your file and anyone who accesses the .procreate file can see it.
This technique will help protect against copyright infringement without being visually distracting to your artwork, but you may want to pair this technique with one of our other methods.
With your finished artwork open, click Actions > Canvas > Canvas information. Type your name or artist name next to Made by and sign your signature or artist mark on the dotted line. Click Done.

4. Import Your Logo
Perhaps, instead of a handwritten signature, you prefer a logo. This is great if your logo includes image elements or designed letters, or if you just like consistency and a professional vibe.
Most commonly, vector logos are designed using Adobe Illustrator. In order to import your logo for use in Procreate, you need to make the background transparent and save your final logo in a PNG format for the best quality and transparency.
If you don’t yet have a logo but want to learn how to make one, we have an in-depth guide on how to create a killer logo. Once you’ve created and saved a transparent PNG logo, you need to AirDrop your file to your iPad so you can import it to Procreate.

Author's screenshot - no attribution.
In Procreate, open your finished artwork and add a new layer. Open the Actions menu, then go to Add > Insert a photo. Find your logo in the photos album—remember that the transparent background will appear white in this album, but it will open as transparent in Procreate.
With the transparent logo on its new layer, you can move and resize it to where it looks best. Once happy with the placement, save your named artwork. This method gives your artwork consistency every time.
Let Your Artwork Scream Your Name
You now have plenty of ways to add your artist signature to your work: Procreate brushes, logo importing, adding metadata, and the timeless act of just signing your signature. We hope you find a method that works for you and your art so viewers can always attribute your work to you, the artist and rightful owner.