Once you have set up a Nextcloud server on your Raspberry Pi using NextCloudPi, you will want to make it accessible via the internet from any location. This involves the use of port forwarding on your router and setting up a Dynamic DNS URL that will automatically stay pointed to your network’s public IP address, even if the latter changes.
NextCloudPi Web Panel
To make the required configuration changes to your Raspberry Pi Nextcloud server, visit the NextCloudPi web panel at https://[IP ADDRESS]:4443. Enter the username ncp and the password you noted down for it during setup.
Select letsencrypt from the left sidebar (under Networking) of the web panel. Add a valid email address in the Email field.
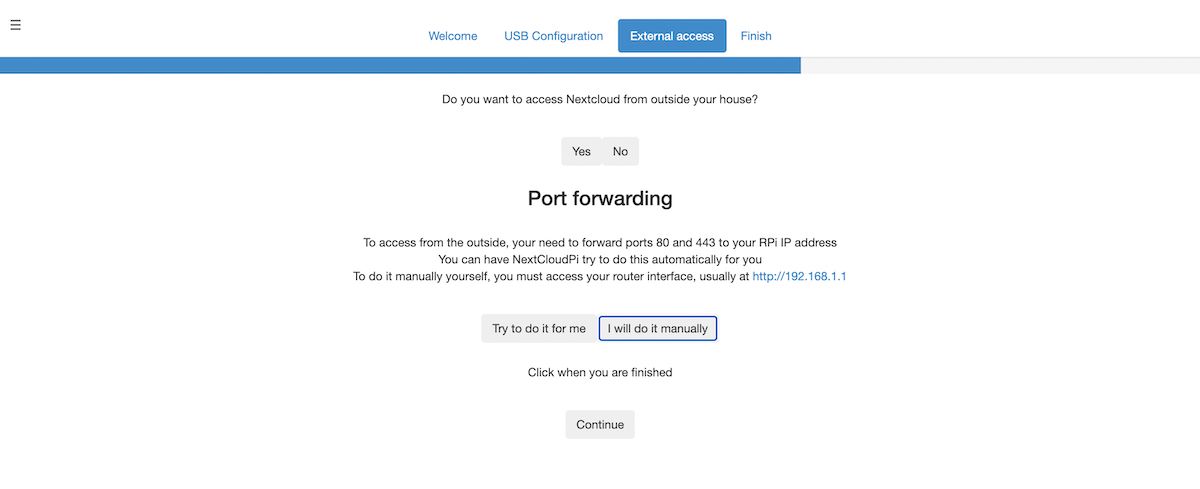
Now open the setup wizard (click the wand icon in the top toolbar) and select the External access tab. Answer Yes to the first question and wait a few seconds for it to be set up.
For Port forwarding, you can click Try to do it for me; if that doesn’t work, you’ll need to set up port forwarding in your Wi-Fi router’s settings (typically under Firewall). Forward ports 443 (HTTPS) and 80 (HTTP) to your Raspberry Pi Nextcloud server, using its IP address or name (nextcloudpi).
If your router doesn’t automatically reserve the same IP address for the device each time it connects, you can set up a static IP address on the Raspberry Pi.
Back in the wizard, click I will do it manually, then Continue.
You’ll need a Dynamic DNS provider in order to access the server from outside your network. In the DDNS section of the wizard, click the link to sign up for FreeDNS and enter your details.
Once you’re logged into FreeDNS, select Subdomains and choose to add one. Choose on one of the free domains available (we chose chickenkiller.com) and type in a suitable subdomain name (ours was pkingcloud). You’ll need your home network’s public IP address—to find it, do a Google search for ‘What is my IP’. With all the details filled, click Save.
Still on the FreeDNS site, select the Dynamic DNS option in the left panel. Right-click the Direct URL link for your subdomain and copy the link address. Paste this into a text editor and copy the hash: the long string of letters and digits after the ‘?’.
Back in the NextCloudPi wizard, select FreeDNS. Enter your subdomain in the Domain field, and your hash in the Update Hash field. Click Finish.
Your NextCloudPi Server Is Ready For External Access
By visiting the subdomain you set up in a web browser, you should now be directed to the Nextcloud server running on your Raspberry Pi. You can also access it from outside of your local network.


