3D print stringing is a problem where the extruded filament accumulates on the design in thin strings, or "hairs", as the nozzle oozes filament when moving from one end to another. These strings can create a rough look on the surface of your 3D printed object.
When you expect a smooth print that doesn’t require much post-processing, you get strands of melted filament around your design, making it difficult to achieve a good finish. After exploring the causes of this issue, we'll look at several ways to prevent stringing.
The Main Causes of 3D Print Stringing

Some of the causes of 3D print stringing include:
- Improper retraction settings: If your printer is not retracting correctly, the filament will continue to flow out of the nozzle even after the print head has moved to a new location. This can cause stringing, as well as a host of other issues.
- Improper nozzle temperature: If the temperature is too high, the filament will melt beyond the normal temperature and start dripping as the print head moves.
- Nozzle diameter too large: If the diameter of the nozzle is bigger than that of the filament, it will extrude more filament than required, leading to stringing.
- Wet filament: When the moisture absorbed by the filament starts evaporating within the nozzle during 3D printing, pressure will build up around the nozzle, resulting in filament splashing around the print.
There are various ways to prevent stringing in 3D printing. Here, we'll take a look at the main ones.
1. Use the Right 3D Printing Temperature

You need to adjust the nozzle temperature to get the correct one for your filament. If the temperature is too low, the filament may not be able to flow through the nozzle correctly. The filament can become too fluid if the temperature is too high, leading to oozing and stringing.
The ideal extruder temperature will vary depending on the type of filament you are using, as different materials require different temperatures to melt correctly. You should adjust the temperature by small amounts to get the best results and see which works best for your filament.
2. Increase the Retraction Speed

Retraction speed is the rate at which the filament pulls back into the nozzle of the 3D printer when it is printing a section of your object. It’s essential to increase the retraction speed so that the filament retracts quickly after printing an area of your part, so the filament won’t have time to ooze out of it.
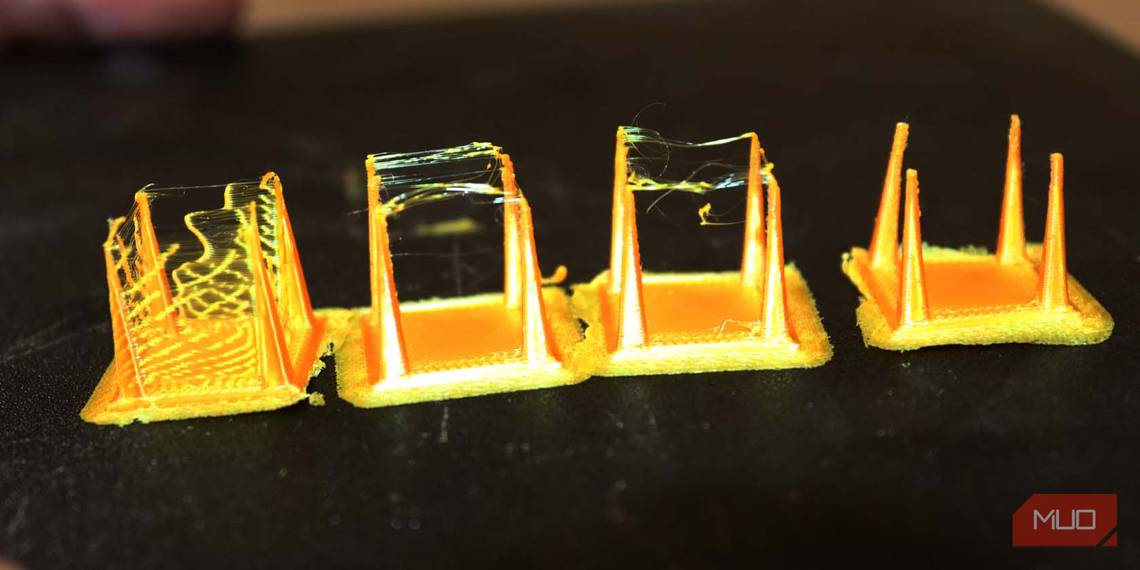
Retraction speed is measured in millimeters per second, and the standard value is usually between 30 and 60 mm/s. Try increasing the speed gradually until you get the perfect setting. If the retraction speed is too low, it will result in stringing. For example, in the image below, I used a low retraction speed of 10 mm/s.

You can see the test print came out with strings, both on the bottom and top sections.
3. Increase the Retraction Distance

The retraction distance is the size of the filament that is pulled back into the nozzle as the latter moves from one end to the other. When the retraction distance is high, stringing is not likely to occur. The retraction distance is usually between 2 and 7 mm.
When using a 3D slicing software like Cura, select the check mark on Enable Retraction, as shown below.

If it is not enabled, strings will be all over your design, and it will take you a lot of time to clean it up. I tried disabling the settings to see how it would turn out, and I got the print below.

You can use a retraction test print (from Thingiverse) to help you get the proper settings for your 3D printer to avoid increasing it much. When I used a low retraction distance of two, it printed the design below.

As you can see, it has a lot of issues. However, I didn't see many strings after increasing the retraction distance and speed to 7 and 50, respectively, as shown below.

These values are not specific to any printer or filament. You need to play around with your own settings until you find the correct one.
3. Clean the Nozzle Regularly

Clogs in the nozzle can result in stringing as the melted filament cannot flow properly, pushing the filament out of the nozzle and leaving behind the stringing pattern. Clogs can occur for various reasons, including a build-up of filament or even a dirty nozzle.
Unclogging your 3D printer nozzle is essential whenever you see signs of the filament not extruding properly. It is also vital to ensure that the filament is of good quality and free of debris or dust, as this can lead to clogs.
4. Adjust the Printing Speed

You need to set the appropriate printing speed on your slicer to avoid stringing. In the Cura slicer, for example, you can increase the speed from the normal 50 to around 55-60 and see if you still experience stringing.
Increasing the speed reduces the chances of stringing as the nozzle will take less time to travel, reducing the chances of leaving behind a filament. You can adjust the speed by small amounts while testing it to see which setting is perfect for your printer and filament.
5. Ensure That the Filament Is Dry Before Using

When the wet filament is heated, the moisture in it evaporates quickly, causing the filament to expand and become brittle. As the filament passes through the hot nozzle, the expanding moisture will cause it to extrude unevenly, resulting in stringing.
To prevent stringing, it is essential to take the necessary steps to keep the filament dry, especially by using a filament dryer or storing it in an airtight container, such as a vacuum-sealed bag, with a desiccant pack. You should also check the filament periodically for any signs of moisture and take action if necessary.
If you don't store your filament well, moisture will accumulate, and it can lead to it becoming damp and sticky, causing other 3D filament issues and mistakes that result in a 3D print failure. Having a separate container for each type of filament is also a good idea, as different materials react differently to moisture.
Produce Great 3D Prints Without Stringing
Stringing is a common problem when printing, and every 3D printer user will experience this issue at some point in their projects. Educating yourself on what causes stringing and how to avoid it is essential.
The above methods of prevention that we have highlighted are just some of them, and stringing can result due to other factors. If you try all those options and the issue persists, try replacing your nozzle or the entire extruder to see if that solves it.