If you have several SD cards (or other memory cards) around your office, home, or studio, you will need a place to keep them safe and easily accessible. This is important to avoid misplacing them, especially if they contain crucial data.
You can use various methods to make your card holder at home, and 3D printing is one of them. With 3D printing, it’s easier and cheaper, even though the initial cost of buying a 3D printer is high (unless you can borrow one). Not much experience is required. Follow along to learn how you can build this exciting project.
Why You Might Need to 3D Print an SD Memory Card Holder

Even though SD memory cards typically come with holders, you might need to prepare your own when:
- You have lost the original one: You might not get another easily after losing it, and the only way out is to create your own.
- When you want to have all cards in one place: Instead of having each card on its own holder, you can create one that can hold all of them together, saving you space, especially if you carry them in a bag.
- Add extra protection to your cards: Some SD memory card holders have spaces where liquids can enter easily. With 3D printing, you can create one that is waterproof.
- Show off your creativity: One of the main advantages of 3D printing is that you can customize any design based on your needs. For example, you can add your name, logo, or any other identifier that is uniquely yours.
- When you want a durable holder: Most of the holders that come with the SD memory cards don’t last. With 3D printing, you can use tough materials like ABS to print the holders so that if you step on them or drop them accidentally, they won’t be easily damaged.
The good news is that making your own memory card holder doesn't require many items.
What You Need to Make an SD Memory Card Holder

You need the following items to build a simple SD memory card holder at home using 3D printing.
- A 3D file: You can obtain this from various websites for 3D printing files.
- 3D modeling and slicing software: If you want to modify the files after downloading, you will need 3D design software. A 3D printer slicer is necessary for preparing the design for 3D printing.
- A pair of nippers: This is necessary for removing excess material from the print, especially 3D print stringing that might have occurred.
- Sandpaper: For smoothing the print.
- SD and/or other memory cards: For testing if the holder works as expected.
Once you have the above, you're ready to download the files, slice them, and print them.
Download the Files

There are various files available on various 3D printing websites that you can download for free and 3D print. Here are some possibilities for your SD memory card holder:
- SD card case by shadow8266 (on Thingiverse): This casing can store six standard SD cards and four microSD cards. It was designed in TinkerCAD software, and you can modify it based on your needs and requirements. You can get the files on TinkerCAD and start editing for free. The maker used a Creality Ender 3 printer for printing, a resolution of 0.4, and an infill of 20%.
- Print in Place SD Card Box (on Thingiverse): Another great SD card box that can hold one full-size SD card and eight microSD cards. It has a snap closure and an optimized lid covering the SD cards. You can check the YouTube video to learn more about how it works.
- Yet Another SD Card Holder (on Thingiverse): This was designed in SketchUp and can hold several SD cards. The maker used the Monoprice maker ultimate machine with a resolution of 0.25 and an infill of 15%. He also recommended using enough shells (three are sufficient) to ensure the design has thick walls.
- GoPro SD Card Holder (on Thingiverse): It’s the size of the GoPro Hero3+ camera and can hold five big memory cards and five microSD cards.
- Memory Holder (on Thingiverse): Able to hold memory cards of different types, it was designed by Jeff Shewmon. He recommends printing at 10% infill and a resolution of 0.3. No 3D printing supports and rafts are required.
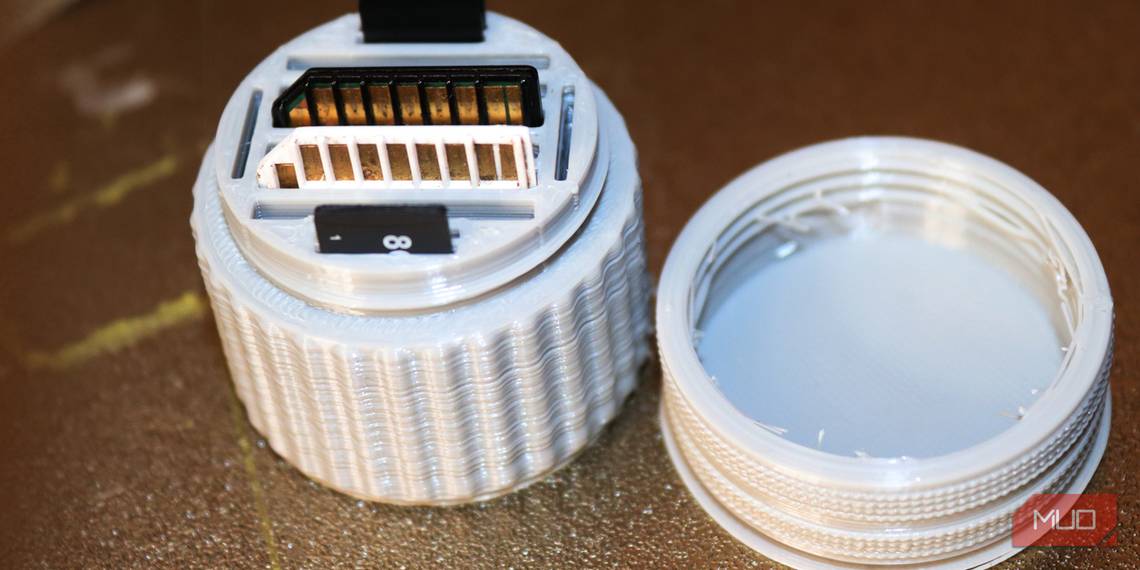
For our example project, we will use the SD card case by T.O.M., found on Thangs. Once you download the files, you must slice them to generate the G-code you will send to the printer.
3D Printing Instructions

The printing settings will vary depending on the printer you have, but below are the most important ones you should consider:
- Retraction distance and speed: Ensure that you use a retraction distance of between 5 and 7 mm and a speed of 40 and 60 mm/s to avoid stringing occurring, especially inside the lid of the holder as the printer moves from one section to the other. For this project, I used a distance of 6 mm and 55 mm/s. You can use a test print (from Thingiverse) to see the best settings for your machine before printing the holder.
- Infill: An infill value of 20% works well.
- 3D printing speed: You can use a speed of between 50 and 60 mm/s.
- Supports: Not required.
- Resolution: 0.1 mm should work well.
- Filament: PLA works great.
After 3D printing, you should proceed to post-processing.
Post-Processing the SD Memory Card Holder

When you finish 3D printing, you must remove any excess material from the design and make it smoother. Use a pair of nippers to trim away any unwanted parts, especially the material that might have built up inside the slots for the SD memory cards. As you do this, take caution to avoid removing important parts, especially inside the lid, as it can make it difficult to fit when you want to close it.

After that, use sandpaper to rub the card holder and the lid until they are smoother. If you don’t like the filament color used, you can also paint the print with the color of your choice. After following the above, you will have a card holder that is ready for use.
A Practical Way to Make a Simple SD Memory Card Holder
Making a simple SD memory card holder at home is simple, fun, and affordable, especially if you own a 3D printer and follow the steps above keenly. Once you finish creating it, you will never worry about losing or misplacing your SD or other memory cards again. It will also help you keep all your cards in one place, so you don't have to hunt for them when needed.