Welcome to the second part of "Speed Up Your Computer." If you haven't read the first part I highly recommend doing so. Finished? OK, let's move onto part two.
In the previous article on speeding up Windows, I talked about how to disable unnecessary Microsoft services that could easily slow down your system. Unfortunately yes, there are also non-Microsoft services!
The Other Unnecessary Windows Services to Disable
Sometimes, when installing applications, the software will automatically install a "useful" service to run in the background to make that application run better, only to slow down your computer because you don't use that application!
To disable these unnecessary memory hogs, simply:
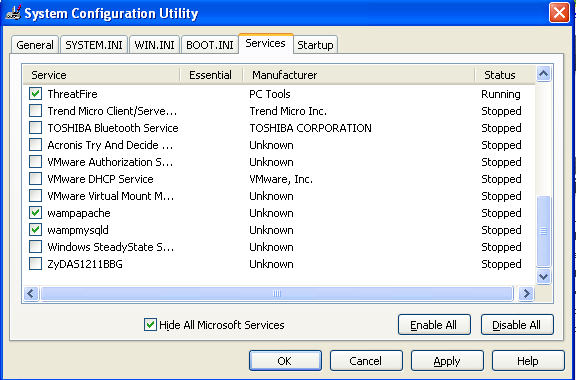
1- Go to "Start," "Run," and type msconfig.
2- Click on the "Services" tab and select "Hide All Microsoft Services."
3- You should now see a bunch of services that have been created by different pieces of software you have on your computer, of course just using memory you really do need. All you need to do is unselect the services you do not want running and click "Apply."
Disable Page File
Windows automatically uses paging files as somewhat of a seriously unnecessary "extension" of the RAM. In a much shorter tense (of the possibly extremely long explanation), if the paging file is disabled, your computer will likely run that much faster.
To disable the paging file (Note: disable paging file only if your have at least 1GB of RAM):
- Right-Click on "My Computer," and select "Properties."
- Click the "Advanced" tab, and then click "Settings" under the "Performance" section.
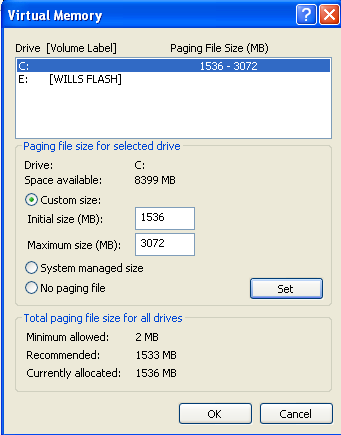
- Click the "Advanced" tab one more time, and then click "Change," under the Virtual Memory section.
- Click "No Paging File," and then click Apply button on all three windows. Done, the paging file should be disabled on the next startup.
If you do not have the suggested 1GB of RAM for disabling the paging file, you can still lower the consumption of the paging file for more memory.
It is not necessary for the paging file to be tampered with those under 1GB of RAM, but leaving the computer to automatically adjust the size of the paging file can be a really bad development.
One reason is that applications may take a much longer amount of time to load due to the automatic analysis and adjustment of the paging file size, and doing so may cause fragmentation errors. None of which are that helpful.
So, if you would like to increase the speed of your computer by limiting the paging file, you may do the following:
1- Right-Click on "My Computer," and select "Properties."
2- Click the "Advanced" tab, and then click "Settings" under the "Performance" section.3- Click the "Advanced" tab, and then click "Change," under the Virtual Memory section.4- Find the system's recommended paging file size as dictated on the line labeled "C:\" and multiply by 2.5. Simply enter those values into the Initial Size and the Maximum Size.
Automatically Remove Temporary Files On Shutdown
One thing Windows does great is creating temporary files for EVERYTHING! Nearly every single thing you do on the computer is logged somewhere in a temporary file that can be used for a bunch of different things, but it is quite unlikely that you will - for some reason - need to access your temporary files to load anything note-worthy, so it is probably OK to remove.
To automatically remove these files on shutdown, simply open Notepad and enter the following information in the file:
RD /S /q "C:\Documents and Settings\YOUR USERNAME\Local Settings\History"
RD /S /q "C:\Documents and Settings\Default User\Local Settings\History" RD /S /q
"D:\Temp\"
Simply replace the place where your username is requested and the D:\Temp\ directory where you Temp folder is. (If you are not sure where you temporary folder is go to "Start," "Run," and type %temp% to load your temp folder.
Now, save the file as whatever you like and wherever you like, except when saving select "All Files," instead of the default "Text Documents." Make sure to include .bat at the end of the filename to save it as a batch file.
Now follow the following steps:
- Go to "Start," "Run," and type gpedit.msc.
- Click "Computer Configuration" and then "Windows Settings."
- Click "Scripts," and then "Shutdown."
- Click "Add," and select the file you just created.
- Temporary files should be automatically deleted everytime you shutdown.
You are now on your way to the fastest computer in the neighborhood!
Stay tuned for more Windows tweaks in the next WinHacks post!


