
TrustedInstaller is a built-in user account in Windows 8, Windows 7, Windows Vista, and Windows 10.
This user account "owns" a variety of system files, including files in your Program Files, your Windows folder, and even the Windows.old folder created after you upgrade from one version of Windows to another.
To rename or delete these files, you’ll have to take ownership of them away from the TrustedInstaller user account. So, here's how to change file ownership from the TrustedInstaller to your regular administrator account and why you want to.
What Is TrustedInstaller?
The TrustedInstaller user account is used by the Windows Modules Installer service included with Windows. This service is responsible for installing, modifying, and removing Windows updates and other optional Windows components, so it has the exclusive ability to modify them.

How to Delete The Windows.old Folder?
If you’re trying to delete the C:\Windows.old folder after upgrading to a new version of Windows, and you’re seeing a message saying you need permission from TrustedInstaller, you don’t need to take ownership of the files at all. You just need to use the Disk Cleanup wizard.
To open the Disk Cleanup wizard, type Disk Cleanup in the Start menu search bar and select the Best Match.
Click on the Clean up system files button in the Disk Cleanup window.

If you have a Windows.old folder on your hard drive, you’ll see a Previous Windows installations checkbox in the list of system files you can delete. Enable the option and click OK. Windows will delete the Windows.old folder for you—ensure you've copied any important files out of it before running Disk Cleanup on it.
Taking Ownership of Files
The TrustedInstaller user account owns your system files. If TrustedInstaller prevents you from renaming or deleting a folder, it’s often for a good reason. For example, if you rename the C:\Windows\System32 folder, your operating system will stop functioning and must be repaired or reinstalled.
You should only take ownership of system files and rename, delete, or move them if you know what you’re doing. If you know what you’re doing, follow the instructions below to take ownership of the files.
Locate the folder or file you want to take ownership of, right-click on it, and select Properties.

Click the Security tab in the properties window and click the Advanced button near the bottom.

Click the Change link next to TrustedInstaller to change the owner.

Type Administrators into the box and click the Check Names button. Windows will automatically complete the rest of the name. This gives ownership to all administrators on the system. Click the OK button to save this change.

Enable the Replace owner on subcontainers and objects setting to apply these changes to all subfolders and files in them. Click the OK button at the bottom of the Advanced Security Settings window. Next, hit the Edit button in the Properties window.
Select the Administrators user and enable the Full Control checkbox to give administrator accounts full permissions to the files. Click the OK button twice to save your changes. You now have the ability to rename, delete, or move the files as you please.
If you find yourself regularly taking ownership of files, you may want to download a .reg file that will add a Take Ownership option to your right-click menu. You’ll then be able to take ownership of files and folders with a few quick clicks.
Check For TrustedInstaller Corruption Issues
If you were still unable to rename your files, it might be possible that the Windows TrustedInstaller is corrupted. System files are prone to corruption issues in Windows for various reasons, the most prominent ones being a recent Windows update, abrupt shutdowns, or malware.
There are a couple of manual ways that you can try to get rid of the issue. You can also use automated solutions. Check our list of free Windows automated repair tools for the best suggestions.
1. Run the System File Check (SFC)
SFC is a built-in Windows utility. It works by scanning your PC for errors and then tries to fix them. It's a handy Windows repair tool that you can use to fix other issues, too.
You'll need to use the Command Prompt, though.
Here's how you do it:
- Type cmd in the Start menu search bar, right-click on the Best Match, and select Run as administrator.
- Type sfc /scannow and hit Enter.

Your scan will be completed in a few minutes. SFC will take care of any issues that it finds automatically.
2. Run Windows System Restore
Like SFC, System Restore is an integrated system tool. It restores your computer to a previous state when it worked fine. Remember that to implement a System Restore, you first need to have a restore point in place, before things went south with your PC.
Here's how you can check if you have a previous restore point:
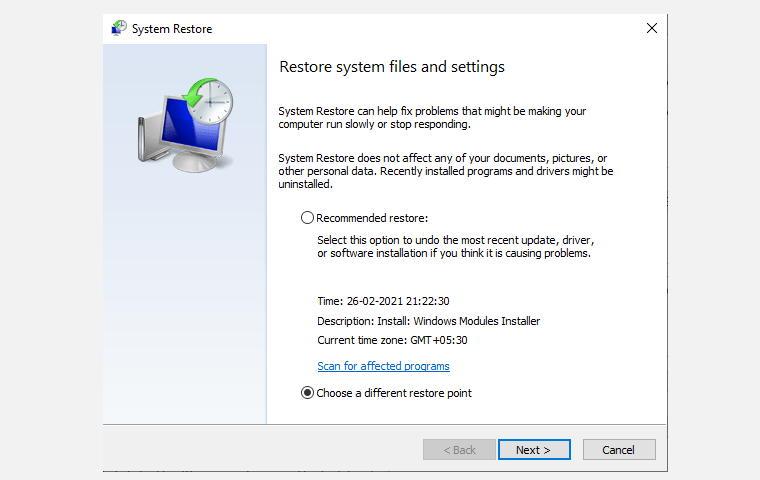
- Type system restore in the Start menu search bar and select the Best Match.
- In the wizard, select Choose a different restore point, and click on Next.
If you can see a restore point here, rejoice. It means sometime in the past, you created a restore point for your Windows (which we highly recommend), or if you didn't, your system did for you.
Now, select Finish to begin the System Restore. Soon, your PC will be restored to a good working state.
Should You Disable TrustedInstaller?
No, you shouldn't.
That's a bad idea. This comes from someone who learned this the hard way. TrustedInstaller indeed uses CPU resources, and while this might seem to you to be a good reason to disable it, it's not.
TrustedInstaller handles numerous other complex Windows system processes. If anything was to go south in your system files while you were tinkering, your whole system might get corrupted.
TrustedInstaller Is a Vital System Tool
Hopefully, now you know more about TrustedInstaller before you began this article. To sum everything up, it's a critical process that takes care of apps, installation, and manages updates in your Windows system. Although it can sometimes stop you from accessing certain files or feel like it is using system resources, it's an important system process.