If you've ever found your photos look different depending on which screen you view them on, or that you printed shots and had them come out far too dark, it's a sure sign that your monitor is not properly calibrated.
Calibrating a monitor ensures that colors are displayed accurately, as well as consistently across every display, even when printed.
But why exactly do you need to calibrate your monitor, and how do you do it? Let's take a look.
Why Do Monitors Need Calibrating?
A monitor uses the RGB color space, where each pixel combines a certain amount of red, green and blue to output a specific color.
RGB values for each pixel are contained within an image (or video, or any other graphical element). On displays that have been properly calibrated, the image will always look the same.

But if a monitor's Red value is set too high, then images will appear warmer. If the Blue value is too high then they will appear cooler, and so on.
This is where problems arise.
You can correct the color so that the image looks good on a single monitor, but as soon as you look at it on a different display — or someone else does after you share it online — the colors will be way off. Only by calibrating your monitor can you guarantee accuracy and consistency.
The most common consequence of poorly-calibrated monitors shows up in prints.
Monitors tend to have their brightness levels set quite high as it makes them appear more vibrant and appealing. However, a bright monitor also makes your photos look bright. If you reduce the brightness of the photos to a more realistic level, it will guarantee that your prints will come out too dark.

Most online print services will provide calibration images that you can use to set the correct brightness and color levels by eye to reduce these problems. Some will even have downloadable profiles you can use to set your monitor's values more precisely.
Doesn't My Monitor Come Already Calibrated?
Monitors may or may not have some basic calibration in the factory, but even if they did, it would likely not be accurate for a few reasons.
Correct calibration is dependent, to an extent, on the ambient lighting conditions, and you should always calibrate in the location you'll be using your display, and recalibrate if you switch to a different location.
In addition, the way that monitors display color can change over time, as they age, so they should be recalibrated every few months.
And there's also the marketing angle. Most users find bright, high contrast displays more appealing, so setting them to this by default makes them more attractive to potential buyers. For non-graphics use, this is perfectly fine too, but those who want accurate colors should never stick with the out-of-the-box settings.
How To Calibrate Your Monitor
So, you need to calibrate your monitor. You have two main choices: using software and doing it by eye, or using a dedicated hardware tool.
Plus there's a third option of using recommended values for your monitor that have been determined by other users who have already experimented with calibration.

The website TFT Central has a comprehensive crowdsourced database of calibration settings for a huge number of monitors. They include RGB, contrast and brightness values, and you can set them manually or install them automatically via a downloadable profile.
Software Calibration
There are two ways to calibrate your monitor by eye.
The first is to use calibration charts such as those at the Lagom LCD Monitor Test Pages. These consist of images showing scales of increasing RGB values, such as black to white incorporating multiple shades of gray. You adjust your monitor's settings until you can see clear separations between each scale.

The other method is via the calibration software that is built into your operating system.
Found in System Preferences on a Mac, or the Control Panel on Windows, these offer a more sophisticated version of the calibration charts that will adjust the color balance at an OS level, as well as enable you to tweak your monitor settings accordingly.

Both use wizard-based systems so there's no technical knowledge needed. You simply follow the instructions on screen. Once done, you can save your profile, but the changes are not permanent — if you're not happy with the results, you can repeat it until you are.
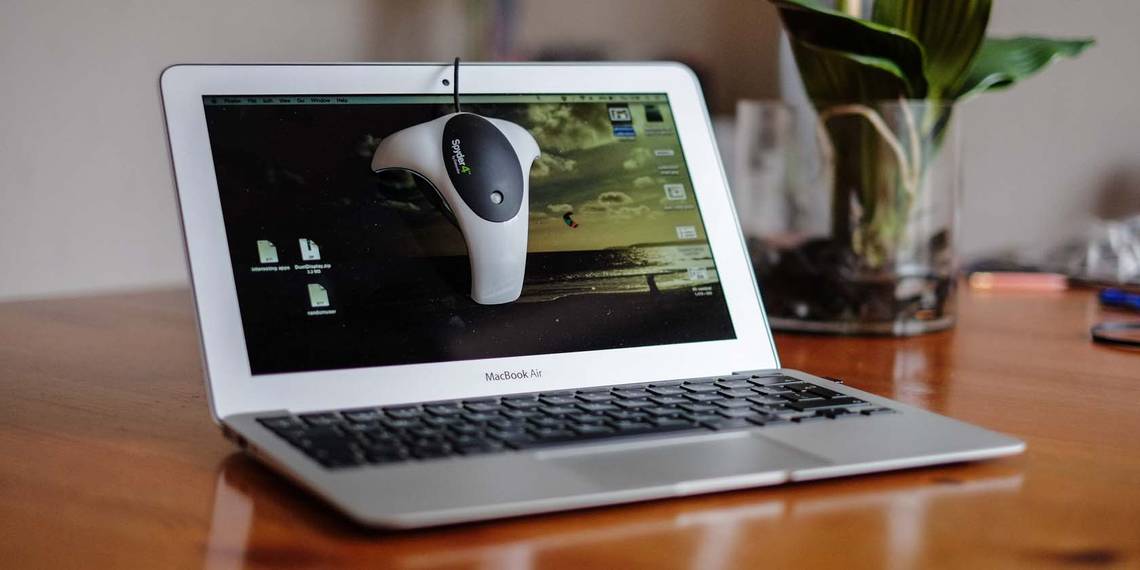
Hardware Calibration
For more accurate calibration, you should use a dedicated tool. The Spyder range of products from DataColor includes devices that will calibrate color for those who share their photos and video online, to those that will also measure ambient light to set the correct brightness levels for print and presentations.

Prices start at around $120 for the entry-level Spyder5Express. X-Rite is another popular brand with a similar range of products, like the CMUNSML ColorMunki Smile which goes for $89.
A calibration device connects to your computer via USB, and hangs over the front of your monitor while internal sensors detect the monitor's output. There's no real user interaction required, and over the course of five minutes or so the device will test and determine the correct color and contrast values for your system.

It's a simple process, and if you're a keen photographer or videographer it gives you the confidence that your finely crafted content will not be ruined by an easily fixed problem.
Wrap-up
Display calibration is something that many of us overlook, or aren't even aware of to begin with. But if you've ever wondered why your photos look weird, or even just why a movie you're watching is so dark, calibration is likely to blame.
Even if you only do a basic test using the built-in Windows or Mac software, or one of the online services, you'll get far better performance than by leaving your monitor on its factory settings.
And if you're serious about making your photos or other graphics looking good, then a dedicated device is not only affordable, but well worth the investment.
Have you ever had problems with your prints not coming out how you expected? Have you calibrated your monitor, and if so which tools did you use? Let us know in the comments below.
Image credits: RGB color model via Wikipedia, Calibration chart via s2art