Even if you're a seasoned macOS user, there are probably some great features you don't use enough. But what if we told you that some of them are hiding in your Mac's Parental Controls menu?
And you don't even have to be a parent to take advantage of them. That's right -- just like the accessibility options in macOS, the Parental Controls menu offers some handy controls not seen elsewhere. We'll show you how to access them and the best ones to try.
How to Access Parental Controls
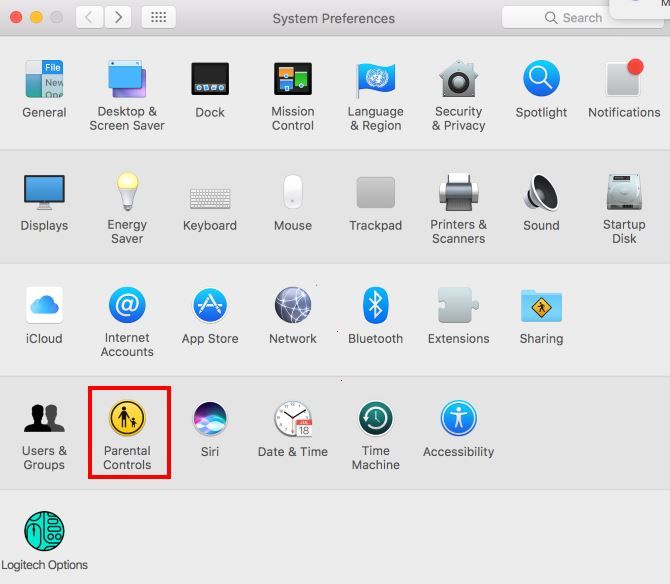
To get started with Parental Controls, visit the Apple Menu in the upper-left corner of your screen and select System Preferences. Then, select the Parental Controls option. It's a yellow icon with outlines of a parent and child inside.
Assuming you're the only user on your Mac, you'll then see a note that there are no user accounts to manage. Indeed, parental controls only work on a non-administrator account. Thus you need to either create a new user account with parental controls, or convert your own account to a controlled account.
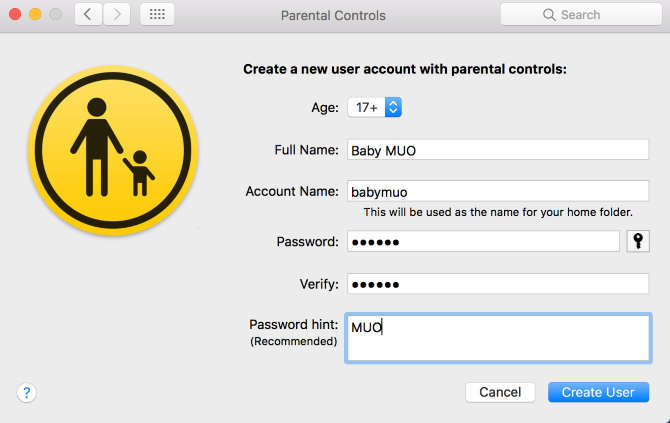
Since you probably like your account the way it is, we recommend creating a new account. See our guide to macOS accounts for more info. Select the Create a new user account with parental controls option and hit Continue.
Next, you'll need to create an account on your Mac for parental controls. This is pretty basic: specify a name, username, and password just like you would for a normal account. You also must enter an age range: 4+, 9+, 12+, and 17+ are your options.
Your Mac will preset some options based what you select here, so go ahead and choose 17+ since you're not actually creating an account for a child.
Click Create User to enter the Parental Controls menu proper.
Parental Controls Basics
Before we jump into the best tweaks, let's take a brief tour of the menu so you know what all is here.
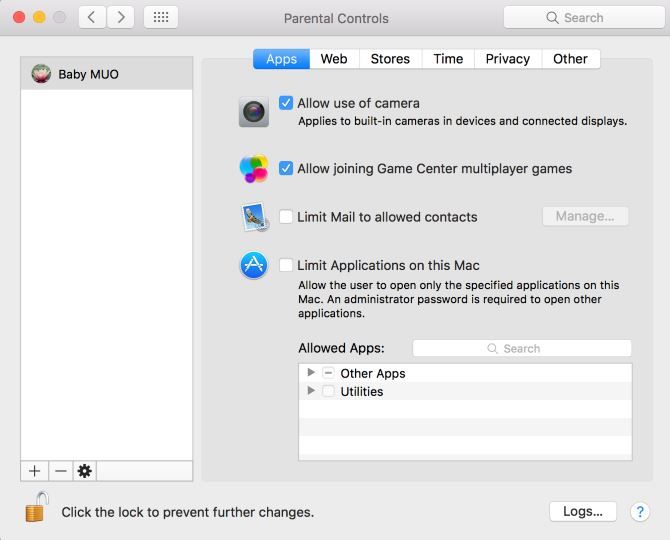
When you open the Parental Controls menu with a managed account ready, you'll see it (plus any others) on the left sidebar. You can adjust the available settings individually for each user: just click a username to make changes to that account. Click the Settings gear at the bottom of the left bar to copy settings to a different account or remove parental controls from it entirely.
The Parental Controls menu is split into six tabs:
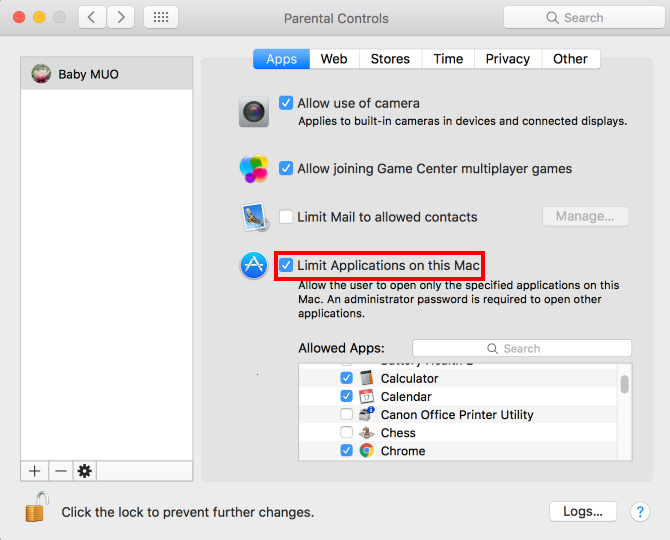
- Apps: Contains controls that limit what apps or people the account can contact.
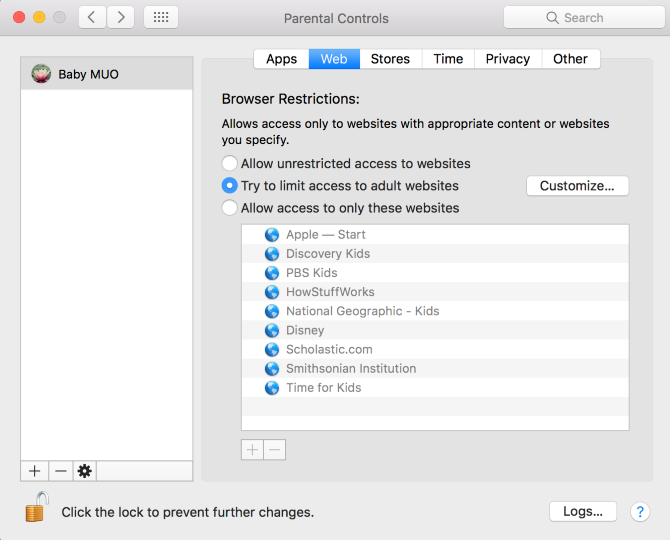
- Web: Lets you restrict access to websites.
- Stores: Come here to block access to certain ratings of content or disable access to entire stores.
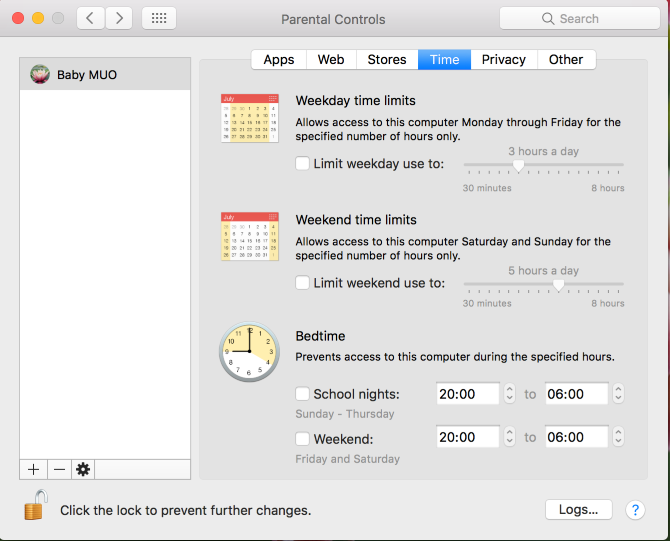
- Time: Set limits on how much the computer can be used, and specify bedtimes to prevent access after-hours.
- Privacy: Prevent apps that the account uses from accessing sensitive information like contacts or location.
- Other: A collection of extra settings. Includes disabling Siri, restricting inappropriate words in the Dictionary, preventing changes to the Dock, and enabling Simple Finder.
While all these options could be useful for managing children, we've selected the most useful tweaks you can make with this menu for your own use.
1. Disable Your Webcam
Here's a simple solution to a common security risk. Your webcam poses a risk to your privacy because if someone gained access to it, they'd be able to view everything you do. How would you feel knowing some creep was watching you undress, and what if you held your credit card near your computer?
That's why unless you're using it, you should disable your webcam. You could find out what device is using it nefariously, but it's easier and safer to just kill it outright.
To do so, head to the Apps tab and uncheck the box for Allow use of camera. Note that this will obviously prevent FaceTime from making video calls.
2. Limit Applications for Another User
Many uses for limiting the available apps on your computer exist. For instance, someone might need to use your computer for a while -- maybe they need access to Safari, but there's no reason for them to go poking through your photos or pop open a Terminal window. Or maybe you're trying to stay productive and don't want to open non-work apps.
Whatever your reason, you can limit the programs an account is allowed to open on the Apps tab. Check Limit Applications on this Mac and you can hand-pick the allowed apps. Under Other Apps the system will check some of the basics for you, such as App Store, Calculator, and iMovie. But you can make any changes you'd like -- search for an app using the box nearby if you can't find it in the list.
Combined with the Prevent the dock from being modified option on the Other tab, you could use this to fill the Dock up with a specific list of apps.
3. Filter Adult Websites
You'll find plenty of ways to filter inappropriate sites on your computer. Some of them involve making tweaks to your router or DNS settings, while others come from paying a third-party security suite. But flipping one setting in the Parental Controls menu can filter out a ton of explicit content with minimal work.
Flip to the Web tab and you'll see three filtering options:
- Allow unrestricted access to websites doesn't filter anything online.
- Allows access to only these websites lets you add a hand-picked list of sites that the account can visit. Anything else simply won't work.
- We're interested in the middle option: Try to limit access to adult websites.
This applies an automatic filter to edit out the worst of the web. You can click the Customize button to add lists of sites to always allow or always deny, handy if you find one that gets through the filter or a false positive. Of course, no automatic filter is 100 percent perfect, but this is still a huge help.
4. Limit Time Spent on Your Mac
Think you spend too much time on your computer? Though it's meant for limiting kids' screen time, you can take advantage of the Time tab to prevent yourself from using your own Mac too often.
Using the Weekday and Weekend time limits options, you can control how long the account can use the computer. Anywhere from 30 minutes to 8 hours will work. The Bedtime option kicks you off after a certain time of night and won't let you back on until morning. If you have a tendency to work too long into the night, this can help you go to bed on time.
5. Make Navigation Easy With Simple Finder
Located on the Other tab, the Use Simple Finder option makes your Mac's file system easier to navigate. For comparison, here's what the standard Finder view looks like:
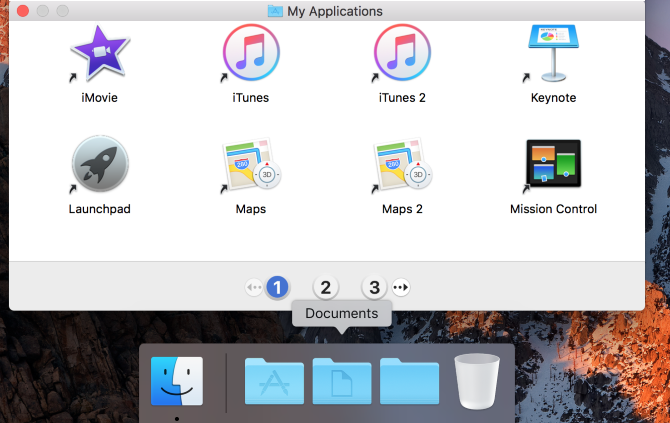
And here's how Simple Finder changes it:
You can't even open Finder normally. You're limited to My Applications, Documents, Shared, and the Trash. The numbered navigation buttons are more obvious and you can't delete applications. This option also hides any documents living on the desktop.
This probably isn't an option you'd want for your everyday account, since it limits what you can do with Finder. But it's a great option for making a computer easier to use for an elderly person, or limiting someone's access to what's on your computer.
Parental Controls Without the Parenting
Now you know the secrets of this oft-forgotten menu in your Mac's System preferences and how to use it to your advantage. You might not get use out of everything here, but the options above are definitely worth taking a look at. And if you have kids, try some controls here to make your Mac safer for them to use!
Continue increasing your Mac knowledge with the best tips and tricks for using Safari.
How do you use your Mac's parental controls? Is there another useful setting we didn't cover in detail here? Tell us in the comments!

