A couple of weeks ago I wrote an article in which I described some of the features I particularly liked about Vista. However in the comments Justin and anob pointed out that a couple of the features I had mentioned were not actually Vista specific.
I decided it was time to teach myself how to really use one of Vista's best new features"¦ Windows Search.
Yeah, I know"¦ wow, exciting stuff. It's not something I used to care about either. I remember whenever I heard Microsoft banging on about the gee-whiz search capabilities of Vista I really didn't care as I was stuck in Win32/XP style navigation; of menus and forms and tabs. Why would I be interested in changing what was already working for me?
This year however I got to a point where the standard folder system just wasn't working for me.I'm a university student and I've been keeping my files and folders organized pretty well, but after spending so much time constantly navigating through folder after sub-folder I finally got sick of it and I started looking for something more productive.
The strange thing is that it takes so little effort to get used to using the integrated Windows search, it just takes a bit of time spent re-adjusting old habits.
I hope this guide can help you to do just that as I will be covering how you can use utilize Windows Search. Part one involves setting Search up to function optimally, Part two involves how best to use the many capabilities of Search itself in your organisation.
1) Updating Search
The very first thing I recommend you do is download the new Windows Search 4.0 and update your system (this applies to XP as well).
With Vista there is no new features or changes to the User Interface but the Windows indexing technology will be working significantly faster. (If you are using XP then you will see a whole new search interface, and I would suggest you download this update if you haven't already.)
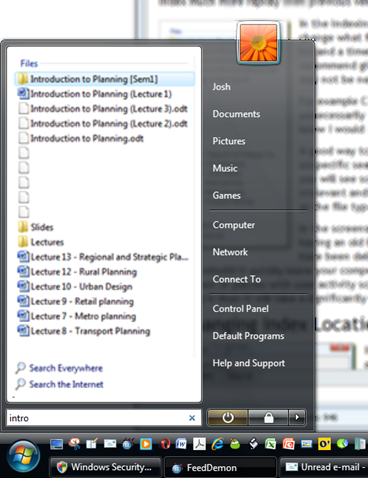
After updating you can then modify the search options with the Indexing section of your Control Panel. The easiest way to access it is by simply typing '"Index" into the start menu.
2) Optimising the Index
Here is the place where you can change exactly what Search indexes and when it indexes. You can also rebuild it from scratch, something I would recommend every 2 - 3 months. Without this, old files that no longer exist will hang around in the index messing up your searches and slowing it down. You'll find Windows Search 4.0 will rebuild your index much more rapidly then previous versions.
In the indexing options, "˜Advanced' options will allow you to change what file types are included in the index. It's a long list and a time consuming task to do properly, but I would recommend giving a quick skim through the list to see what may not be necessary.
For example Command and Conquer game campaign files were unnecessarily included in mine, as were text files which I knew I would never need to search for.
A good way to find what files you don't need is to run a unspecific search and take a look at the results. Chances are you will see some kinds of files included which are fairly irrelevant and unnecessary, right-click these and take a look at the file types in the properties panel.
In the screenshot below you can see the problems with having an old index. Here are fragments of old files which have been deleted but are still included in the search. If you want to rebuild it quickly leave your computer running all night. Background indexing slows down or pauses with user activity so if you only have your computer on when you are using it then it will take a significantly longer period of time to complete a full index.
3) Changing Index Locations
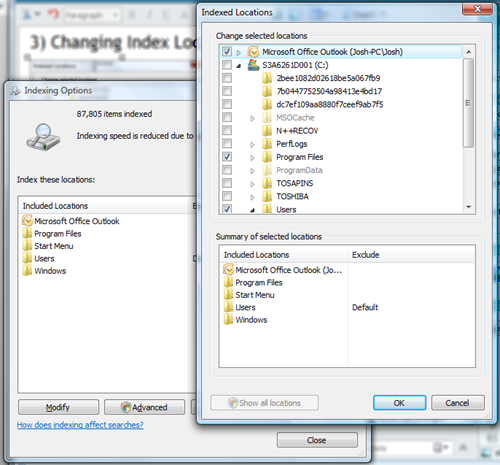
In 'Indexing Options' you can also change the areas of the hard drive which you want indexed.
The modify button takes you to the options, but you will have to reveal 'all locations' in order to get a complete overview such as I have in the screenshot here.
I would suggest excluding certain areas of the hard drive from indexing. For example I have no need for all the System32 files to be included.
It's up to you how you want Search to work, but I suggest you optimise it to suit just the files you will always be wanting to call up quickly. If you do need to search for other rarely needed files or system folders the Search will still find them, just a little slower.
4) Changing the Default Windows Search
If you have Vista SP1 then it's now optional to use Windows search as the default indexing service. You can change it to any third-party indexing technology such as Google Desktop.
Setting it as the default is now as simple as opening up the "Default Programs" panel then associating the search protocol with the third-party service you want. You will also need to set this program as the default.
I hope this helps you get the most accurate search results as quickly as possible. Some of it's pretty basic I know, but in part two I will be going through how to search using filters, saved searches and virtual folders which will make your organisation a whole lot easier.
image credit: Windows Search 4.0 Image © Microsoft 2008


