Android 8.0 Oreo, the newest tasty dessert for your phone, brings some refreshing updates to Android's notification system. In prior versions, thanks to third-party apps, you could snooze and group notifications. But Oreo packs that and more into Android without you having to install anything extra.
Let's take a look at how notifications have changed and how you can take advantage of the new features.
Notification Channels Explained
The most important change comes with a new feature called notification channels. This doesn't have anything to do with subscribing to TV channels. Instead, notification channels let you decide how important different types of notifications are. And with apps updated for Android Oreo, you can even change settings for different types of notifications within an app.
It's pretty exciting, but easier to understand with an example. Let's take a look.
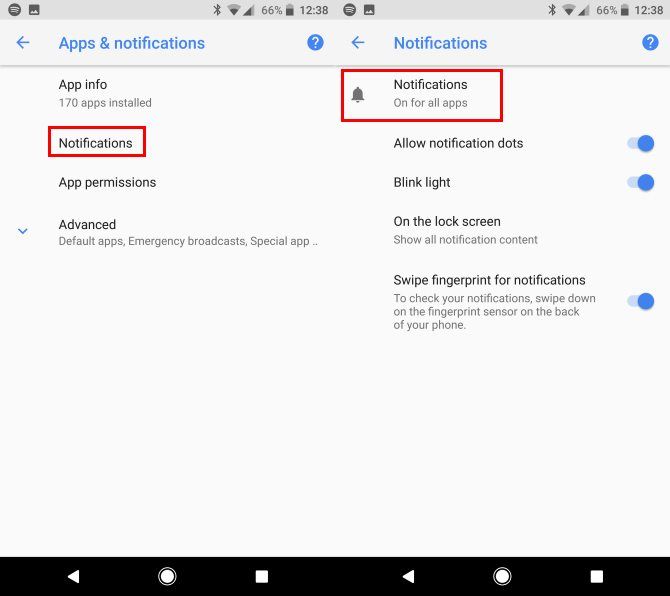
First, open the Settings app on your device and tap the Apps & notifications category. On the resulting page, tap the Notifications entry, then again hit the Notifications option with a bell icon next to it. This will bring you to a list of all your apps.
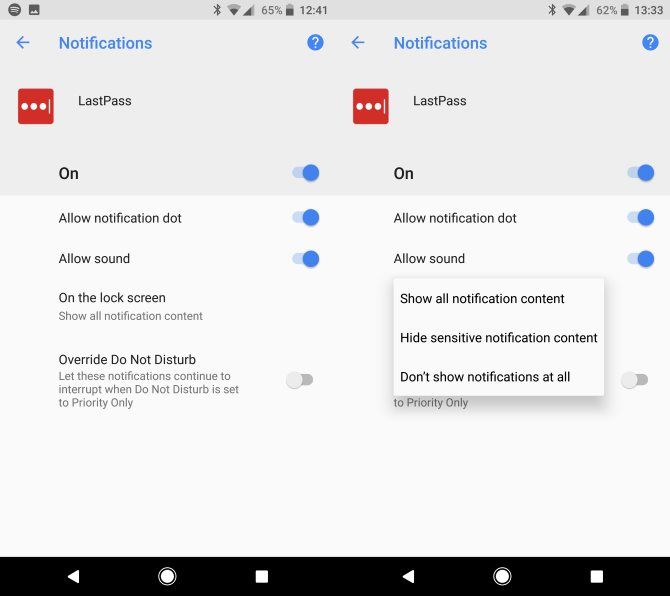
Next, you'll need to find an app that supports the new Oreo notifications. If it doesn't, you'll see a few basic options. LastPass, shown below, is an example of an app that's not updated for the new system.
For apps like these, you can completely disable notifications if you like. You also have the option to turn off the sound, let it override Do Not Disturb mode, or change how it displays notification content on the lock screen. While you can also toggle these options for apps that support the new system, this isn't terribly exciting.
Let's take a look at an app that supports notification channels, like Twitter.
Tweaking Notification Channels
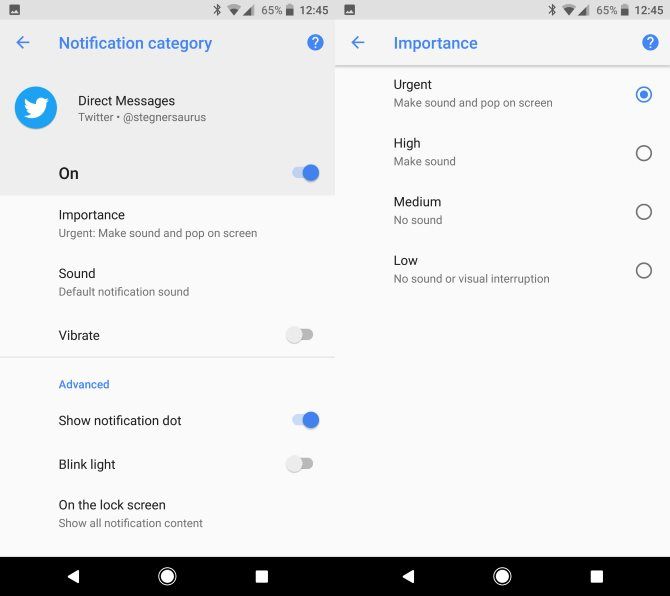
Notice how many more options Twitter provides than LastPass?
This page groups the notification types into categories, like Direct Messages and Tweets from people you follow. These will differ depending on the app you're viewing; the Uncategorized option is a catch-all for other notifications. You can fine-tune each one just the way you like it, or even disable it. Tap a category to adjust settings.
The Importance setting changes the most about its behavior. You can choose from four levels:
- Urgent: The notification will make a sound and pop up on your screen to ensure you see it.
- High: You'll hear a sound, but the notification won't interrupt what you're doing.
- Medium: The notification will appear in your tray, but it won't make a sound.
- Low: At this level, the notification won't appear in your bar. If it's a persistent notification, it goes to a small stack below the rest of your notifications. This makes it a good way to hide the new "running in the background" notification.
You can decide how important a notification is to you. For instance, you probably want direct messages to grab your attention so you don't miss someone getting ahold of you, so set it to High. But you don't really need Twitter to distract you when you've gained a new follower. Set that to Medium, and you'll see it later when you look at your notifications.
For each category in a given app, you can also change its sound, vibration, lock screen, and Do Not Disturb settings. Adding a unique notification sound to an important notification will let you know what's up without even looking at your device.
Adjusting Live Notifications
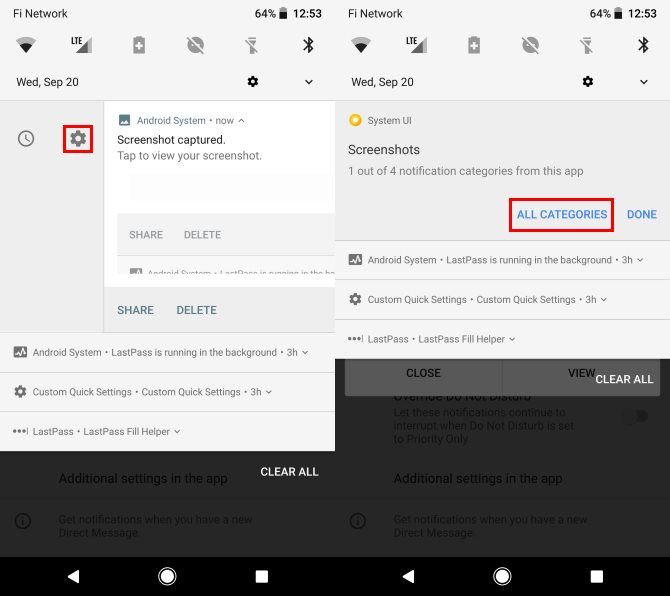
If you get a notification that you want to tweak but aren't sure which app it's coming from, Oreo has you covered there. Next time you see such a notification, pull it slightly to the left or right and tap the gear icon that appears. Don't swipe it too far, or you'll dismiss it. Once you tap the gear, press All Categories to open that app's notification settings.
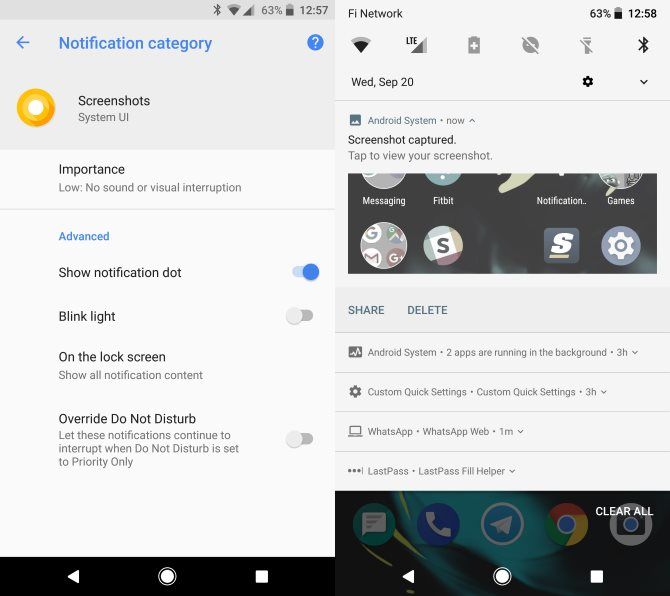
Here, you can toggle the category that launched the annoying notification. In this example, I don't need a notification in my tray every time I take a screenshot. So tap on Screenshots to change options for just that notification. Change the Importance from Medium to Low, and you won't have to see an icon for a screenshot every time you take one.
Low priority notifications that are persistent, like the LastPass Fill Helper, live below the standard notifications. These take up less space, and you can swipe them away or pull down to expand if needed.
Snoozing Notifications
Aside from Notification Channels, Oreo has another notification-related tool for you. How many times have you left a notification sitting in your tray for half a day so that you didn't forget about it? Sometimes a notification comes in that you don't want to dismiss, but don't have time to deal with right away. Now, you can snooze these for later.
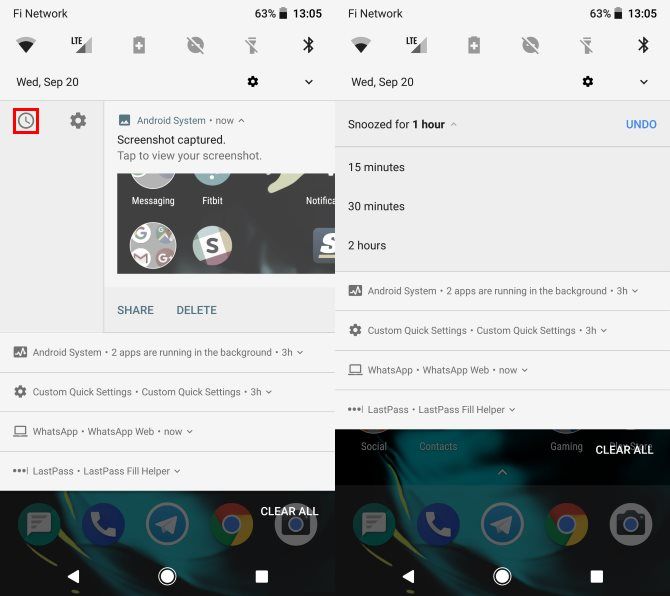
It's easy to do. When a notification comes in, slide it slightly to the left or right to expose the clock icon under it. Don't slide too far or you'll swipe the notification away. Tap the clock icon, and you'll snooze the notification for an hour. After that time, your phone will show you the notification again.
If an hour isn't a good amount of time, tap the 1 hour text and you'll see other options like 15 minutes and 2 hours. Select one of them to change how long before you see the notification again.
This saves you from having to dig through your notification history and reduces clutter in your bar.
Don't Have Oreo Yet?
These new notification options are awesome and let power users tweak exactly how their phone can get ahold of them. But they're only available for Android Oreo users, which many users won't see for several months.
If you're using a Nexus or Pixel device, you can update to Android Oreo now. Check for updates by visiting Settings > About Phone > Software update to see if it's ready to arrive over-the-air (OTA). If not, you can try using the beta workaround. Should both of those fail and you don't mind getting a little technical, you can also manually flash Google's OTA images to your phone.
Those without a Google device are out of luck for now. Your best bet is using a third-party app to mimic some of the new notification options in Oreo. It won't be as expansive as the stock feature, but it's something. Check out why Android phones take so long to get updates if you're curious as to why this is a problem.
Notifications Galore
Now you know how notification channels give you more control over what notifies you on Android. They definitely take a bit of getting used to. But after you've got everything set up just the way you like it, you'll know that you won't miss an important notification, and that low-priority notifications won't be grabbing your attention.
Want to get more out of notifications? You should set them up to sync with your Windows, Mac, or Linux computer.
What do you think of Android Oreo's notification channels? Have you made any major customizations with them that you'd like to share? Please let us know your thoughts in the comments below!


