More and more of our information is being stored on our computers, devices, and online. We've covered how to secure your iPhone, but you also need to secure your computer, especially if it's a laptop. People can gain access to your Mac, private files, and sensitive information if you aren't careful.
Today we'll look at 20 ways you can secure your Mac to prevent your data falling into the wrong hands. Don't panic if you don't use all these methods — some are better than none!
Disable Automatic Login
The automatic login feature on your Mac is convenient, allowing you to sign into your account automatically. However, it is not secure. You might as well have no password on your account (which is not recommended).
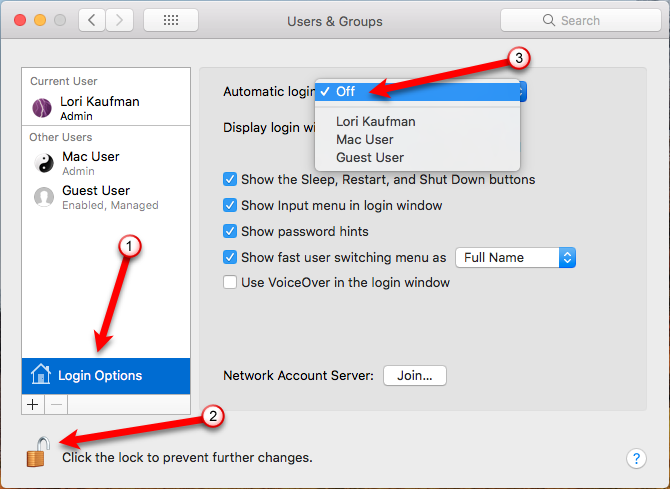
You really should disable the automatic login feature. To do so, go to Apple > System Preferences and click Users & Groups. Then, click Login Options at the bottom of the list of users on the left.
Next, click the lock at the bottom of dialog box and enter your password when prompted. This allows you to make changes to the settings.
Select Off from the Automatic login dropdown list. You will have to enter your password every time you boot your Mac, but a little inconvenience is preferable to someone getting into your account and accessing your data.
Protect Your User Account With a Secure Password
Now that you've disabled automatic login, make sure you have a secure password on your user account. When setting up a Mac, you are asked to enter a password for your user account.
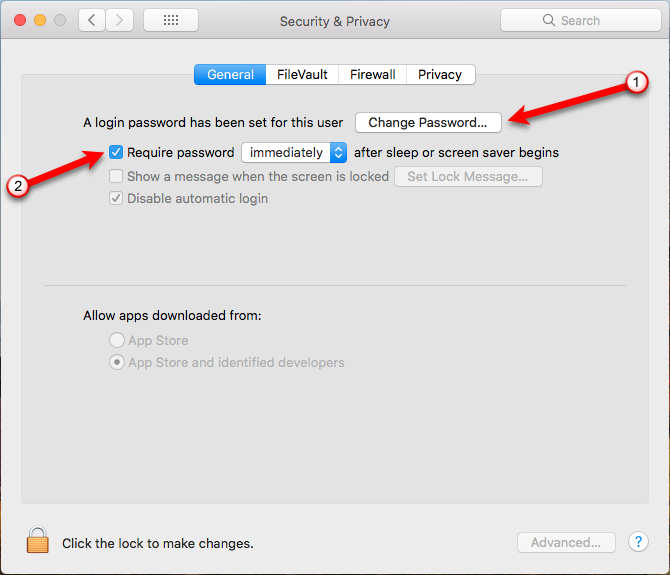
To keep your account secure, it's a good idea to change your password periodically. Go to Apple > System Preferences and click Security & Privacy. Make sure the General tab is selected and click Change Password.
Note: If you've forgotten your account password, there are ways you can reset it.
On the popup dialog box that displays, enter your Old password. Then, enter the New password you want to use and Verify the new password. Enter a Password hint to help you remember your new password. Click Change Password.
You should also password protect your Mac when it goes to sleep or when the screen saver begins. To turn on this setting, check the Require password box. Select how soon after your Mac goes to sleep, or the screen saver begins, to require the password to get back into your account. It's a good idea to choose Immediately, especially if you're in a public place, or anywhere there are other people around.
If you need to briefly step away from your Mac, you can easily turn on the screensaver immediately using Hot Corners. To assign a hot corner to starting the screen saver, go to Apple > System Preferences and click Desktop & Screen Saver. Then, click Hot Corners in the lower-right corner of the dialog box.
The Active Screen Corners dropdown dialog box displays. Select Start Screen Saver from the dropdown list for the corner you want to use and click OK.
To activate the screen saver, drag your mouse to the corner you chose. The screen saver immediately starts.
Use a Password Manager
Practically all our information is online today, and we need passwords for almost every service we use online. With the following password guidelines you should follow, it's hard to remember every password for every service we use.
- Every account should have a unique password.
- Use strong passwords with a mix of uppercase, lowercase, numerical, and special characters.
- Change your passwords frequently.
Unless you have a photographic memory, you need to use a password manager. Many password managers can create strong passwords for you and store them. We've compared five password managers, including LastPass and Dashlane. If you're concerned about the LastPass breach, we've covered the best alternatives to LastPass and how to migrate from LastPass to other password managers.
Image Credit: iqoncept /Depositphotos
Make Sure Find My Mac Is Activated
Find My Mac allows you to protect and find your lost or stolen Mac. You can locate your Mac, lock it, or erase all its data with your Apple ID and another computer or your iPhone.
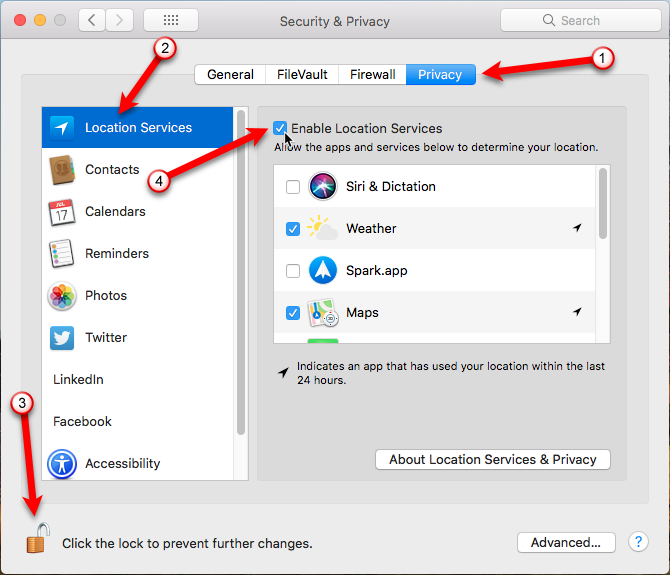
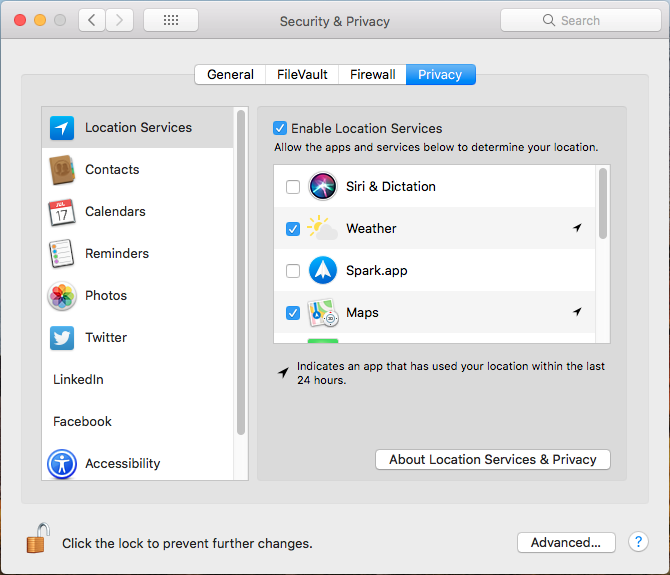
Before activating Find My Mac, you must enable Location Services. To do that, go to Apple > System Preferences > Security & Privacy. Click the Privacy tab and then Location Services.
Click the lock at the bottom of the dialog box and enter your password when prompted to be able to make changes. Then, check the Enable Location Services box. Click the lock at the bottom again to prevent further changes.
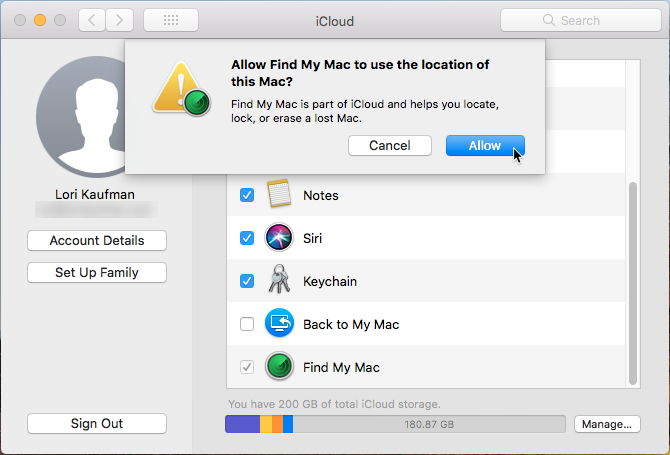
Once Location Services is enabled, click the left arrow at the top System Preferences dialog box to go back to the main screen. Then, click iCloud.
On the iCloud screen, check the Find My Mac box at the bottom of the list, if it's not already checked. Click Allow when prompted.
Now, if your Mac is lost or stolen, you can locate it, lock it, or erase it from your computer or another iOS device.
Make Sure the Guest User Account Is Enabled
Why should you allow someone who stole your Mac to use it? The Guest account works in tandem with the Find My Mac feature. If someone finds your Mac, you can locate it if that person logs on as a guest (because that's the only account they can access), and gets on the internet using Safari.
So, in addition to making sure the Guest account is enabled, see the Make Sure Find My Mac is Activated section above to enable Find My Mac.
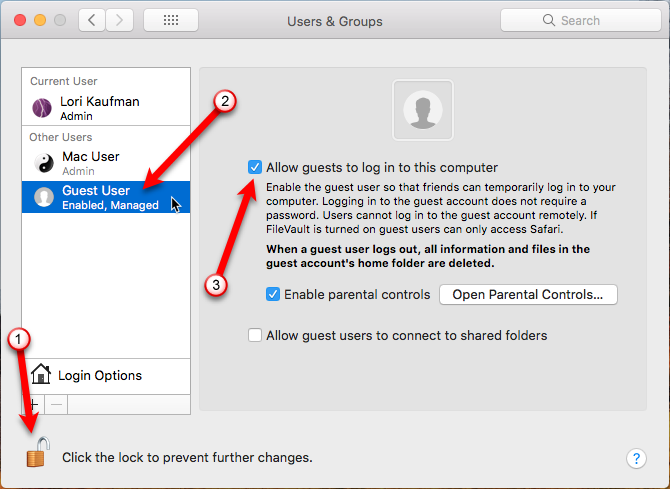
To make sure the Guest User account is enabled, go to Apple > System Preferences > Users & Groups. Click the lock at the bottom to make changes. Click Guest User in the list and then check the Allow guests to log in to this computer box. Click the lock again to prevent further changes.
Enable the Firewall
The firewall on your Mac is turned off by default. Isn't that insecure? Yes and no. Your Mac's firewall blocks incoming traffic to specific apps. So, the firewall is only useful if you have apps on your computer that you want to restrict in terms of incoming information.
So, you don't necessarily need a firewall to secure your Mac. However, it's easy to turn on if you want to enable it, and we cover how to configure it.
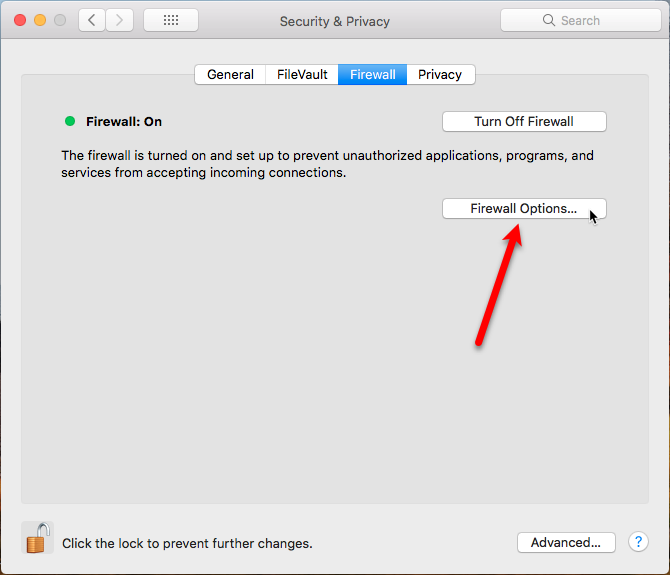
To turn on the firewall, go to Apple > System Preferences > Security & Privacy. Click the Firewall tab and click the lock at the bottom and enter your password to be able to make changes. Then, click Turn On Firewall.
To configure the options for the firewall, click Firewall Options.
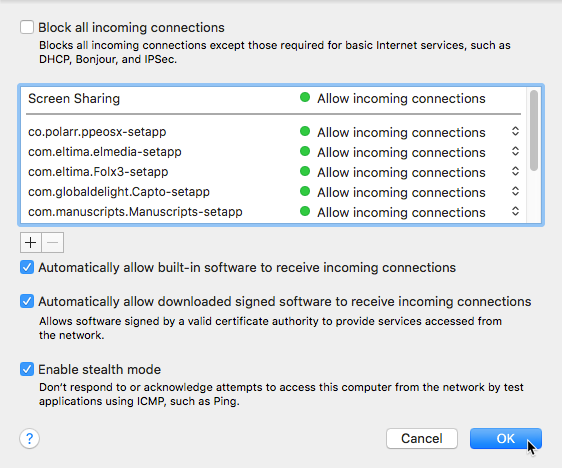
You'll see a list of apps and services that are able to receive inbound connections. You can add to the list using the plus icon below the list. You might have to do this if you run and app and it gives you an error saying that it has been prevented from accepting an inbound connection.
See our article for more information about configuring your Mac's firewall.
The built-in firewall on your Mac only blocks inbound traffic. However, it doesn't allow you to control outbound connections, that is apps and services that initiate connections. For example, if you download a piece of malware, your Mac's firewall won't prevent it from connecting to the internet and sending out information.
We recommend additional firewall apps that provide control over incoming and outgoing connections, as well as which apps can send and receive information over the Internet. Use of a third-party firewall app can prevent malware from compromising your Mac's security by allowing you to block outgoing connections in addition to incoming ones.
Enable Full Disk Encryption Using FileVault
FileVault is a built-in utility on your Mac that encrypts all the data on your hard drive. When FileVault is enabled, the contents of your drive cannot be accessed without a login password or recovery key.
FileVault is off by default, as most users may find that encrypting the entire drive is a bit overkill. The inconvenience of having to type a password to open a file and the extra time required to initially encrypt your entire drive may outweigh the security FileVault provides.
If you mainly use your Mac at home or in other mostly secure environments, FileVault may not be the ideal security solution. Consider some of the other options we present in this article. However, if you want, or need, the extra security, FileVault is easy to turn on and set up.
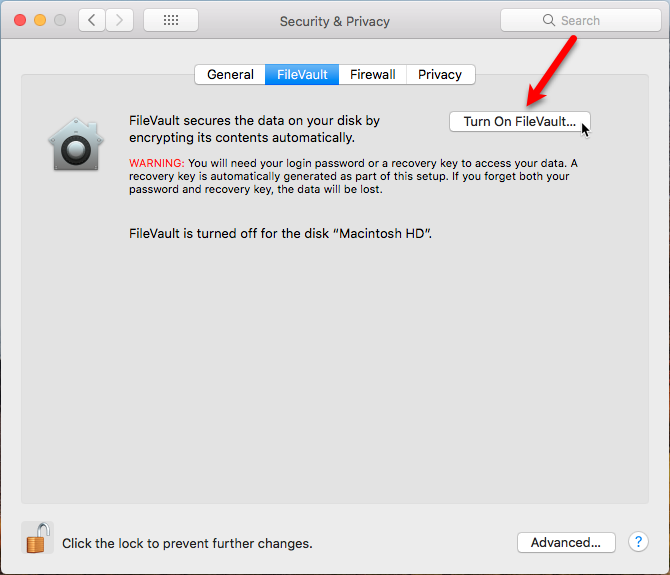
Go to Apple > System Preferences > Security & Privacy and click the FileVault tab.
Click the lock at the bottom to be able to make changes and enter your password. Then, click Turn On FileVault and follow the instructions to set it up. Be sure to store your recovery key in a password manager (see the Use a Password Manager section above). Your recovery key is the only way to access your data if you forget your password (which you should also store in a password manager).
Create an Encrypted Vault
On a Mac, DMG files are usually associated with installing apps. However, you can also use DMG files as encrypted vaults to store sensitive files and folders. This feature is like using a program like VeraCrypt on Windows.
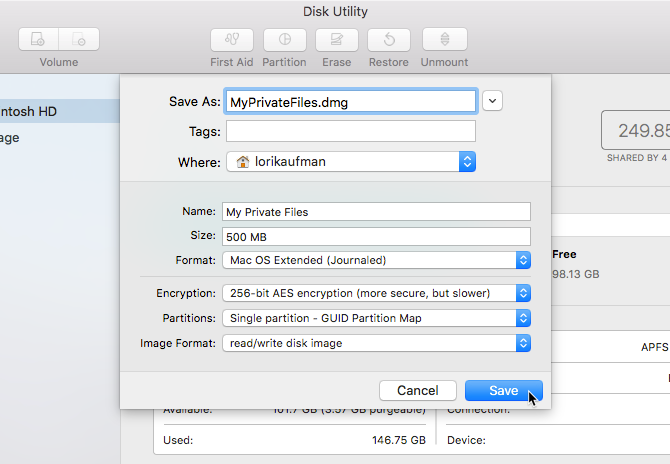
You create DMG files using the built-in Disk Utility app, located in the Applications/Utilities folder. Once you've opened Disk Utility, go to File > New Image > Blank Image and enter the information for your DMG file, including the file name in Save As, Where to save the file, and the Size.
Be sure to select the Encryption type and enter a password when asked to secure the DMG file.
Once your DMG file is created, it's automatically opened. It shows up in Finder and on the desktop as another drive. Move your private files and folders into the DMG file. To lock it, eject it from its desktop icon like you would any external hard drive connected to your Mac. To open the DMG file again, double-click on the file and enter your password.
Password Protect Files and Folders
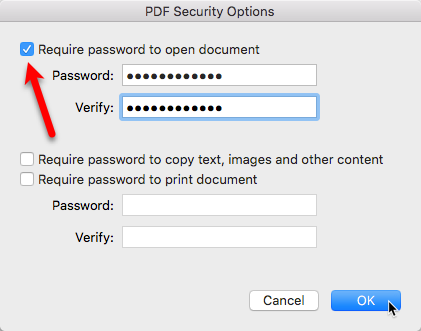
There are other ways to protect the data on your Mac. You can password protect your files and folders in several different ways. We cover how to password protect different types of files, like Microsoft Office files (Word, Excel, PowerPoint), iWork files (Pages, Keynote, Numbers), and PDF files. You can also password protect folders using a few different methods.
Back Up Your Data
You can use all the methods we mention here to secure and protect your data. If your Mac is lost or stolen, you can lock it or erase the data. Then, what do you do? Your data is gone, right? Not if you've backed it up.
Your Mac includes a very useful backup solution called Time Machine. If you're using a large capacity external hard drive, you can partition it first, using one partition for the Time Machine backup and the other partition to store files.
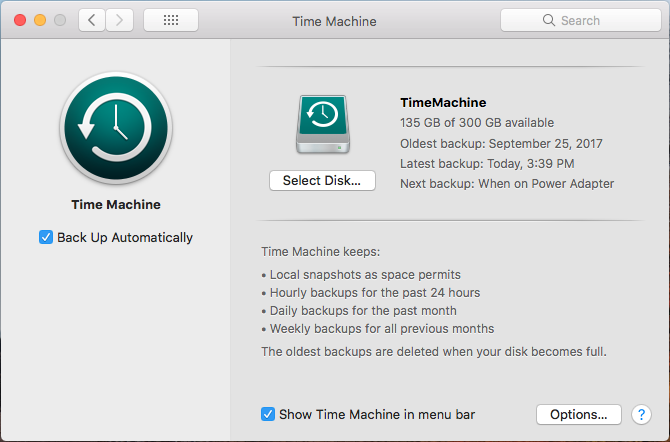
Once you've partitioned your external drive, go to Apple > System Preferences > Time Machine. We've covered how to set up and use Time Machine.
After the initial backup, you can automatically start a backup with Time Machine (check the Backup Up Automatically box). If you want to start a backup manually before an automatic backup happens, check the Show Time Machine in menu bar box. Then, access the Time Machine menu and start the backup from there.
If you'd rather not use Time Machine, you can choose a different solution for backing up your data. We also cover the ultimate triple backup solution for your Mac.
When you need to recover your data from a backup, there are three ways to get your files from a Time Machine backup.
Check Your Security & Privacy settings
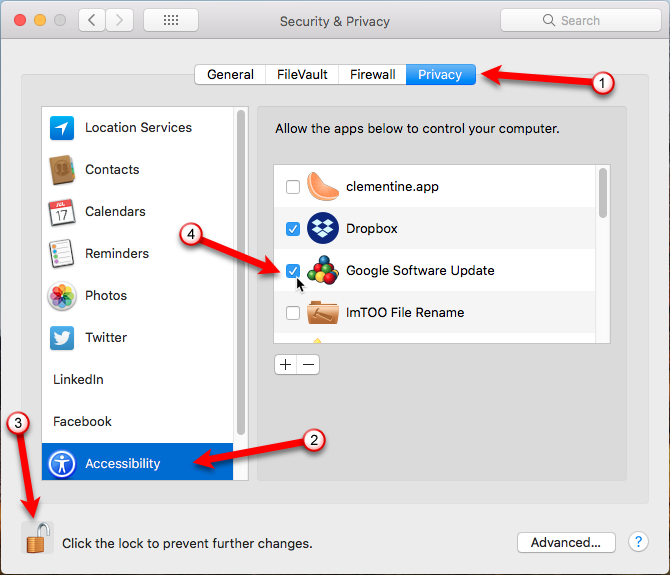
We mentioned the Privacy tab on the Security & Privacy preferences screen briefly when we talked about enabling Location Services for the Find My Mac feature earlier in this article. The Privacy tab allows you to control which apps have access to specific data on your Mac.
You can disable Location Services completely on the Privacy tab, but remember that Find My Mac will not work if you do. It's better to just disable individual apps in the list on the right.
The apps listed on the left, like Contacts, Calendar, and Reminders, allow other apps to access the data stored in them. You can specify which apps have access to that data.
You can add your social media accounts, like Facebook, Twitter, and LinkedIn, in the same place in the System Preferences as adding email accounts. On the Security & Privacy screen's Privacy tab, you can choose which apps have access to the information in your social media accounts.
The Accessibility section of the Privacy tab is different from the Accessibility options available from the main System Preferences screen. The Accessibility options on the Privacy tab allow you to control which apps can control your Mac in some way. You may notice that some apps may not work until you enable them on this screen.
Keep Your Software and System Up to Date
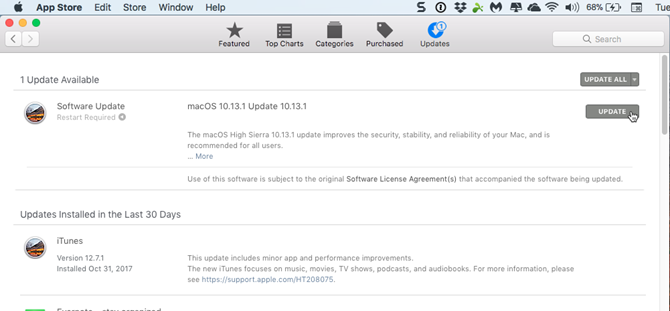
Outdated software can cause problems, especially if you ignore security updates. Apple regularly releases updates for both macOS and the firmware which controls various aspects of your system to patch security holes that make your Mac vulnerable to attack.
Most updates can be installed in the Mac App Store on the Updates tab. By default, the system notifies you when system or app updates are available. You should install updates as they're released to keep your apps and the system up to date.
Restrict Which Apps Can Run on Your Mac
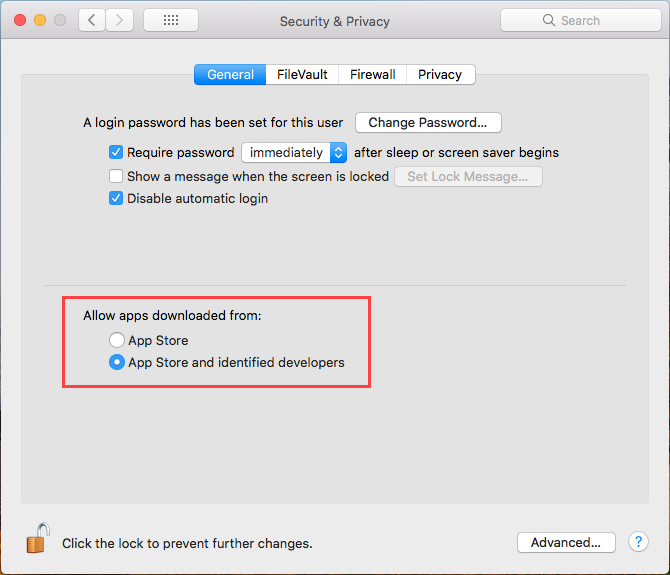
Your Mac has a built-in feature called Gatekeeper that allows you to choose from where apps can be installed. You can choose to only allow apps from the App Store to be installed or apps from the App Store and from identified developers. To choose one of these option, go to Apple > System Preferences > Security & Privacy > General.
There used to be an option for installing apps from Anywhere, but it was removed in macOS Sierra. This was probably in response to a Gatekeeper vulnerability discovered in 2015. Some apps could bypass the Gatekeeper security feature completely.
You can still install apps from anywhere, but you must specifically approve each app separately on the General tab on the Security & Privacy screen in the System Preferences.
Apple also introduced System Integration Protection (SIP) in OS X 10.11 El Capitan. SIP is designed to protect the most vulnerable parts of you the Mac operating system. It prevents a user with root access (using the sudo command in the Terminal) from modifying certain areas on the hard drive where the operating system is installed.
The Mac has become a bigger target for malware, and SIP is most likely a response to the growing threat of malware. SIP is meant to keep Mac users safe, just like the restrictions in Gatekeeper.
Check for Persistent Apps
Persistent apps on your Mac are like startup programs in Windows. They start invisibly each time you boot your Mac, and remain that way while you use the computer. Some examples are apps that check for updates for apps like Google Chrome and Microsoft Office.
Although persistent apps can be useful, malware also uses persistent apps to sneak into your system and run without you noticing. There are places in the file system where malware can hide so it can be started when you boot your Mac.
It's an enormous task to keep an eye on all the possible locations where malware can insert itself, but there are two free apps that can help. KnockKnock scans these locations and tells you what's there. It's not a malware scanner, so it won't tell you if what's in these locations is dangerous or not. But, Google search can help you research whatever is not recognizable to you or seems dodgy.
The second app is by the same company that makes KnockKnock. BlockBlock sits on the menu bar and runs in the background. It monitors all the locations in which persistent apps install themselves. If an app tries to install persistently, a dialog box displays telling you, and giving you a choice whether to allow it or ban it.
BlockBlock is not an antimalware tool, so it doesn't know which persistent apps are legitimate and which ones are malware. Again, you'll have to do your own research.
Scan for Malware
There are other types of malware, in addition to the types that disguise themselves as persistent apps. Although Macs don't see anywhere near the amount of malware that hits Windows PCs, there's still more and more malware targeting Macs. Don't get complacent. Malware has been known to attack Macs.
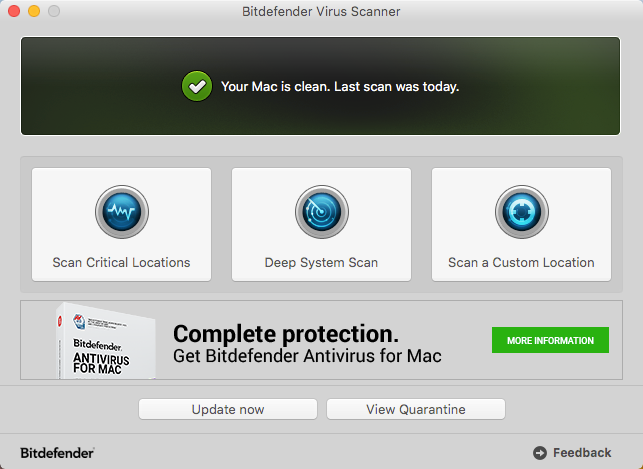
Your Mac already has a built-in antimalware tool called Xprotect, that's always running, invisibly, in the background. So, antimalware software is not necessarily needed on a Mac, but it can't hurt. If you feel better with extra protection, you can install an app like Bitdefender Virus Scanner.
Bitdefender Virus Scanner is free and easy to use. It can detect and remove all kinds of malware including viruses, spyware, trojans, keyloggers, worms, and adware. Bitdefender Virus Scanner doesn't install any system monitoring software that could bog down your system. But, this means you must run it manually to scan your system for malware.
Bitdefender Virus Scanner also detects and removes Windows malware present on your Mac. This prevents you from accidentally sending infected files to others using Windows PCs.
Malwarebytes Antimalware is well known app that focuses on finding and removing adware, which is hidden code in certain apps that forcefully shows advertisements on your desktop or on websites in your browser.
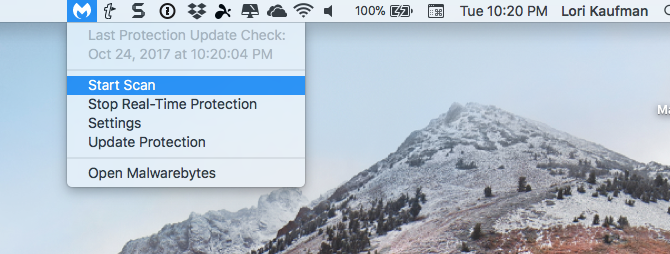
The free version of Malwarebytes Antimalware installed on the menu bar and must be run manually to clean your Mac. To gain the ability to prevent viruses, spyware, and malware infections and proactively block adware and unwanted programs, will cost you $39.99 per year for the Premium service. However, that's not necessary.
Manually running Malwarebytes Antimalware periodically should be sufficient, as long as you remember to do so.
Use a VPN Service
If you use your Mac in public places, like a café or an office, you should use a virtual private network (VPN) service for extra protection. A VPN encrypts your data before it's sent out over the internet. It keeps you safe by masking your online presence.
You won't notice any difference as you browse the internet and download files. But, anyone on the same shared wi-fi network is blocked from snooping into the data being sent to and from your computer.
We've covered some of the best VPN services available, both paid and free. However, using a free VPN can be risky. You should also be aware of five myths about VPNs that aren't true.
Adjust Safari Privacy Settings
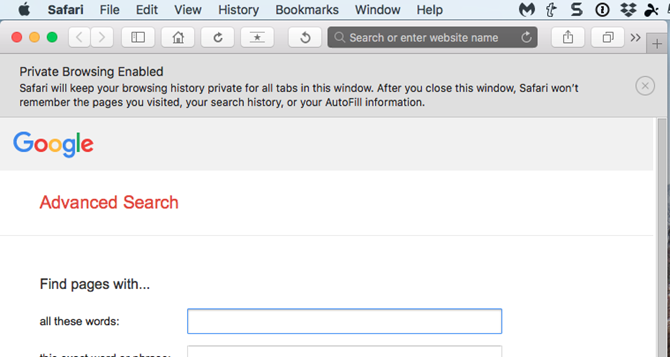
In addition to the Security & Privacy settings in the System Preferences that we've covered so far, Safari has several settings that make browsing the web more private. However, private browsing is not as secure as you might think. You can still be tracked while using a private browsing window.
Private browsing is useful for hiding where you go on the internet on your own computer. Others who use your computer will not see which sites you visited or items you searched for.
To enter private browsing mode in Safari, go to File > New Private Window, or press command+shift+n. In the private browsing window, you can visit websites, search for anything, and use AutoFill on web page forms. Your browsing history, search history, and AutoFill information are all erased when you close the private browsing window. Any items you download while in private browsing mode are preserved.
Chrome also offers a private browsing mode called Incognito Mode. Private browsing is also available in Firefox and we've covered add-ons that make the browser more secure.
If you want complete privacy when browsing the internet, try some anonymous web browsers or use Tor.
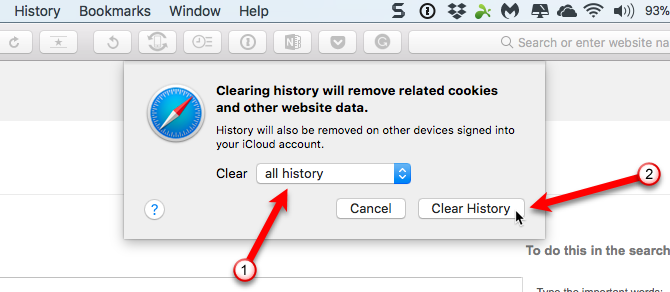
You can also erase browsing history, cookies, and cached data from sites you visit in the normal Safari browsing window. To clear your browsing history and website data, go to Safari > Clear History or History > Clear History. You can also go to History > Show All History and click Clear History at the top of the page. The Show All History page also allows you to delete browsing history from individual sites.
If you don't want Safari storing user names and passwords, or other personal data you enter on websites, go to Safari > Preferences and click AutoFill on the toolbar at the top. Make sure all the AutoFill web forms boxes are unchecked.
Use HTTPS Everywhere
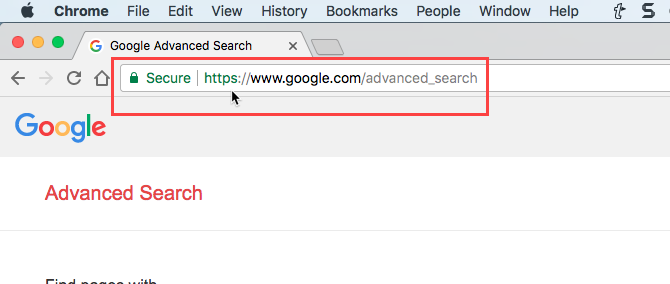
When you go to a website, most of the time the data is transmitted in plain form, which means that anybody can access the data while it's in transit. Websites like banks, webmail services, and online shopping sites, provide secure connections. You can tell you have a secure connection with a website if the website address starts with https rather than http.
Making a website secure using https is more complicated and expensive than running a basic website, but more websites are switching to https. You can add an "s" to the end of http for every site you visit, but there's an easier way to do this, if you're not using Safari.
If you're using Chrome or Firefox, you can install the HTTPS Everywhere browser extension, created by the Electronic Frontier Foundation (EFF) and the Tor Project. The extension automatically switches thousands of sites from the insecure http to secure https when available, protecting you from many forms of account hijacking and surveillance, and even some forms of censorship.
There is no extension that we could find for Safari that automatically switches to https. However, Safari does offer built-in features that defend your online privacy and security, like intelligent tracking prevention, sandboxing for websites, and protection from harmful sites.
Check What You're Sharing
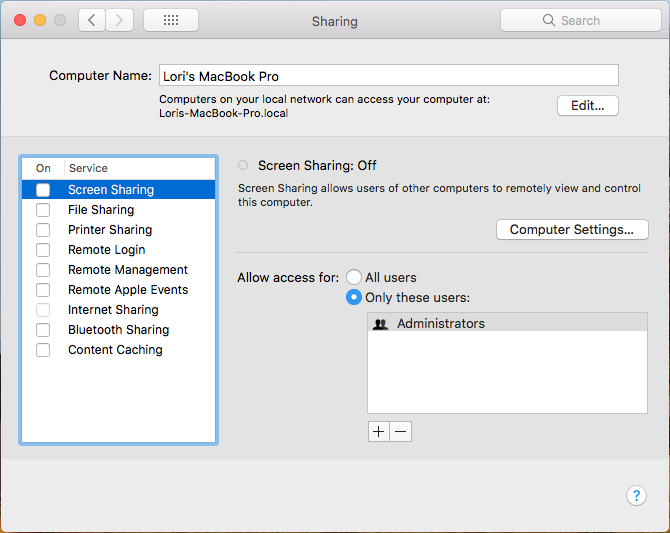
There are many things you can share from your Mac, like files, your screen, a printer connected to your Mac, and your Internet and Bluetooth connections. When a sharing service is enabled, it's like adding a new door or window to your house. You can lock the door or window (require a password to access the sharing service), but that's not a guarantee someone can't get in.
You should turn off sharing services when you're not using them. Go to Apple > System Preferences > Sharing. Make sure all the boxes in the On column in the list on the left are unchecked. Only turn on services as you need them, and then turn them off when you're done using them.
Enable Two-Factor Authentication Everywhere You Can
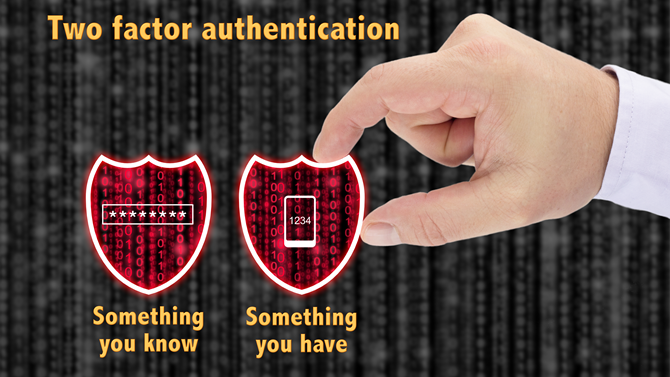
Two-factor authentication is a method of logging in to websites and services using more than just your password. Two-factor authentication involves something you know (your password) and something you have (generally a mobile device, like a smartphone). You enter your password and then a code is sent to your phone that you must enter on the site to complete the login process.
Some sites use apps like Authy or Google Authenticator, available on iOS and Android, as a way for you to get a code on your phone that you enter on the site to access your account.
Most social media accounts, like Facebook and Twitter, offer two-factor authentication, as do cloud backup services, like iCloud, Dropbox, Google Drive, and OneDrive. You can even protect your gaming accounts with two-factor authentication.
Image Credit: BeeBright/Depositphotos
All Secure!
We've presented a lot of options here to keep your Mac secure. Use the methods that makes sense for you. Be aware and use your common sense, too.
How do you secure your Mac? Do you use any methods we didn't list here? Share your ideas and experiences with us in the comments.


