You can only cram so much into a graphical user interface before it becomes cluttered, so it should come as no big surprise that you can do some really cool things using the Mac Terminal.
After you've learned the basic Terminal commands and geeked out with some funny Terminal easter eggs, you might wonder what else this slick beauty can do for you.
1. Lower Your Mac's Wake Up Time
You probably noticed how your MacBook sometimes takes an age to wake up from sleep, especially when you've been away from your keyboard for some time. This is due to Mac OS X's standby mode, which is a deep lumber that your computer enters after a set period of inactivity.
Standby is a great feature that saves a tremendous amount of battery; it's part of the reason that your MacBook's battery lasts so long. However, you might want to change the time after which Mac OS X enters standby mode, increasing the window in which you can do a fast wake up. On laptops produced after 2013 the default time is 3 hours. On older computers, that's 1 hour.
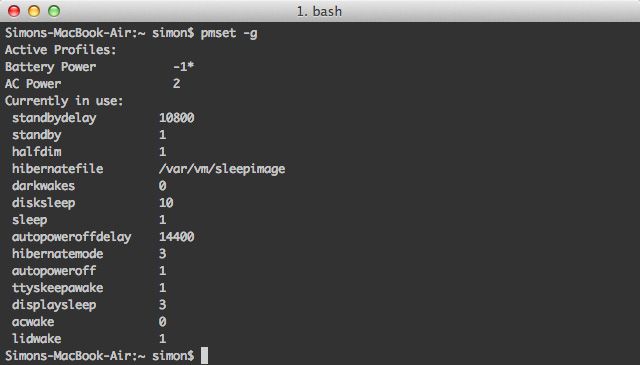
Check your current standby delay by running the following command:
pmset -g
The current value of your MacBook's standby delay is expressed in seconds (e.g. 10800 seconds, equal to 3 hours). You might want to make a note of this somewhere.
Change the standby delay by running the following command, substituting
<b>NEW_VALUE</b>
for the new delay (expressed in seconds).
sudo pmset -a standbydelay <strong>NEW_VALUE</strong>
Be aware that increasing the standby delay does lower your battery life. It's the trade you make for being able to wake up your MacBook faster. If you want to change back to default settings later on, just run that same command again with the original standby delay value.
2. Kill The Dashboard
A lot of users don't use the Mac OS X Dashboard. If you're on a fast machine, that's no big issue; you just ignore it. However, older MacBooks often have to cope with memory limitations.
This Terminal command will turn off the Dashboard altogether:
defaults write com.apple.dashboard mcx-disabled -boolean YES
Restart the Dock to put these changes into effect:
killall Dock
If you want to reenable the Mac OS X Dashboard in the future, run those same two commands again, but swap out
YES
for
NO
at the end of the first command.
3. Quick Look Files From Terminal
Quick Look is one of the fastest ways to preview a file without opening it in its designated application. Tap space to view the file contents, tap space again to discard. What a lot of people don't know is that you can open files in Quick Look from the Terminal. This is especially useful if you're an avid Terminal user and like to combine CLI with Quick Look magic.
To open a file in Quick Look use the following command, substituting
<strong>FILE_PATH</strong>
for a reference to your file:
qlmanage -p <b>FILE_PATH</b>
Using this command will print a lot of feedback in the Terminal, intended for Quick Look testing. You can ignore those lines.
4. Enable Text Select in Quick Look
While we're still on the subject of Quick Look, let's talk about one of its biggest shortcomings: you cannot select text in file previews. Interestingly, a single Terminal command is sufficient to take care of that lack, although it won't work with files opened in Quick Look using the Terminal.
Run the following command to enable text select in Quick Look:
defaults write com.apple.finder QLEnableTextSelection -bool TRUE
Restart Finder to put these changes into effect
killall Finder
If you want to revert Quick Look to its default settings, run those same two commands again, but swap out
TRUE
for
FALSE
at the end of the first command.
5. Make The Dock Appear Faster
If you have hiding turned on for your Dock, there's a slight delay between your mouse hitting the edge of your screen and the Dock actually sliding into view. You can remove this delay by using the following command:
defaults write com.apple.dock autohide-delay -float 0
killall Dock
Alternatively, you can change
0
to some other value (in seconds) to make the Dock appear at a different speed. If you want to revert these settings in the future, run the following commands:
defaults delete com.apple.dock autohide-delay
killall Dock
Even though the previous command makes the Dock start to appear faster, you'll notice it still slides into view at exactly the same speed. With the following command you can change the speed of this animation, substituting
MODIFIER
for the multiplicative change in speed you're looking for. In other words, a value of
0
will make the Dock snap up instantly, a value of
0.5
doubles the speed and a value of
1
keeps the speed the way it was.
defaults write com.apple.dock autohide-time-modifier -float <strong>MODIFIER</strong>
killall Dock
If you want to revert the animation to its original speed, run the following commands:
defaults delete com.apple.dock autohide-time-modifier
killall Dock
6. Disable Auto-restore in Preview and QuickTime
In Mac OS X 10.7 Lion and later, some applications keep track of what files were opened when the application was closed. This can mean a dozen documents popping up when you open Preview, just because you didn't close each window separately before quitting.
The following command disables the auto-restore feature in Preview:
defaults write com.apple.Preview NSQuitAlwaysKeepsWindows -bool FALSE
You can do the same for QuickTime by swapping out
Preview
for
QuickTimePlayerX
. If you ever want to revert these changes and turn auto-restore back on, just execute the same command but change
FALSE
to
TRUE
.
Do you have any other cool Terminal tricks up your sleeve that make your MacBook snappier? Share your tips in the comments section below the article!


