Apple Music recently passed the 13 million subscribers mark, which might pale in comparison to the 30 million claimed by Spotify, but it's still remarkably popular for a service that's not even a year old yet.
If you've recently signed up to the streaming service (and even if you haven't) you might be surprised to find out there's a lot Apple doesn't tell you about Apple Music. Instead of letting you figure out the finer points on your own, here are some of the best tricks for making the most of your tunes.
Connect Shazam to Apple Music (iOS)
Shazam hasn't always had this functionality, but the recent iOS 9.3 update allowed developers to add Apple Music integration, which works relatively well. Just in case you're unfamiliar with it, Shazam is a music identification service that listens to music playing in the background and checks against its database of recognized tunes, all for free.
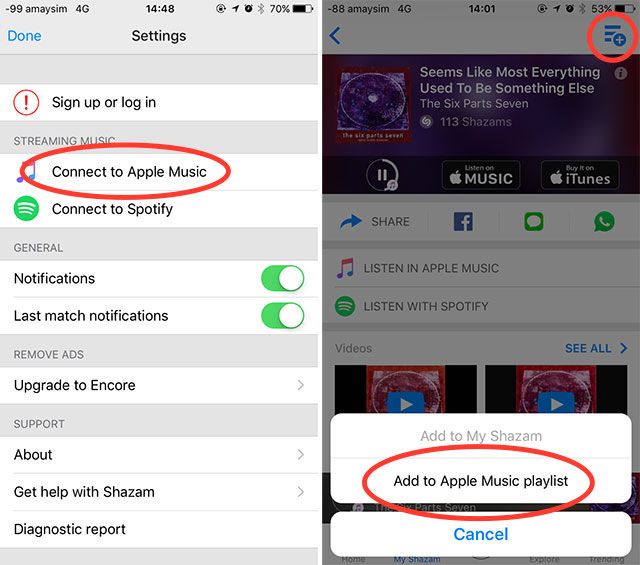
To connect Shazam and Apple Music you'll need to update your device to iOS 9.3 or later, download the app, launch it, head to the My Shazam tab and hit the cog in the top right corner. In the settings menu hit Connect to Apple Music, then grant permission in the dialogue box that appears. You can also connect Spotify here, but as you're reading an article about Apple Music we're going to assume you aren't using that.
If the song you want is on Apple Music, you can play it directly within Shazam without leaving the app by hitting the play icon that appears directly below the result. To access the song (and the album it's featured on) from within Shazam, use the Listen in Apple Music link. To add a song to one of your playlists, hit the playlist button in the top-right corner then specify a playlist.
There's no way to add music from Shazam to your iCloud Music Library yet, but if you have Add Playlist Songs to Music enabled under Settings > Music then this will happen automatically.
Improve "For You" Suggestions
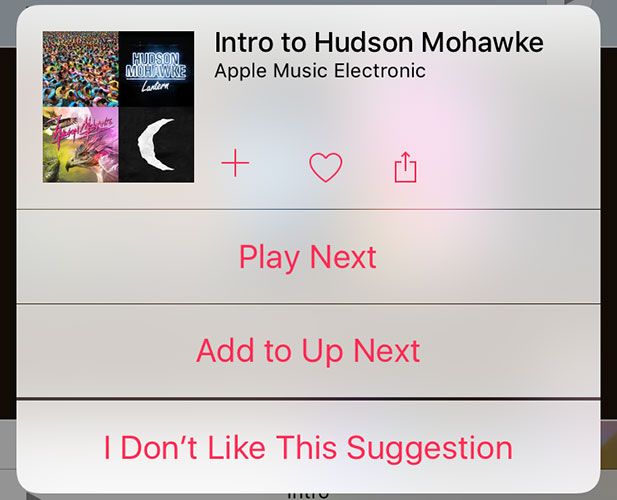
The For You tab in Apple Music features music that Apple thinks you'll like based on the artists you named when you first signed up, your "Loves", and your listening habits. But if Apple Music is way off the mark, you can let Apple know simply by tapping and holding it, then selecting I Don't Like This Suggestion.
You can do the same in iTunes for Mac or Windows by clicking the three dots next to a result and choosing Recommend Less Like This too. It works for both playlists and albums, though in its current capacity this step won't necessarily remove the offending item immediately (which sounds like something Apple needs to fix).
Use Siri's Apple Music Commands (iOS)
Siri is Apple's digital assistant for iOS devices (and if reports are to be believed, Mac users soon too). Apple Music users can take advantage of Siri to control their listening hands-free, something users of rival services can't do with Siri at present. Voice control is perfect if you're driving, jogging, cycling, or sitting across the room from your device using the "Hey Siri" hands-free command.
The basic commands you'll want to master are:
- Playing artists, songs or albums — "play Boards of Canada" or "play The Campfire Headphase" and "skip this" to advance the current playlist or album.
- Starting radio stations and playlists — "play Beats 1" and "I like this" or "I don't like this" for better radio suggestions.
- Controlling your queue and library — "after this play Cream on Chrome by Ratatat" or "add this album to my music" and "like this song."
- Asking Siri questions — "who sings this song?" or "what album is this from?"
Apple Music is pretty well integrated with Siri, and there are a few other cool commands you can use like:
- Playing chart toppers from a specific year — "play the top tunes from 1986"
- Please sir, can I have some more? — "play more like this"
- Use built-in Shazam, hands-free — "what is this song?" then "play this song" or "add this song to my library."
Even if you don't have a song or artist in your library, you can still use Siri to access the entire Apple Music catalogue — so give it a go!
Show Only Offline Music (iOS)
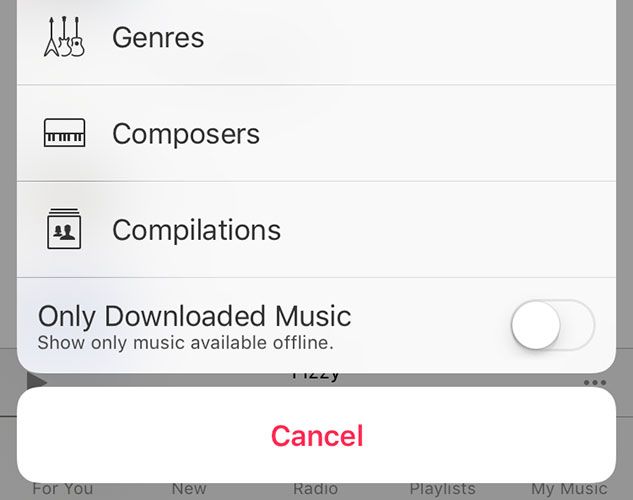
If you're on a tight data budget and you only want to see songs you've already synced to your device, you can choose to show only offline music. In the My Music, tap the drop-down at the top of the list (it'll say Artists, Albums or Songs probably), and in the menu that appears check Only Downloaded Music.
Don't forget to turn this setting off, because you won't be able to find your entire library unless you do so (and many have been caught out this way before you). If you're really concerned about data, you can disable mobile data entirely by heading to Settings > Music and disabling Use Mobile Data.
Alternatively, if you're on an unlimited plan and you're swimming in data then you might want to turn on high quality streaming over mobile data from this same menu.
Access Your History
Listened to something earlier and can't quite remember what it was? On an iOS device head to the Now Playing screen by tapping the bar at the bottom of the screen (which only shows up when you are playing a song, or at least have one paused) then tap on the Up Next queue icon (it looks like three lines and three dots). From here scroll up to reveal your playback history.
You can do this on iTunes for Mac and Windows too — hit the queue icon in the main display, then tap on the clock icon to see a list of recently played songs. You can also access your radio station history on both mobile and desktop devices by accessing the Recently Played option under the Radio tab (tap or click it to bring up the full list).
Replace iTunes Connect with a Playlist Tab (iOS)
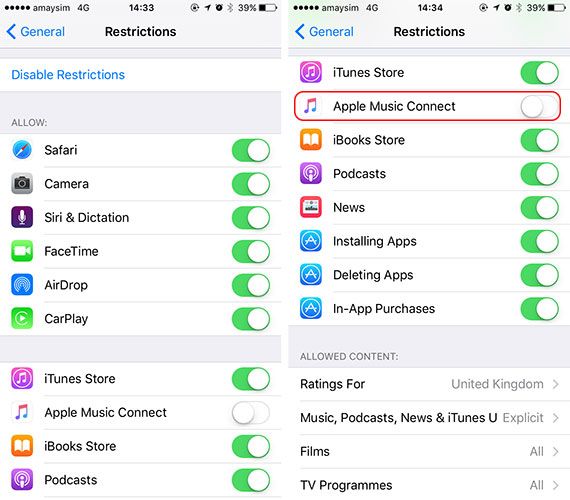
We've mentioned this tip before, but it's definitely worth repeating as it's so damn handy. You can use iOS Restrictions to disable iTunes Connect, which removes the tab completely and instead replaces it with a dedicated playlists tab. Normally playlists are accessed from within My Music, so if use another way to track upcoming releases and get alerted for gigs in your area, this is a great use of available screen space.
Head to Settings > General > Restrictions and set a passcode you can actually remember (I'd recommend using the first four numbers of your main passcode). From the menu that pops up, disable Apple Music Connect. Now head back to the Music app to admire your handiwork.
There's a few other things you can do with the iOS restrictions feature, but this is probably the best of the bunch.
Create a "Loved" Playlist (iTunes Desktop)
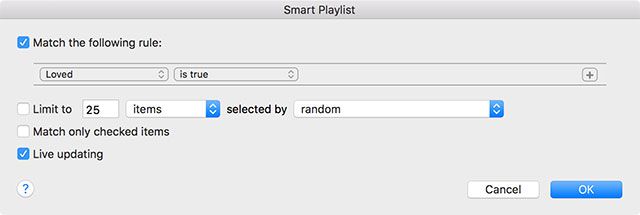
Apple seems to be using the heart button you'll find next to songs, albums, and playlists to deliver better suggestions based on your favorite things. Unfortunately, that means that, by default, there's no way of putting everything you've "loved" together in one place. However, using iTunes on a Mac or Windows PC, you can create a smart playlist that brings all your loved songs together in one place — and it'll even sync to your devices and update automatically.
Launch iTunes and head to File > New > Smart Playlist. In the box that appears, choose Loved in the first drop down and is true in the second drop down (pictured above). Give your playlist a name, then head to your iOS device to see it magically appear (provided you have iCloud Music Library enabled on both devices).
Note: Only songs you have "loved" will appear in this playlist, so if you love an entire playlist or album it won't add everything (which is handy).
Make Everything Available Offline
There's no option to download your entire library yet, but there's a workaround that will make it a far less painful experience. You should only attempt this if you have plenty of available space on your iPhone, iPad or computer.
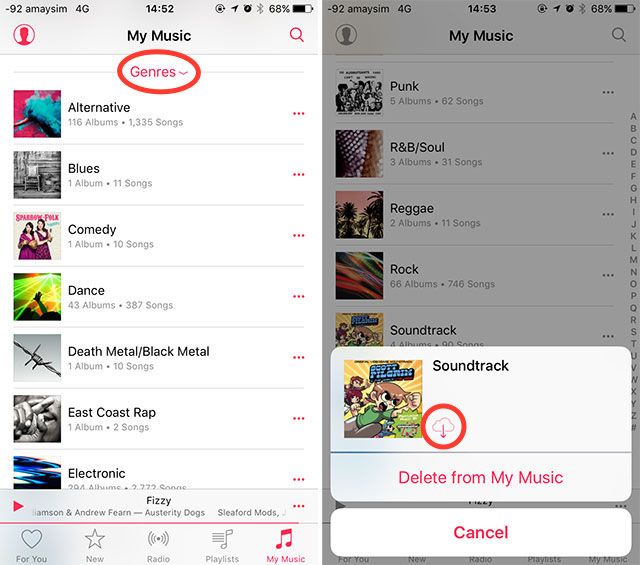
On iOS, head to the My Music tab and tap the drop-down at the top of the lists (it will say Artists, Albums, Songs, or similar) and choose Genres. You can now tap the three dots next to each entry then hit the "cloud-with-arrow" symbol to download the entire genre to your device. You'll need to do this for each subsequent genre, which is considerably quicker than doing it on a per-artist basis.
You can also do this on iTunes for Mac and Windows by heading to the My Music tab, clicking the button in the top-right corner (it probably says Artists, but it might say Albums or Songs) and choosing Genres. Now you can right-click (or control-click) on each genre and choose Make Available Offline to download everything to your computer.
Wake Up or Go to Sleep with Apple Music (iOS)
You can use Apple Music like an alarm clock by editing an alarm in the Clock app, tapping Sound then scrolling to Pick a Song at the top of the list.
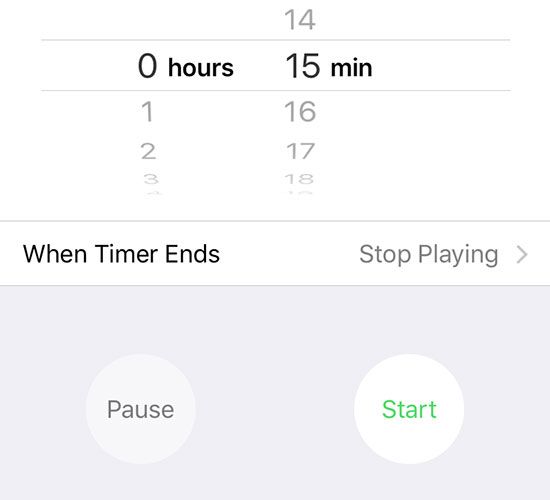
To set a sleep timer, simply start playing something then launch the Clock app and head to Timer. Set how long you want to wait till Apple Music stops playing, then tap When Timer Ends and choose Stop Playing. This works great if you have an AirPlay receiver in your room.
Add Your Apple Music Tips
Do you have any Apple Music tips of your own? Let us know what they are in the comments below, as well as what you want to see from the service in iOS 10 and beyond.

