macOS doesn't really need a Start Menu, but some people prefer having one nonetheless. Having a list of apps you can refer to and peruse is handy, especially if you're coming from Windows. Plus, the Applications folder is a hot mess of everything installed on your machine.
Today we'll look at adding two useful items to your dock: a Mac Start Menu of items chosen entirely by you, and a recent documents stack for quickly finding what you were last working on.
1. Add a Start Menu to Your Mac Dock
The Start Menu we will create today is little more than a regular folder that you pin to the dock as a shortcut. The first decision is choosing where you want to store your Mac's Start Menu. For ease, we'll be using the Documents folder.
In a new Finder window, locate the Documents folder and create a new folder using File > New Folder. For the purposes of this article we'll name ours Start---remember not to delete it!

Within this folder you can start creating new folders based on how you want to organize the Start Menu on your Mac. It's probably a good idea to only include the apps you most use, since the macOS Applications folder already makes it difficult to find what you're looking for.
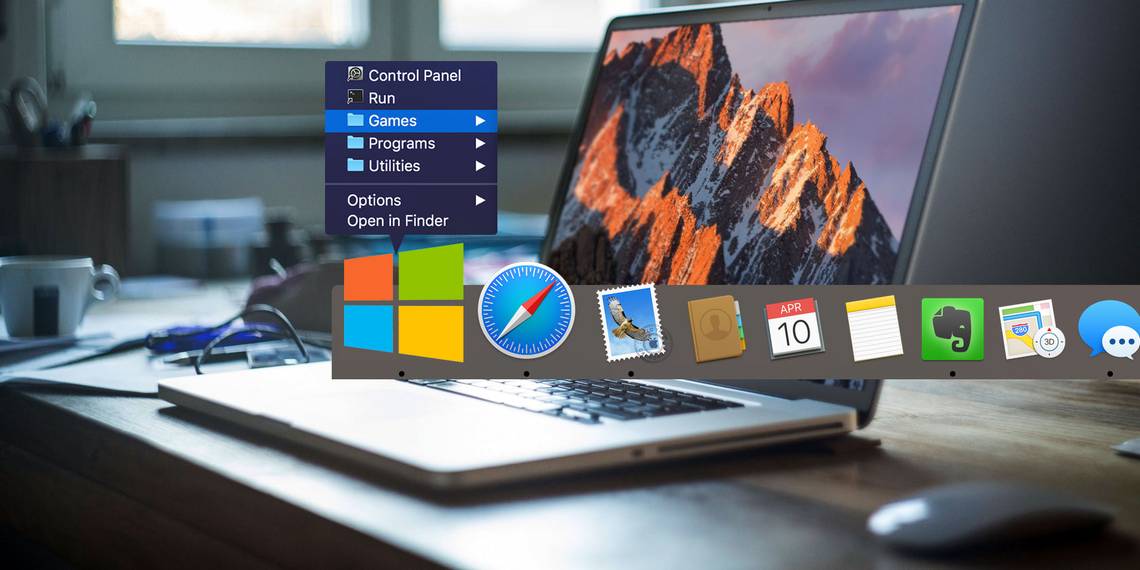
I created three folders: Games, Utilities, and Programs. You might want to create folders for other uses like Work, Steam Apps, System Tools, and so on. Click and drag your newly made Start folder to the far end of the dock, near the Trash can. Right-click on it and specify the following options:
- Sort By: Kind
- Display as: Folder
- View content as: List

Once you're done with the basic structure, it's time to start adding shortcuts to your apps.
2. Create Aliases and Organize Your Menu
We'll use aliases to create a list of apps. Aliases are tiny files that represent other files, like a shortcut in Windows. Unlike a Windows shortcut however, aliases will still link to the target object even if it is moved.
There are all sorts of creative uses for aliases on macOS, not least populating a list of favorite apps. There are two ways to create an alias in macOS:
- Highlight an item, right-click, and select Make Alias; or use the keyboard shortcut Cmd + L.
- Click and drag an item, hold the Cmd + Option keys, then release to create an alias in the target location.
The latter technique is more useful here, since you can highlight multiple items, click and drag them all, then hold Cmd + Option and release to create multiple aliases. This is best done with two Finder windows side-by-side.

Highlight and create aliases for any relevant folders. Your aliases will use the same icons and names as the target objects, except you'll see a small "shortcut" arrow in the bottom-left corner of the icon. You can change the names and icons of your aliases, and they will still work just fine.
For fun, I added an alias to the Terminal called Run and a System Preferences alias called Control Panel in the root Start folder.
Note: You could alternatively drag an alias of your entire Applications or Utilities folder, if you want a list of everything installed.
3. Change the Icon to Suit
To differentiate your Mac's Start Menu folder from the others pinned to your dock, you'll want a distinctive icon. Google Image Search will help you find variations on Microsoft's Start theme, or you can opt for an Apple logo of some sort if you want to think a little different. I chose this Vista Orb on DeviantArt.
Navigate to the directory containing your Start folder. Right-click on the folder, and choose Get Info. Drag your image file over the default folder icon in the top-right corner, and watch it change. To remove your custom icon, click on it and hit the Delete key.

If your icon doesn't display in the dock, right-click on it and choose Display as > Folder instead.
4. Add a Recent Documents Folder
Unfortunately, saved searches don't automatically expand in pinned folders. That means you can't nest a Recent items "folder" in your new Start Menu. However, you can add a Recent folder to the dock, where it will sit alongside your Start Menu and perform basically the same task.
You can customize it so that only relevant documents are displayed, set your own range, exclude files and apps, and enforce any other criteria possible through macOS Smart Folders.
Option 1: Recent Documents Stack Using Terminal
This is simple, but you won't get as much control over what displays using this method. You can use it to display recent applications, documents, servers, and favorite volumes and items.
-
Launch Terminal and paste the following command followed by Enter:
defaults write com.apple.dock persistent-others -array-add '{"tile-data" = {"list-type" = 1;}; "tile-type" = "recents-tile";}'; killall Dock - Wait for the dock to disappear and reload, then find the new Recent Applications stack next to the Trash.

You can right-click this stack and choose what content to display, and how to display it. You can also run this command multiple times to add the same stack to your dock.
Option 2: Recent Documents Folder With a Smart Search
Launch Finder and select File > New Smart Folder. You'll see a small bar appear at the top of the Finder window. Leave This Mac selected, then click on the plus (+) icon.
From the dropdown menu choose Last opened date, then specify a range in days. I went for 30, but you could leave it at a week or less if you get through a lot of documents on your Mac. At this point, you'll see the results of your search below:

In this instance, there are three items I want to remove from my search: applications, folders, and chat logs. None of these are particularly useful additions to a recent documents list, so we can set rules to exclude them.
Hold the Option key on your keyboard, watch the plus (+) icon change to an ellipsis (...), then click on it. On the next row down, choose None of the following are true, which will allow us to specify exclusions to the rule.

On the next row, select Kind in the first dropdown, and Application in the second. Click on the plus (+) button again to add another exclusion, and specify Kind in the first box and Folder in the second. Both application files and folders will now disappear from your results.
To exclude chat logs, click on the first dropdown and choose Other. This is where you can add all manner of custom criteria. We're looking for Delivery type in this instance; check it and hit OK. Now specify Delivery type in your search, and type iMessage in the custom field. Add another Delivery type rule and type SMS into the custom field.

You can continue refining your results until you're happy. When you're done, click Save and put your smart folder somewhere you can find it. Finally, drag your smart folder into the dock area near the Trash. You can right-click it and sort by Last Opened, plus choose between Folder and Stack, and List and Grid views.
Master Spotlight for Mac Proficiency
Creating a Mac Start Menu gives you the option of shortlisting your favorite apps and locations. You could add remote servers, frequently used documents, or your own AppleScript automations. The recent document menu is handy too, particularly if you can't remember what you were last working on.
But for most tasks, your Mac's built-in search tool Spotlight is a faster way to work. You can invoke Spotlight anytime by hitting Cmd + Space. Start typing an app name and hit enter to launch it. You can even use natural language for search queries, just like that fancy smart folder we made earlier.