The best camera you can possibly lay your hands on is the one that you currently have on you, or so the saying goes. Ever since hardware manufacturers started putting bigger and better cameras on our devices, we're always in the presence of a capable camera - so what about video?
If you have a recent smartphone capable of shooting 1080p full-HD video, you might be surprised at the potential you have in your pocket. You only need to read our smartphone review and buying guide to see how many smartphones have such a feature. With the right apps, techniques and a few inexpensive accessories you could turn your iPhone or similar into a highly capable video capture device.
Here are my top mobile video tips for getting the most out of your smartphone's video capabilities, along with a few examples for good measure.
Ditch Your Camera App
Unfortunately, the default in-built camera app used by your phone is probably not going to cut it. While iOS users can at least lock focus and exposure (but not separately), the feature still hasn't made it to many Android handsets. Even the iPhone's Camera app saves video at a lower bitrate than most filmmakers would desire at only 17Mbps according to GSM Arena. Lower bitrates are ideal for most mobile videos where disk space is a concern, but if you're shooting something that needs to look good then you want the highest quality source video you can get.
For the iPhone video maker there is no better app than FiLMiC Pro ($4.99). Not only does it shoot at a maximum of 50Mbps at 1080p (which generates massive high-quality video files) but it also comes with just about every other feature a mobile filmmaker could ever want or need. This includes the ability to lock focus, exposure and white balance separately, audio metering, support for external microphones and variable framerates including 24p and 25p for that film look.
To prove how good FiLMiC is at squeezing as much quality as possible out of your iDevice, the developers beat the $5000 Sony FS100 in a blind audience test using an iPhone 4S and their app. They even tied the $13,000 Canon C300 at the same screening. This isn't to say your iPhone is anywhere near as versatile as those cameras, but it's not bad for $4.99. You can see some raw FiLMiC footage I shot at 32Mbps (the second-highest quality setting) in 720p 25p below. The source video was shot in 1080p, but a free Vimeo account is limited to 720p.
https://www.anrdoezrs.net/links/7251228/type/dlg/sid/UUmuoUeUpU60104/https://vimeo.com/67869992
Unfortunately I can't find an app quite like FiLMiC for Android, though there is talk of a Samsung-optimized version among some Android filmmakers. The closest app I've found is called lgCameraPro [No Longer Available] ($1.99), and it includes variable bitrates, framerates, formats and encoder options, though it doesn't seem quite as refined and built specifically for filmmaking quite like FiLMiC Pro does.
Even More Apps
As well as a main go-to video capture program like FiLMiC or lgCameraPro, there are a lot of other potentially useful apps in the App Store or on Google Play. Different apps have different designated uses, like SloPro (iPhone, free) which captures video at 60fps on the iPhone 4S or later and then halves the framerate, providing a smooth half-speed video. You'll need to pay for an in-app purchase to unlock high-quality exporting though.
Similarly there are a huge number of time-lapse apps for Android and iOS. Time-lapse sequences break up narratives, make great cut-aways and can be virtually completely automated using today's smart devices.
Sound Judgement
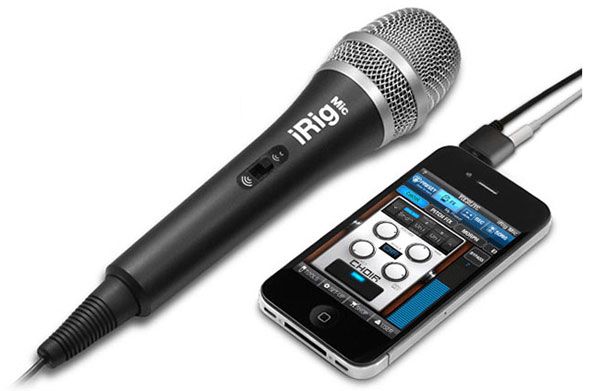
If there's one thing you can't disguise particularly well when it comes to capturing decent video, it's bad sound. As a filmmaker you can do a lot more to patch up poor video than you can poor sound. For those of you who need crisp audio it's a good idea to get yourself an external microphone that's compatible with your device.
To save on repetition I'll point all iPhone owners (and even Android users might find the information useful) to my previous article about iPhone microphones and better sound.
Battery & Storage
There's nothing worse than perfecting your technique, downloading the best apps and arranging a big shoot only to fall at the last hurdle. If you're shooting on a smartphone, you're not only going to use a lot of CPU shooting at higher bitrates, you're also going to be using the screen constantly and this will result in a fairly quick flat battery.
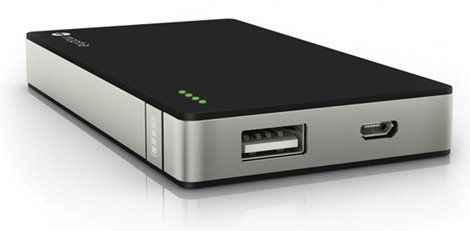
When shooting indoors it may be possible to power your phone from a nearby outlet or laptop, but in the field it might pay to invest in a portable battery pack. These come in the form of cases with in-built cells or as external batteries that roughly equal the size of your device itself. Most provide at least 100% of charge, effectively doubling your shooting time in the field. Pictured below is the Mophie JuicePack Powerstation, which comes in a variety of sizes and capacities and is able to charge most USB devices including iOS and Android smartphones. I bought my girlfriend one of these as her 4S battery is waning and it's a great reassurance knowing you have an extra full charge in your pocket or bag.
Similarly, don't forget to empty your device of unnecessary video and media first, so you can capture as much video as you need. Having a laptop around might be a good idea for transferring footage should you run out of space. It's also a good idea to shoot in airplane mode (turn off all cellular radios, Wi-Fi antennas and Bluetooth) as you will save money and avoid being interrupted by unwanted callers.
Accessorize Your Setup
Most film camera rigs are complex-looking constructions on rails or tripods with giant lens adapters and handles for getting the smoothest possible shots. Your smartphone can also make use of these sorts of accessories, starting with a simple and cheap home-made tripod adapter for static shots. For movement, why not consider buying or making a steady-cam system for silky smooth "fly-by" shots. You could even build a fairly inexpensive rails system for smooth panning shots. The footage below (complete with terrible music) was shot with FiLMiC Pro at "extreme" quality on a rails system with an Olloclip lens on an iPhone 4S, and the results are truly impressive:
Similarly for a more versatile focal length consider something like the Olloclip, a series of clip-on lenses for current and past-generation iPhones. You're probably going to have less choice if you're using an Android device, but similar products do exist. Those of you who prefer a DIY challenge migth want to begin dismantling old toy cameras for their lenses, there are tutorials for macro lenses and others for wide-angles. Remember you're not exactly going to get DSLR-quality sharpness, but depending on the look you're after this might not make a huge difference to you.
Adapt Your Techniques
If you find that you spend a lot of time shooting free-hand, you might want to practice a means of steadying your shots. There are a number of after-market products that can help steady your footage (like the aforementioned steady-cam) but one user has perfected his iPhone technique into one clenched fist he calls "The Grip".
https://www.anrdoezrs.net/links/7251228/type/dlg/sid/UUmuoUeUpU60104/https://vimeo.com/thefilmartist/steady
Vimeo user The Film Artist shot the above video handheld (aside from the running shots) using the technique shown by his friend in the video. By using his arm as a dolly, and by "moving [the device] before the camera shakes" the results are surprisingly smooth. Similarly using windows like those on buses and trains is a great way of getting a perfectly smooth moving shot.
Avoid digital zoom at all costs, instead move closer to your subject - even if it means using a cut. Digital zoom stretches pixels and destroys quality. Similarly, low light performance is still touch-and-go on smartphones, so adequate lighting will help reduce noise and grain.
Colour Grading
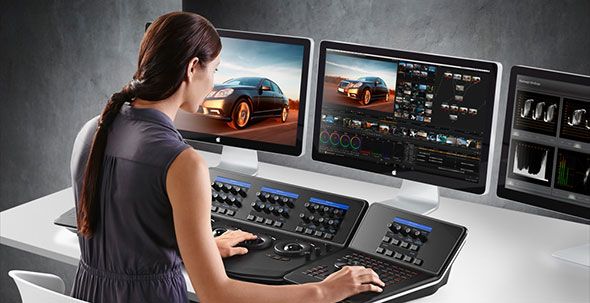
Colour grading is the act of changing the appearance of your footage by modifying hues. In layman's terms it's like Photoshop for video, allowing you to stylise and enhance your footage artificially. Traditionally this was done using a photo-chemical process similar to cross-processing, but now is done digitally using sophisticated, eye-wateringly expensive software and peripherals like Blackmagic Design's DaVinci Resolve suite, below.
But who said you need to export to a PC in order to post process your iPhone video? VideoGrade ($2.99) is my new favourite video processing app; it allows you to quickly colour grade your video and export to 1080p in a couple of taps. From exposure to temperature, tweaking brightness to deepening shadows, you can definitely achieve that "film look" with VideoGrade. It's even possible to save presets so you can maintain uniformity within your production. Not only is it very handy to be able to colour grade on your source device, it also provides incredible value when you consider the cost and results alongside.
Below is an original video I shot in South Africa.
https://www.anrdoezrs.net/links/7251228/type/dlg/sid/UUmuoUeUpU60104/https://vimeo.com/67875270
And below, the same video but graded (harshly).
https://www.anrdoezrs.net/links/7251228/type/dlg/sid/UUmuoUeUpU60104/https://vimeo.com/67875271
Unfortunately Android lags behind in this department as well, and I can't find one app that has a high enough rating to recommend an equivalent. If you're shooting with an Android smartphone and you'd like to colour grade, you might be better of colour grading with a PC instead.
These mobile video tips should help get the most out of your smartphone when it comes to video. Be sure to let us know any of your tips or post a link to your smartphone masterpieces in the comments, below.


