When you're getting started in the world of Arduino, wiring up a simple project and figuring out how to code it is the best way to learn. But if you don't have access to an Arduino, want a faster way to mock up a circuit, or just want to try something new, 123D Circuits is a great way to give it a go online.
123D Circuits lets you create and test virtual Arduino circuits, check your wiring, debug your code, and experiment with different setups. It's a fantastic tool for anyone getting into Arduino for the first time or experts who want some flexibility in how they prototype and test.
Everything You Need
123D Circuits consists of 4 different sandboxes: there's the Electronics Lab; a printed circuit board design center; a Circuit Scribe tool; and a MESH creation center. The Electronics Lab will be the most useful for prototyping Arduino, and it's what we'll be using to build an Arduino project in just a moment.

Each sandbox has all the tools you need to diagram a project, much like Fritzing, one of our favorite diagramming tools here at MakeUseOf. They have tons of different components, different Arduino models, and realistic ways of getting everything connected up. You can even convert your diagram into a circuit diagram that contains all of the electronics information needed to recreate the project.
You can also order some of the things you'll need to create your project in real life directly from the site.

The Electronics Lab lets you actually test your creations by entering Arduino code and seeing what happens. Let's run through a sample project to see just how that works.
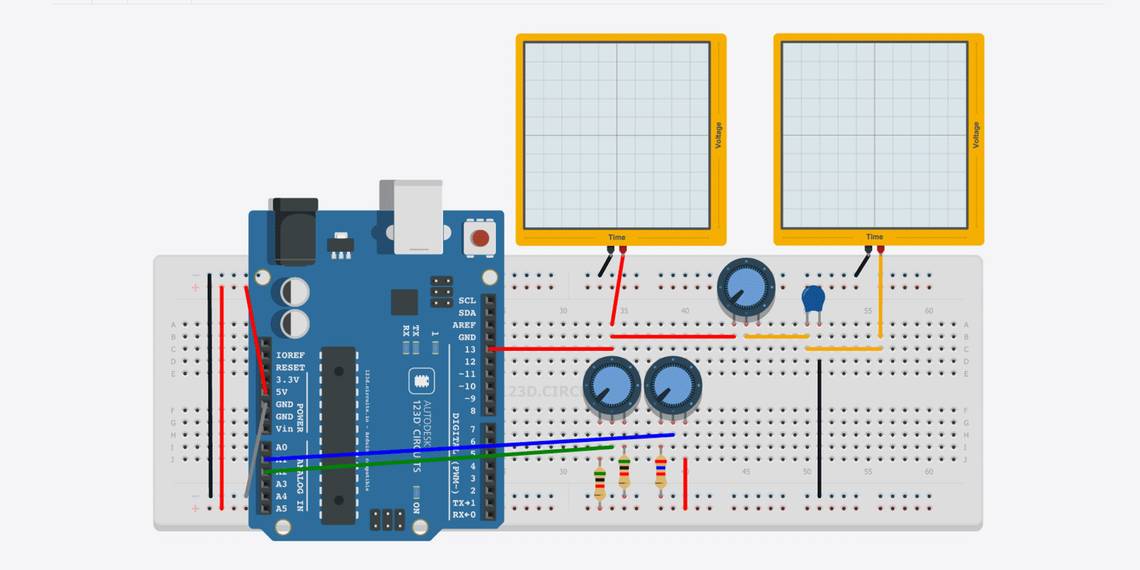
Sample Project: Arduino Traffic Light
We're going to whip up a quick sample project to get an idea of how 123D Circuits works. The Arduino traffic light is a great beginner project, so we'll use the system to create one of those.
When you first enter the Electronics Lab, you'll see a breadboard and nothing else. Let's change that. Click Components in the upper-right-hand corner to see a list of things you can add to the sketch. A quick search for "arduino" shows three options, and we'll add the Arduino UNO R3 by clicking first on the icon, and then in the work area.

Another quick search for "led" shows us the plain LED; click the icon, then click on the breadboard to place the LED. Once it's placed, the drop-down in the upper-right-hand corner of the work area lets us change the color. We'll place one red, one yellow, and one green.

Now to wire everything up. To add a wire, just click anywhere on the breadboard without clicking on a component first (you can also use the "breadboardwire" component), and click on the space, either on the breadboard or the Arduino, where you'd like it to connect; you can change the color in the same way as the LEDs; using the drop-down in the upper-right-hand corner of the work area.

To add the resistors, select them from the Components bar, then click on the slot where you'd like them to connect. If you need them to stretch further, you can use breadboard wires to connect them.

To select the resistance of each piece, you can use the components option box on the right side of the screen. Once you've made the adjustment, the colored bands on the resistor will change color to reflect the resistance (make sure to select the correct units, too).

Use the same methods for connecting the push-button from the Arduino diagram. To rotate the resistor, select it then hit the R. To bend a wire, just click somewhere (without a component) where you'd like the bend to occur.

Now, hit the Code Editor button to open the editor. It's exactly like using the Arduino IDE; just copy the instructions from the Arduino traffic light tutorial into the text box (note: there are some "intentional" errors in the code that you'll need to fix - if you'd like a complete and working example, check it out here).

After that, hit Upload & Run, and you have yourself a working virtual Arduino traffic light!

It can take a few minutes to get the hang of the interface, but once you do, adding components and editing the code is very intuitive.
What Else Have People Created?
The number of different components available combined with the flexibility of the platform means that prototypers around the world have created some really cool projects. Here are a couple of my favorites.
The NeoPixel clock is a very cool project that uses two circular LED boards to simulate the hands of a clock, and a small seven-segment display in the middle to indicate AM or PM.
A slightly less exciting, but potentially more useful circuit that you can check out is this weather station, which pulls weather data from the OpenWeather API to get the current temperature in San Francisco.

Not all of the projects are meant to be useful, though. Here's a reflex game that pits two players against each other and will turn on an LED for the player whose reflexes were faster.

There are all kinds of projects on 123D Circuits, from smart home automation projects to games and projects that just play around with motors to see what they can do.
A Valuable Resource
If you're a fan of Arduino, 123D Circuits is a great place to spend some time, whether you're looking to learn the basics or perfect your latest complex project. By giving you a way to rig up projects quickly, it can save you a lot of time in the prototyping phase. Of course, it's no substitute for an actual Arduino with wires, electricity, and real components, but if you need to work quickly or don't have access to what you need, it's a great tool.
Have you used an Arduino simulator like 123D Circuits? What did you think? Will you be using this tool in the future, or do you prefer to use a real board? Share your thoughts in the comments below!