Have you ever needed to know your computer's CPU or memory details, serial or model number, or installed software versions, but weren't sure where to look? With just a bit of simple code in Excel, you can extract a whole library of your Windows PC information.
Sounds too good to be true? Well, that's Windows, if you know how to use it.
You may need to get your hands a little dirty, but in this article we'll provide you with all of the code you need, and how to put it into Excel and make it work. Once you're done, you'll have an Excel sheet that, every time you open it, tells you everything you ever wanted to know about your computer system.
Note that this will only work with the desktop version of Excel, which you can get with a free trial of Office.
The Magic of WMI
On any computer running a Microsoft operating system, you have access to a powerful set of extensions called Windows Management Instrumentation (WMI), which provides you with a very powerful and extensive method to access information and specifications about your computer, operating system, and installed software.
Best of all, the WMI is accessible from programming languages like VBA, available in nearly all Microsoft Office products.
Setting Up Your Automated Spreadsheet
First, create your new Excel workbook and call it something like MyComputerInfo.xlsm (Macro enabled). Open it up, skip Sheet1, and rename the next 11 sheets as follows:
- Network
- LogicalDisk
- Processor
- Physical Memory
- Video Controller
- OnBoardDevices
- Operating System
- Printer
- Software
- Accounts
- Services
These will hold all of your computer details, and will get updated every time you open this Excel spreadsheet.
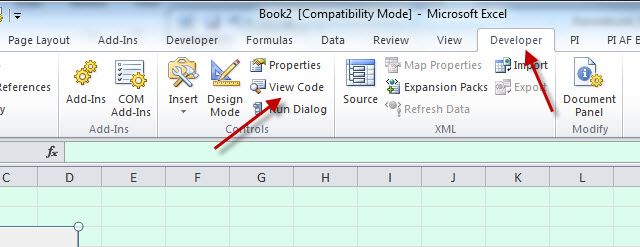
Next, go to the Developer menu item and under the Controls section click View Code.
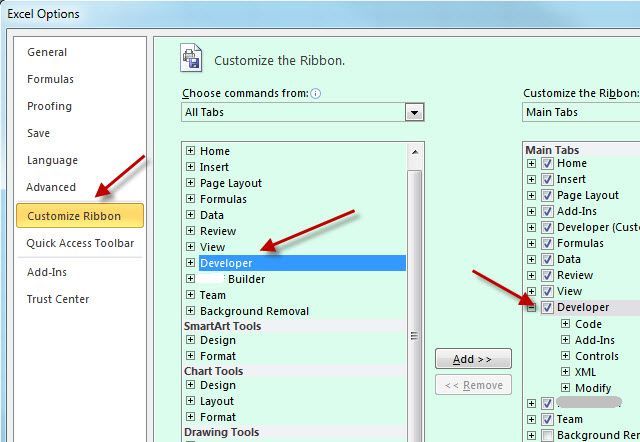
If you don't see the Developer menu item, click on File > Options > Customize Ribbon, change the Choose commands from dropdown to All Tabs, select Developer and press the Add>> button to add it to the Customized Ribbon side. Make sure the Developer checkbox on that side is selected once you've added it.
Once you're inside of the VBA code editor, all you have to do is add the scripts below to a module. These scripts will do all of the heavy lifting. You don't have to write this code yourself, just copy and paste them in as shown below.
Once you're done copying and pasting using the code in the next section, all you have to do is add a bit more code to load up your sheets, and you're done.
Okay, ready to copy and paste? Let's get to it.
Building Your WMI Modules
The inspiration for this code comes from a fantastic Google Sites resource called Beyond Excel. The example shown there is a subroutine called WMI(), which passes all of your computer's network information to the debugging area of the Excel programming environment.
Of course, it doesn't do us much good there, so I've modified the code to instead output all of the details to one of the sheets that you created in the first step of this guide.
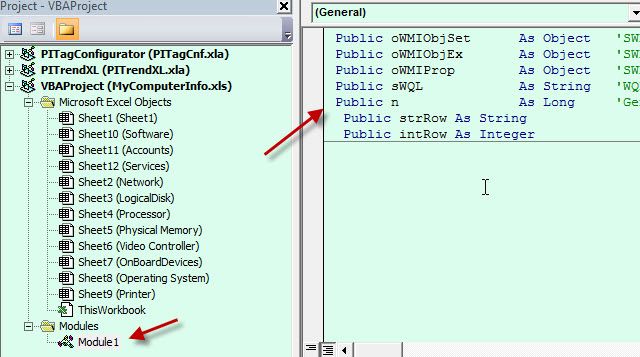
In the coding navigation area, you'll also see a section called Modules and a component under called Module1. Double click on this to open it. If you don't see the Modules folder, expand Insert from the menu and select Module.
This area is where all of the subroutines will be that will use WMI to pull all important information about your computer, and load it into the sheets you created.
Place the following lines at the very top of the code window all by itself.
        Public oWMISrvEx As Object 'SWbemServicesEx
Public oWMIObjSet As Object 'SWbemServicesObjectSet
Public oWMIObjEx As Object 'SWbemObjectEx
Public oWMIProp As Object 'SWbemProperty
Public sWQL As String 'WQL Statement
Public n
It should look like this when you're done:
Paste the following code into Module1 underneath the lines you just created:
        Sub NetworkWMI()

sWQL = "Select * From Win32_NetworkAdapterConfiguration"
Set oWMISrvEx = GetObject("winmgmts:root/CIMV2")
Set oWMIObjSet = oWMISrvEx.ExecQuery(sWQL)
intRow = 2
strRow = Str(intRow)

ThisWorkbook.Sheets("Network").Range("A1").Value = "Name"
ThisWorkbook.Sheets("Network").Cells(1, 1).Font.Bold = True

ThisWorkbook.Sheets("Network").Range("B1").Value = "Value"
ThisWorkbook.Sheets("Network").Cells(1, 2).Font.Bold = True

For Each oWMIObjEx In oWMIObjSet

For Each oWMIProp In oWMIObjEx.Properties_
If Not IsNull(oWMIProp.Value) Then
If IsArray(oWMIProp.Value) Then
For n = LBound(oWMIProp.Value) To UBound(oWMIProp.Value)
Debug.Print oWMIProp.Name & "(" & n & ")", oWMIProp.Value(n)
ThisWorkbook.Sheets("Network").Range("A" & Trim(strRow)).Value = oWMIProp.Name
ThisWorkbook.Sheets("Network").Range("B" & Trim(strRow)).Value = oWMIProp.Value(n)
ThisWorkbook.Sheets("Network").Range("B" & Trim(strRow)).HorizontalAlignment = xlLeft
intRow = intRow + 1
strRow = Str(intRow)
Next
Else
ThisWorkbook.Sheets("Network").Range("A" & Trim(strRow)).Value = oWMIProp.Name
ThisWorkbook.Sheets("Network").Range("B" & Trim(strRow)).Value = oWMIProp.Value
ThisWorkbook.Sheets("Network").Range("B" & Trim(strRow)).HorizontalAlignment = xlLeft
intRow = intRow + 1
strRow = Str(intRow)
End If
End If
Next
'End If
Next
End Sub
Now, you're going to create an identical function to this for every sheet you created in the first part of this guide with some minor differences.
For example, next you would copy that code above for NetworkWMI(), paste it underneath the end of that code, and then replace "NetworkWMI()" with "LogicalDiskWMI()"
There's only a few sections you need to change so that this code fills in the correct sheet.
Change this:
sWQL = "Select * From Win32_NetworkAdapterConfiguration"
To this:
sWQL = "Select * From Win32_LogicalDisk"
Change these four lines:
        ThisWorkbook.Sheets("Network").Range("A1").Value = "Name"
ThisWorkbook.Sheets("Network").Cells(1, 1).Font.Bold = True

ThisWorkbook.Sheets("Network").Range("B1").Value = "Value"
ThisWorkbook.Sheets("Network").Cells(1, 2).Font.Bold = True
To this:
        ThisWorkbook.Sheets("LogicalDisk").Range("A1").Value = "Name"
ThisWorkbook.Sheets("LogicalDisk").Cells(1, 1).Font.Bold = True

ThisWorkbook.Sheets("LogicalDisk").Range("B1").Value = "Value"
ThisWorkbook.Sheets("LogicalDisk").Cells(1, 2).Font.Bold = True
Change these two lines:
        ThisWorkbook.Sheets("Network").Range("A" & Trim(strRow)).Value = oWMIProp.Name
ThisWorkbook.Sheets("Network").Range("B" & Trim(strRow)).Value = oWMIProp.Value(n)
To this:
        ThisWorkbook.Sheets("LogicalDisk").Range("A" & Trim(strRow)).Value = oWMIProp.Name
ThisWorkbook.Sheets("LogicalDisk").Range("B" & Trim(strRow)).Value = oWMIProp.Value(n)
And these three lines:
        ThisWorkbook.Sheets("Network").Range("A" & Trim(strRow)).Value = oWMIProp.Name
ThisWorkbook.Sheets("Network").Range("B" & Trim(strRow)).Value = oWMIProp.Value
ThisWorkbook.Sheets("Network").Range("B" & Trim(strRow)).HorizontalAlignment = xlLeft
To this:
        ThisWorkbook.Sheets("LogicalDisk").Range("A" & Trim(strRow)).Value = oWMIProp.Name
ThisWorkbook.Sheets("LogicalDisk").Range("B" & Trim(strRow)).Value = oWMIProp.Value
ThisWorkbook.Sheets("LogicalDisk").Range("B" & Trim(strRow)).HorizontalAlignment = xlLeft
Now, you're almost finished!
Repeat the above for every tab in your workbook. The functions will be as follows:
- "ProcessorWMI()" for the "Processor" sheet.
- "PhysicalMemWMI()" for the "Physical Memory" sheet.
- "VideoControlWMI()" for the "Video Controller" sheet.
- "OnBoardWMI()" for the "OnBoardDevices" sheet.
- "PrinterWMI()" for the "Printer" sheet.
- "OperatingWMI()" for the Operating System sheet.
- "SoftwareWMI()" for the "Software" sheet.
- "ServicesWMI()" for the "Services" sheet.
The special "Win32_" objects you need to use to access this information about your computer are as follows:
- Win32_NetworkAdapterConfiguration - All of your network configuration settings
- Win32_LogicalDisk - Disks with capacities and free space.
- Win32_Processor - CPU Specs
- Win32_PhysicalMemoryArray - RAM/Installed Memory size
- Win32_VideoController - Graphics adapter and settings
- Win32_OnBoardDevice - Motherboard devices
- Win32_OperatingSystem - Which version of Windows with Serial Number
- WIn32_Printer - Installed Printers
- Win32_Product - Installed Software
- Win32_BaseService - List services running (or stopped) on any PC along with the service's path and file name.
Finish copying/pasting and tweaking each of those functions in the Module1 area of the code. When you're done, move on to the next section of this guide.
Remember to save your code in the VB view! If you initially saved your workbook with the .xls file type, Excel will now ask you to use a Macro enabled file type, such as .xlsm.
Automatically Loading the Workbook
Now that you have all of those powerful functions created, all that's left is to run them every time the workbook is opened. Doing this is really easy.
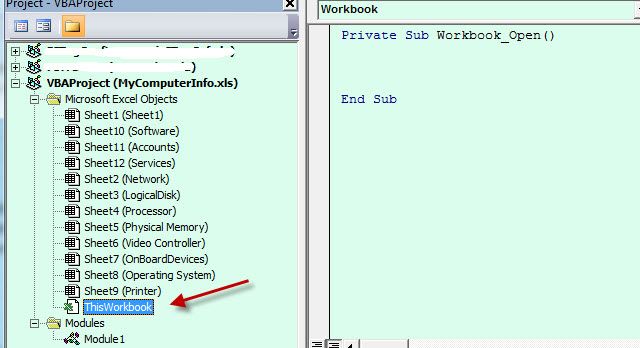
In the left object browser, under Microsoft Excel Objects, you should see ThisWorkbook. Double click on that object to open it.
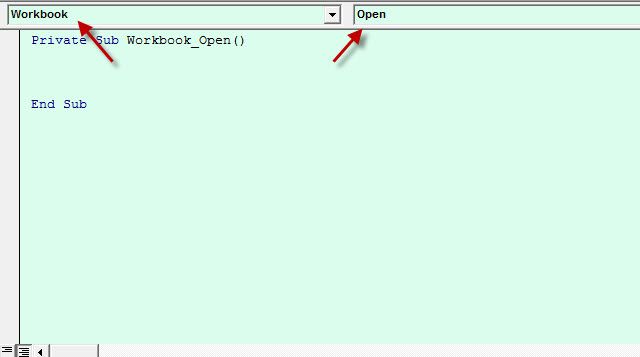
At the top of the code area, there are two dropdown boxes, change the left one to Workbook and the right one to Open.
You'll see a function automatically generated for you called Private Sub Workbook_Open().
Inside here, type the following lines of code so the function looks like this:
        Private Sub Workbook_Open()
NetworkWMI
LogicalDiskWMI
ProcessorWMI
PhysicalMemWMI
VideoControlWMI
OnBoardWMI
PrinterWMI
SoftwareWMI
OperatingWMI
ServicesWMI
End Sub
Now, every time you open the workbook, each of your newly created functions will get called, pull all the data from the computer, and load it into the appropriate sheet.
To see it in action, save the code, close the code window, save the workbook, and close that too. Re-open the file you just closed, and you'll discover that every single sheet holds volumes of data about your computer.
Since the workbook contains Macros, which can be disabled for security reasons, you might have to click Enable Content at the top of the sheet for data to be collected.
Warning - it collects a LOT of data, so expect to wait a few minutes for it to load when you first open the file.
Collecting Computer Information
The amazing thing about using WMI for this is that the data above is only the tip of the iceberg. There are hundreds more WMI classes available containing information about every aspect of your computer system.
If you were adventurous and wanted to take this a step further, you could turn the first sheet of the workbook into a dashboard, and use the data from the other sheets to feed that dashboard.
The bottom line is that using this new tool, you'll be able to collect and display more information than most IT experts even realize is available about a computer system, and you'll be able to do it in a fraction of the time those same experts spend digging through the control panel and Administrative areas searching for those details.
Do you see yourself building and using a tool like this? Are you a VBA programmer and have you ever used WMI classes? Share your own experiences and ideas in the comments section below!
Image Credits: Adriano Castelli via Shutterstock.com, Mclek via Shutterstock


