Windows power plans are a great way to manage your computer or laptop. Working in combination with the latest and greatest processors, your laptop's battery life can now last for over 10-hours, depending on the make and model.
Custom Windows power plans allow you to modify how your processor and other hardware components switch from low-power, low energy modes to high power modes and then back again.
So, here's how you craft a custom Windows power plan to extend battery life and save power.
What Is a Windows Power Plan?
A "power plan" is simply a collection of settings in Windows that determine how certain features operate. Windows power plans are not laptop specific. You can create and use a custom power plan on any Windows 10 computer, though the power plan options will vary depending on hardware.
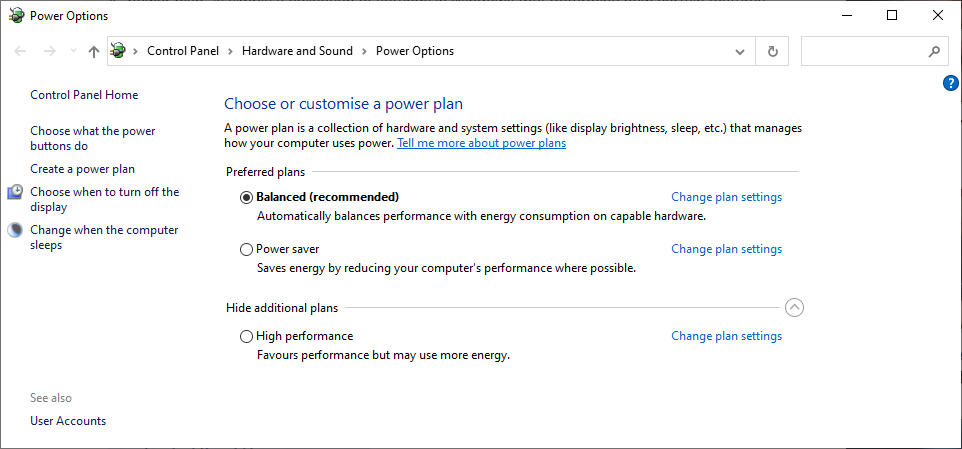
Windows 10 includes three default power plan options:
- Balanced: Windows 10 balances your system performance with energy consumption in relation to your system hardware. This means your CPU speed will increase as required and reduce when not.
- Power Saver: Windows 10 reduces your system performance to save battery power. Your CPU will run at lower speeds as much as possible, while other power savings come from reduced brightness, switching the screen off quicker, switching your hard drive or Wi-Fi adapter into power saving mode, and so on.
- High Performance: Windows 10 cranks the performance dial up but increases power consumption. Your CPU will run at faster speeds most of the time, your screen brightness will increase, and other hardware components will not enter power-saving mode during periods of inactivity.
Although the Windows 10 power plans attempt to help increase performance or battery life, they're not perfect. Furthermore, you can override the power plan through your regular usage. For example, you can switch the power saver power plan on to reduce your screen brightness, but it doesn't stop you from cranking it back up again.
At times, the use of certain applications will force you to switch power plans, too. If you want to play an intensive game on a laptop, for example, you will have to leave the power saver power plan to enable your CPU to run at full capacity. Games and other CPU intensive activities will ignore the power plan restrictions on CPU performance, using CPU turbo boost as required.
How to Switch Windows Power Plans
There are a couple of ways you can switch between power plans on Windows 10.
Desktop Power Plan Switching
On a desktop computer, the fastest and easiest method is to input power plan in your Start Menu search bar and select the Best match from the results.
The Control Panel Power Options page will open. Select your preferred plan, and you're good to go.
Alternatively, you can press Windows Key + I, then input power plan in the Settings app search bar. Select Edit power plan to open the Control Panel page.
Laptop Power Plan Switching
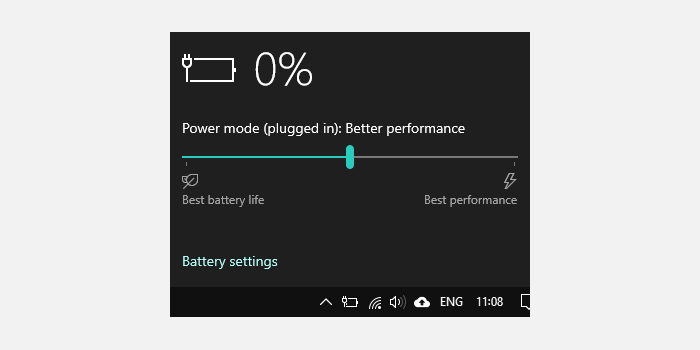
If you're using a Windows 10 laptop, you have an alternative power plan management option. As you're using a battery-powered device, there is a battery icon in your system tray.
Select the battery icon to reveal the power plan slider. Slide to the left, and you're increasing your laptop battery life (power saver plan). Slide to the right, and you're increasing your laptop performance (high-performance plan).
You can right-click the battery icon and select Power Options to open the power plan Control Panel Power Options or use the shortcuts in the previous section.
Creating a Custom Power Plan to Save Battery Life and Reduce Power Consumption
Sometimes, none of the default power plans suit your requirements. You might use a laptop with a portable battery and want to extend both devices' battery life. In that instance, you can customize a power plan to suit you.
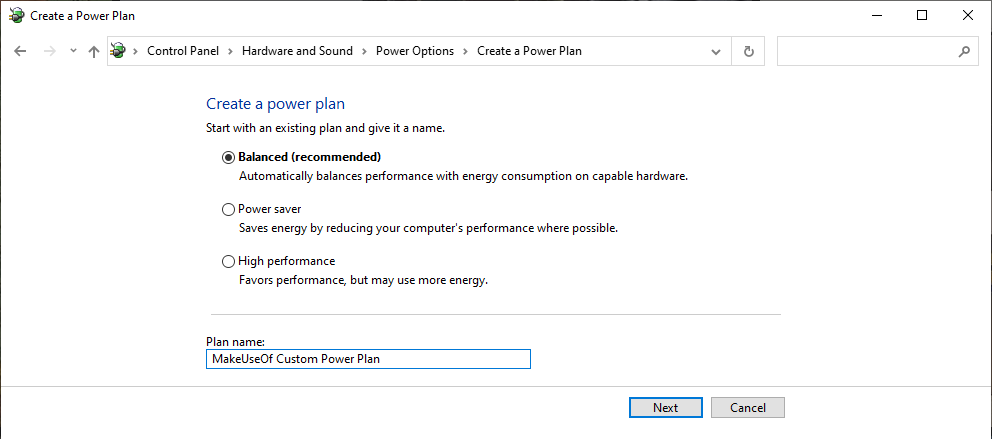
To create a custom power plan, select Create a power plan from the Control Panel Power Options menu, on the left of the window. Give your power plan a name and select the existing plan you want to base your plan upon.
When you create a custom power plan on Windows 10, there are a few settings for you to consider.
1. Turn Off the Display and Put the Computer to Sleep
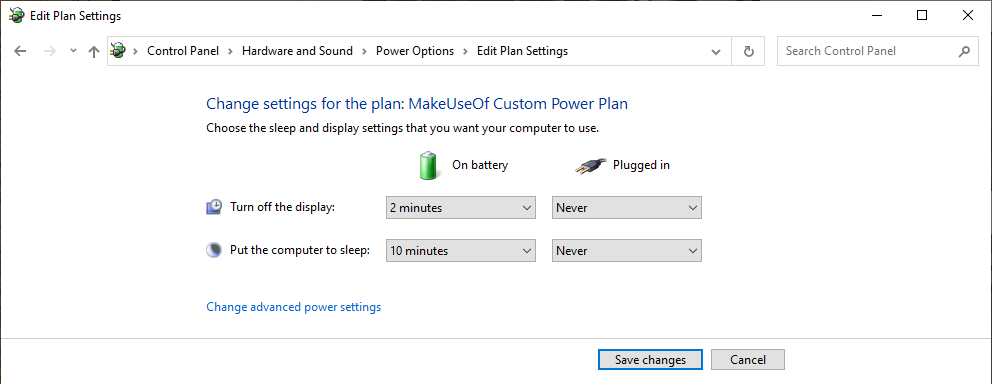
The first two settings are the easiest to tweak. How long do you want your display to remain idle before switching off, and how long should the computer idle before switching to sleep mode?
On portable devices, Windows 10 provides an option for On battery and Plugged in. You might have to play around with timings to find your sweet spot. If extending your custom power plan is all about power saving and battery life preservation, set the numbers as low as possible.
Display Brightness
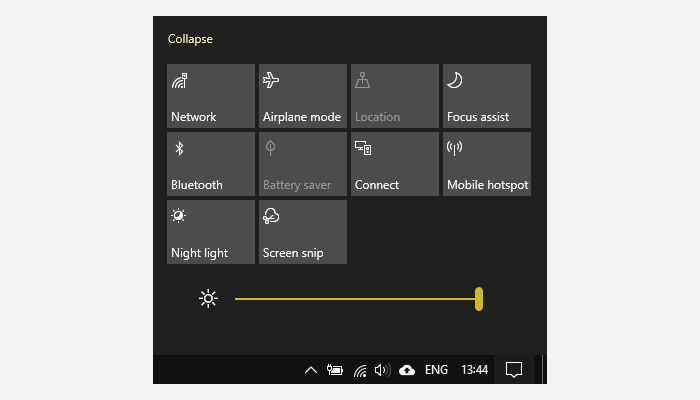
Wondering where the display brightness toggle setting is? Microsoft removed the option to set display brightness (as well as adaptive brightness) through your power plan in Windows 10 update 1809. The move is infuriating, as the display brightness option was another handy power saving factor you could customize.
You can still change how bright your display is without the toggle. Tap the Notification icon on the bottom right of your screen to open the Action Center. At the bottom of the panel is an adjustable brightness slider.
Don't discount the power savings an even slightly dimmed monitor will deliver. Power savings vary between monitors, but according to this tip from Harvard Law School's Energy Manager, reducing your computer monitor brightness from 100-percent down to 70-percent can "save up to 20% of the energy the monitor uses." You might not notice that 30-percent brightness reduction too much, but you'll note the extra battery power!
2. Advanced Sleep Settings
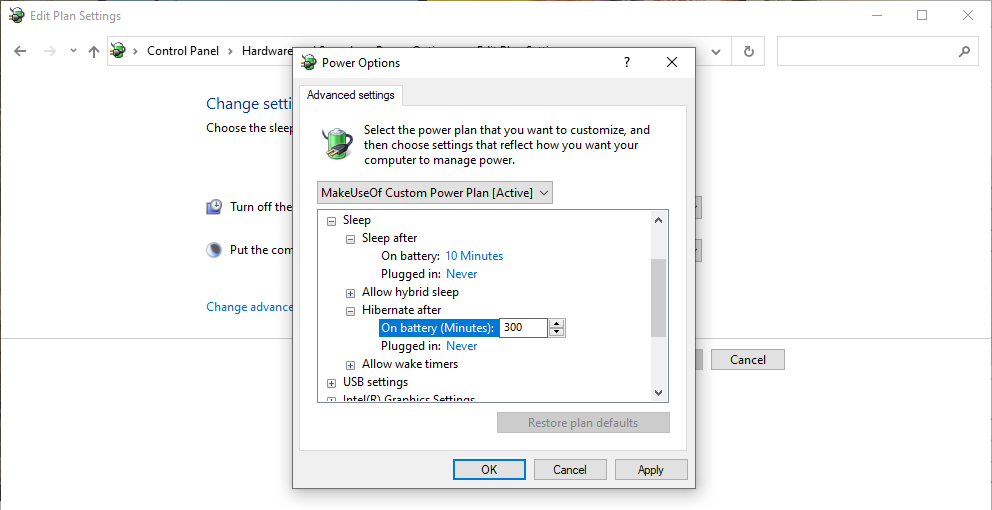
The sleep timer in the basic settings isn't the only adjustable option. The Windows 10 power plan advanced settings hide a host of customizable options. Select Change advanced power settings to open the advanced menu.
You'll find three additional sleep options; Sleep after, Allow hybrid sleep, and Hibernate after. Hybrid sleep attempts to combine the sleep and hibernate mode into a single mode and is intended for desktops, so ignore that for now.
You can switch out the option to put the computer to sleep with hibernate using a combination of the "Sleep after" and "Hibernate after" options. If you set the sleep timers to Never, and set a time for the hibernate timers, your computer will hibernate instead of sleep after a certain period.
The best option for maximum battery preservation is a combination of the two. Allow your computer to enter hibernation mode after a certain period, rather than keeping it exclusively in sleep mode (which uses more overall power).
What Is Hibernate?
Hibernate dumps your system RAM to your hard drive and then shuts down your computer, which drastically cuts (but does not completely eliminate) power draw. Furthermore, your computer's state saves to your hard disk, so you don't run the risk of losing data when the battery gives out (a common problem with sleep).
Restoring from hibernation takes longer than the effortless sleep restoration, so that's another consideration.
3. Processor Power Management
Display brightness helps reduce power use and increase battery life. But it isn't the only thing affecting power consumption on your custom power plan. The amount of power your CPU uses depends on how you use it. Running a demanding program (or multiple programs) can cause your power draw to increase drastically, regardless of the power plan you use.
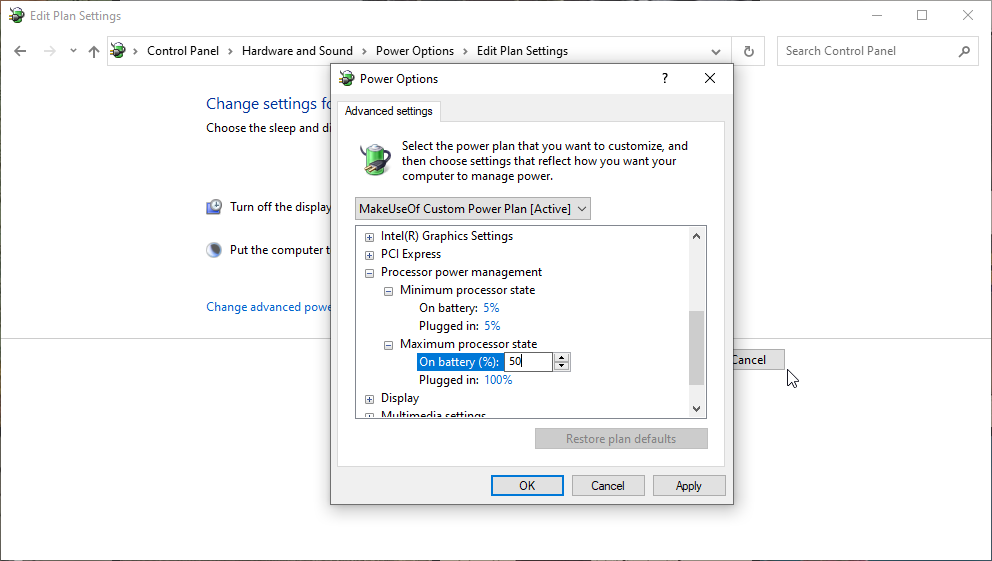
The Processor power management option controls your CPU output, providing a percentage amount for the minimum and maximum state.
If your maximum state is set to 100-percent, your CPU will use its full capacity when required. Whereas, if you set the maximum state to 50-percent, your CPU will use less capacity (though not exactly half as the percentage amount implies). That is to say, if you have a 2.0GHz processor and set the maximum processor state to 10-percent, your laptop won't use just 200MHz of its potential.
The processor power management option is somewhat like an underclocking tool, allowing you to use fewer CPU resources. In turn, you'll save some power and battery life.
It isn't a perfect science. You'll have to experiment with the best option for your device along with the applications you regularly run.
4. Wireless Adapters and Graphics Settings
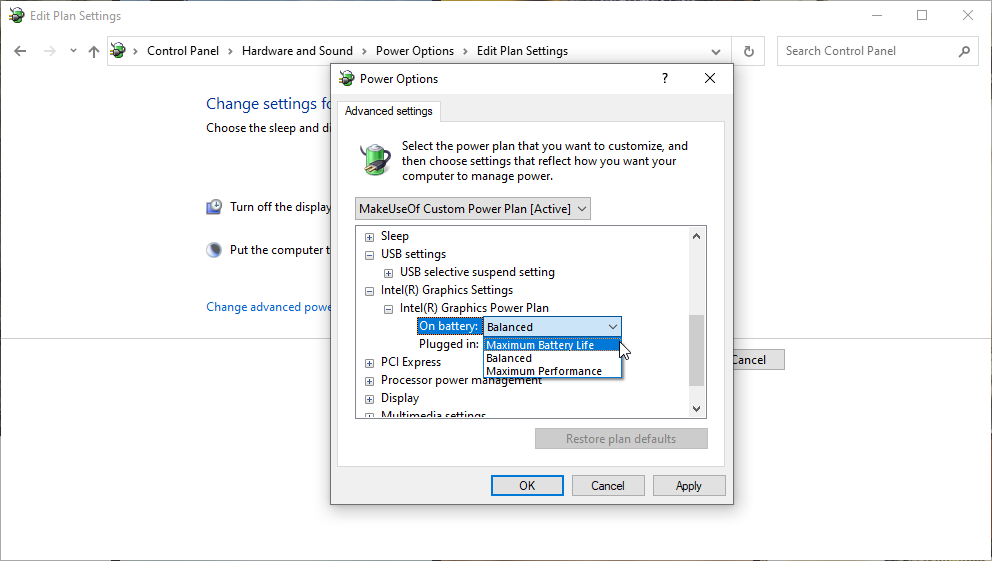
If you're using an Intel system, you'll find an Intel Graphics Settings option in the advanced power plan menu. This option lets you define a default level of graphics for your integrated CPU graphics settings, switching between Balanced, Maximum Battery Life, and Maximum Performance. If you're looking to extend battery life and reduce power consumption, switch to Maximum Battery Life.
Another power-saving option in your custom power plan is Wireless Adapter Settings. Your wireless adapter can periodically power down to save battery life. Changing this setting adjusts the period before the Wi-Fi adapter sleeps. For maximum battery life, switch to Maximum Power Saving.
5. Other Settings
There are a lot of settings to fiddle with in the advanced power plan options. But, There's a number of settings that have no meaningful impact, even when they work correctly. Irrelevant settings include those listed under desktop background settings, USB settings, power buttons and lid, and multimedia settings.
Some of these, like desktop background, have laughably little to do with power draw. Whether or not your computer's background changes every minute, three minutes, or ten minutes is completely irrelevant.
Other options, like changing the speed with which your hard drive turns off, are theoretically useful. Still, the component in question uses so little power that its impact on battery life is difficult to notice outside of carefully constructed, instrumented tests.
A mechanical hard drive, for example, demands between one and three Watts while active—but spends the vast majority of its time at idle, consuming just a few tenths of a Watt. Solid-state drives use even less power.
You could spend weeks testing these settings with a wattmeter and a stopwatch and never obtain a quarter of the gains you'll receive by decreasing the brightness of your display when it doesn't need to be at its maximum. Don't waste your time; focus on the fundamentals.
Save Battery Power with a Custom Power Plan
Your Windows 10 power plan can save your battery's charge, but there are limits to how much it can do. As you have read above, the biggest power savings come from turning your screen brightness down and using idle modes more efficiently. You can also attempt to moderate the type of work you do while using your battery power. For example, stick to word processing and emails while using the battery, rather than rendering a giant 3D image.

