Hollywood movies look stunning. Countless hours are spent making sure of it. But, have you ever wanted to appear in a movie? Well with Photoshop, recreating the cinematic look from a film is pretty simple. It won't work with video, but it will make your Facebook profile picture seem like a movie still.
What Is the Cinematic Look?
The cinematic look is what separates a Hollywood film from the video you shot on your smartphone. Recreating it accurately for video requires a lot of work in-camera. Thankfully, today we're just looking at mimicking the effect for a movie still so we don't have to worry about shutter speeds, frame rates, or any of that.
There are three things typically associated with the cinematic look that are relevant to stills:
- A relatively shallow depth of field.
- A 2.37:1 aspect ratio.
- Professional-looking color grading.
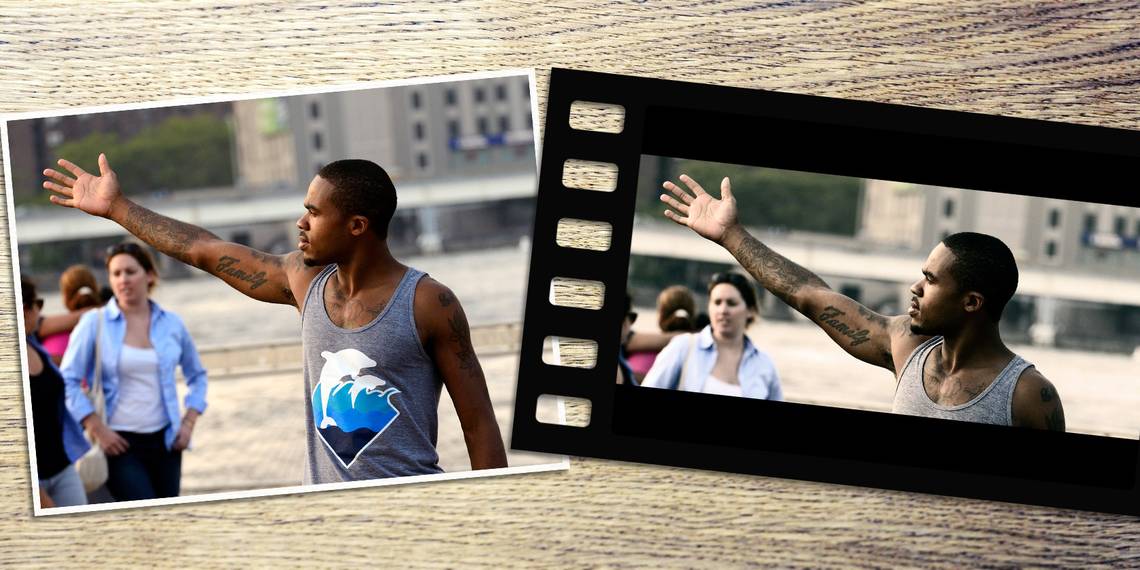
While cinematic films rarely use a depth of field as shallow as some photography, it's a lot shallower than other kinds of movie footage. Objects in the background of a close-up shot will normally appear blurry, but still somewhat recognizable. Rather than trying to add this blur in Photoshop, it's best to select an image with a relatively shallow depth of field. Something shot with an aperture of between f/5.6 and f/8 normally works great. I'm using this awesome shot from Steven Pisano which is perfect:

The aspect ratio of films is much wider than widescreen TV or photographs. While they use 16:9 or 3:2, movies generally use an aspect ratio of 2.37:1. This is easy to recreate in Photoshop, but it's important to choose a photo to follow along with that will look good when cropped to that ratio.
Finally, getting the color grading right is the most important part of recreating the cinematic look. Filmmakers rarely use realistic colors in their scenes, instead, they use different color grades to match the emotion they want the audience to feel.
An incredibly popular color grade at the moment is to have teal-tinged shadows and orange-tinged highlights. You can see a great example of it in the Mad Max: Fury Road trailer above.
Now that you have an idea of what we're going to do, grab an image and let's get started.
Sorting the Aspect Ratio
Open the image you're using in Photoshop. The first thing we're going to do is fix the aspect ratio. Rather than crop the image to 2.37:1, we're going to crop it to 3:2 and then add black letterboxing -- like what you see when you watch a movie on your computer.
Select the crop tool (the keyboard shortcut is C) and set the ratio to 3:2. Crop your image making sure to leave plenty of room to cut it down to 2.37:1.

Create a new layer with Command + Shift + N or Control + Shift + N, grab the Rectangular Marquee tool with the M key, and set its Style to Fixed Ratio and enter 2.37 for the Width and 1 for the Height.

The next sequence of events might seem a little confusing; just follow my instructions exactly. If in doubt, watch the screencast to see me do it.
- Use the marquee tool to draw a full-width selection.
- Press D to reset your color swatches to their default values.
- Use Option + Delete or Control + Delete to fill the selection with black.
- Select the move tool (keyboard shortcut V), press Command + A or Control + A to select everything and then, in the menubar, choose Align Vertical Centers. This position the 2.37:1 section in the exact middle of the document.
- Command + Click or Control + Click on the layer with the black rectangle to select it.
- Press Backspace or Delete to remove the black rectangle.
- Press Command + Shift + I or Control + Shift + I to invert the selection.
- Finally, press Option + Delete or Alt + Backspace to fill the selection with black. The letterbox effect should now be set up.

To finish, select the photo layer, grab the transform tool with Command + T or Control + T, and reposition the image so it looks good within the widescreen frame. Pay attention to the rules of composition while you do.

Color Grading the Image
Now that the image is cropped and composed, it's time to focus on the color grading. I'm going to use the teal-orange effect I mention earlier. You can use the same technique to tone your image any color you like.
Select a Gradient Map adjustment layer. This remaps the colors in the image to a gradient. By default, it's set to black and white.
Double-click on the gradient to access the gradient editor and then again on the black color stop to select a new dark color for the gradient. I'm using the teal below.

Double-click on the white color stop and select an orange.

Once you're done, click OK.

We're going to need two of these gradient layers so duplicate it with the keyboard shortcut Command + J or Control + J.
Select the bottom gradient layer and change its Blend Mode to Color. Lower its Opacity to about 30%.
Select the top gradient layer and change its Blend Mode to Soft Light. Lower its Opacity to about 20%.

The image should now look a lot more like a movie still.
Finishing Tweaks
The final step is to tweak the overall exposure and color of the image. Films often have quite a bit of contrast so feel free to add a Curves adjustment layer to tweak it. Similarly, if the colors don't look quite right, add a Hue/Saturation adjustment layer and dial things in.

For my finished image, I added some contrast with Curves and desaturated everything by about 15%. Overall, I think it looks great.
Conclusion
Hollywood films have a certain look that's ingrained in popular culture. Most people can instantly spot the difference between a movie and footage from a TV show. With this simple Photoshop technique, you can make it appear like you're a movie star.