Python has taken the coding world by storm. Alongside the rise of this new language, the DIY electronics scene has also flourished. Development boards and single board computers from companies like Arduino and Raspberry Pi have changed the way people create home brewed electronics. Wouldn't it be awesome if you could program an Arduino with Python?
There is no better feeling than combining two cool things. Sadly, it is impossible to directly program an Arduino with Python, as the boards have no option for onboard interpretation of the language. What is possible however, is direct control over USB using a Python program.
This article will show you how to set up an Arduino UNO (though any Arduino compatible board can work here) to be programmed and controlled from the command line using Python programs. This tutorial is written for Windows 10, but also works for Mac and Linux. You could even use this workflow to control an Arduino directly from a Raspberry Pi for the ultimate double-down-DIY experience.
Setting Up Your Arduino for Python
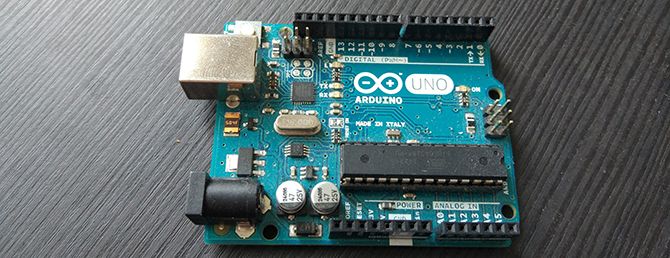
For today's project we will be using an Arduino Uno, along with the pyFirmata interface for Python. You can use almost any Arduino-compatible board for this, though at the time of writing only the Arduino Uno, Mega, Due and Nano are supported by the pyFfirmata interface. If you are already a Python guru, you can add your own board support to pyFirmata -- be sure to update their GitHub if you do!
If you haven't already, install the Arduino IDE. If you are completely new to the world of microcontrollers, our beginner's guide to Arduino will help you get everything in place.
Connect your Arduino board, and open up the IDE. Make sure you have the correct board and port selected in the Tools menu. Load up the StandardFirmata example sketch and upload it to the board. This will allow you to control the Arduino directly so long as it is connected to the computer via USB. Provided the sketch uploads to your board without any errors, you are ready to move on.
Python and Command Line Control
We'll use Python 3.4 to control our Arduino, as the module you will be installing specifies this as the latest compatible version. Any version before this should work fine, and later versions have been reported to work. You can download Python 3.4 for Windows 10 from the Python Software Foundation site. If you want to run multiple version of Python, our guide to Python virtual environments will be able to help you.
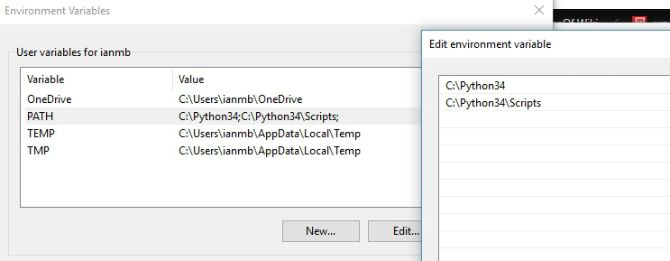
Once you have installed Python, we want to add it to your system's PATH variable. This will let us run Python code directly from the Command Line without needing to be in the directory it was installed in. You can do this by opening the Control Panel, searching for Environment and click on Edit the system environment variables. At the bottom of the window select Environment Variables. This will bring up this window:
If you already see PATH in the list, click edit, and add your Python and Python/Scripts directory. If you don't have a PATH variable, click new and add it. Note that Python was installed directly into the C:\ here. If you installed it elsewhere you'll need to modify it to reflect this. Click OK back down the chain of windows, and you're almost ready to control your Arduino with Python!
The Magic Grease
You'll need one final piece of the puzzle to get Python talking nicely with our Arduino. This comes in the form of a Python interface called pyFirmata. This interface, created by Tino de Bruijn is available to download from github, though you can install it straight from the command line by typing:
pip install pyfirmata
All being well, it should install and look like this:
If it fails, go over adding Python to the Environment Variable section and make sure you've given the right path to your Python directory.
Making It Happen
Now everything is set up, and you can create a Python program for your Arduino to test it. Open up an IDE of your choice. We will be using Eclipse today, but you could just as easily use any text editor, or even an IDE in the cloud.
Create a new script, and save it as blink.py. Breaking tradition with the standard blinking LED program, you are going to create a program which prompts the user for the amount of times they want the LED to flash before carrying it out. It's a short program, which you can download here if you want to get straight to it, but let's break it down.
Firstly, you'll want to import what you need from the pyFirmata module, along with the standard Python Time module.
        from pyfirmata import Arduino, util
import time
Now you'll want to set up the Arduino board. This article assumes you are using an Arduino Uno board, though several other Arduino boards are supported. Refer to the pyFirmata github for details on board support.
Check which COM port you are using in the Arduino IDE, and enter it into your code as the variable board.
board = Arduino("COM3")
Now you'll set up the user prompt. Those familiar with Python will recognize everything here. You print a question to the screen using the input function, and store the answer as a variable. Once the user has provided a number, the program reports back how many times the LED will blink.
        loopTimes = input('How many times would you like the LED to blink: ')
print("Blinking " + loopTimes + " times.")
To make the LED blink the appropriate number of times, you use a for loop. If you are new to Python, take care with the indentation, as unlike other languages the spaces are part of the syntax. Note that pin 13 is the onboard LED for the Arduino Uno, you will need to modify this if your board is different.
        for x in range(int(loopTimes)):
  board.digital[13].write(1)
  time.sleep(0.2)
  board.digital[13].write(0)
  time.sleep(0.2)
You'll cast the loopTimes variable to an integer here, as the input from the user will be automatically stored as a string. In this simple demo, we are assuming the user will input a numerical value. Any other entry such as 'eight' will throw an error.
Save your script, and open up the Command Prompt.
Blinking Lights and Other Revelations
Everything is ready to go, all you need to do is navigate to where the script is and run it. Do this by typing cd [path to the script's directory] and then typing python blink.py.
All being well, your program will start with a slight delay as the Arduino initializes, prompt you for a number, and then flash that many times using the onboard LED.
The program output should look like this:
As soon as you press enter after your chosen number of blinks, the Arduino should carry out your orders.
Small Beginnings
This project has been a barebones start to communicating between Python and an Arduino board. This approach is very different to the usual workflow of uploading scripts to the Arduino itself, yet it opens a whole new way of working with the platform, especially if you like the Python programming language.
If you use a Linux server at home, this method of communicating with Arduino boards could extend that server into a fully fledged DIY Home Automation system. By combining Python scripts controlling the microcontroller with a DIY automation circuit, Your NAS storage box could take on a whole new set of useful functions.
To make it the ultimate DIY experience, why not build your own NAS box and use it to also control your appliances? Imagine how cool it would be to press play on your Plex server and have the lights turn themselves off automatically!
Are you already controlling Arduino using Python? Are there amazing workarounds we just don't know about yet? Let us know in the comment section below!


