The pomodoro technique is a popular time management system that involves breaking work into 25 minute chunks with a 5 minute rest. Various software exists to help with this, but what if you want to use the pomodoro system while you're working away from your computer, or while you're at your workbench? Making an Arduino-powered pomodoro timer is a great introductory project to help you learn your way around an Arduino, and will actually result in something useful.
The Goal
In case you'd like to try to figure out how to set this up before looking ahead, here's what we're trying to do. We'll have three lights; one for "work," one for "break," and a warning light. The work light will stay on for 25 minutes, and the warning light will also be on for the last two minutes of that interval. After 25 minutes, the work and warning lights will turn off, and the break light will turn on for 5 minutes (the warning light will again be on for the last two minutes).
Also included will be a button that will delay the change of the lights for two minutes to give you a little extra work time or break time.
What You Need
For this project, we'll be using the follow parts - all of which you should have in your starter kit.
- Arduino microcontroller (we used a Mega, but Uno would work just fine too)
- Breadboard
- USB cable
- 6 wires
- 3 x 330 Ohm resistors
- 3 x LED (we've used green, yellow, and blue)
- 1 pushbutton
Step 1: Setting Everything Up
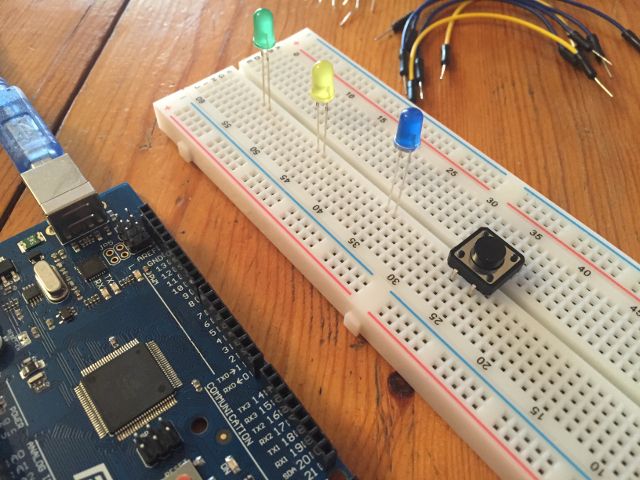
Put each of the LEDs into a different column on the breadboard (it's easiest if they're spaced out a bit), and place the button a little further down. Make sure that the button is facing the right direction—there are two sets of two pins on a single side of the button, and those pins need to be in the same row.
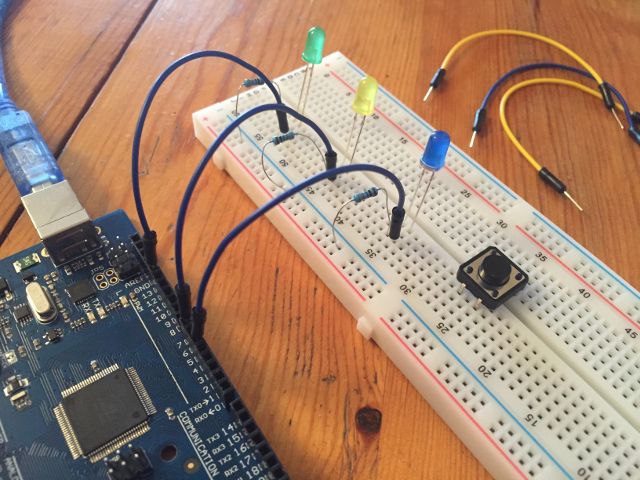
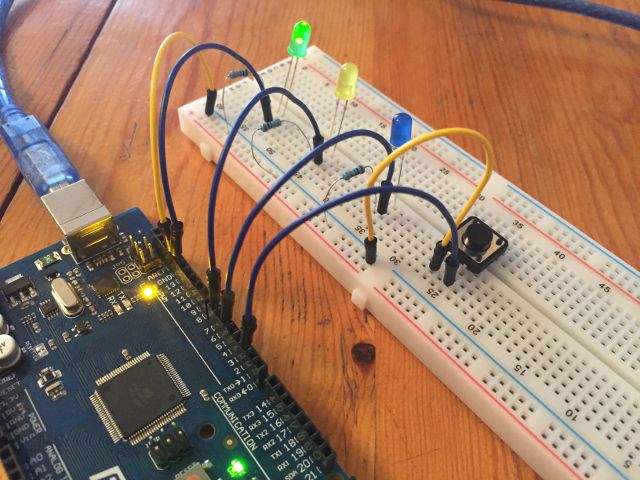
Run wires from pins 5, 7, and 13 to the column that contains the negative leg of the blue, yellow, and green LEDs (the negative leg is the shorter of the two). Next, put a resistor in the same column as each positive leg, and connect them to the negative rail on the side of the breadboard (the blue one, though the color doesn't really matter, it's just convention to use blue for clarity).
Also run a wire from the blue rail on the breadboard to one of the legs on the button, and another wire from the other leg (on the same side) to pin 2 on the Arduino. Then ground the blue rail into the GND pin on the Arduino.
Here's a diagram that should clear up any confusion:
That's it's! Now on to the programming.
Programming Your Arduino
Below is the code for the Pomoduino timer - have a read through the inline comments, as they explain what each step of the code is doing.
int green = 13;
int yellow = 7;
int blue = 5;

int ledStateGreen = LOW;
int ledStateBlue = LOW;
long previousMillis = 0;
long interval;

int buttonPin = 2;
int buttonState = 1;
bool pressed = 0;
long pressTime = 0;

int phase = 0;

void setup() {
 pinMode(green, OUTPUT);
 pinMode(yellow, OUTPUT);
 pinMode(blue, OUTPUT);
 pinMode(buttonPin, INPUT_PULLUP);
 digitalWrite(buttonPin, HIGH);
}

void loop() {

// update current time and state of button
unsigned long currentMillis = millis();
int buttonState = digitalRead(buttonPin);

// measure time since last button press
long progress = currentMillis - previousMillis;

// check to see if button has been pressed
// over 2 seconds since last press
// (to prevent multiple presses registering)
if ((pressTime - currentMillis) > 2000){
 if(buttonState == 0){
   pressed = 1;
   pressTime = currentMillis;}
 else{
    pressed = 0;}
}

// phase 0 is "work" phase
// if button has been pressed, add 2 minutes to work timer
if (phase == 0){
 if (pressed == 1){
   interval = 1620000;}

 // if interval is over, record current
 // time for measuring next interval
 if(currentMillis - previousMillis > interval) {
   previousMillis = currentMillis;

 // set green and blue LED states
 if (ledStateGreen == LOW){
   ledStateGreen = HIGH;
   ledStateBlue = LOW;}
 else {
   ledStateGreen = LOW;}

 // apply LED states to LEDs
 // reset interval and switch to "break" phase
 digitalWrite(green, ledStateGreen);
 digitalWrite(blue, ledStateBlue);
 interval = 1500000;
 buttonState = 1;
 phase = 1;
 }
}

else {

 // if button has been pressed, add 2 minutes to break timer
 if (pressed == 1){
 interval = 420000;}

   // if interval is over, record current
   // time for measuring next interval
   if(currentMillis - previousMillis > interval) {
     previousMillis = currentMillis;

   // set blue and green LED states
   if (ledStateBlue == HIGH){;
     ledStateBlue = LOW; }
   else {
     ledStateBlue = HIGH;
     ledStateGreen = LOW;}

 // apply LED states to LEDs
 // reset interval and set to "work" phase
 digitalWrite(green, ledStateGreen);
 digitalWrite(blue, ledStateBlue);
 interval = 300000;
 buttonState = 1;
 phase = 0;
 }
}

// calculate time left in interval
unsigned long timeLeft = (interval - progress);

// if there are less than two minutes left, light up yellow LED
if (timeLeft < 120000) {
  digitalWrite(yellow, HIGH); }
else {
  digitalWrite(yellow, LOW); }

// reset pressed variable
 pressed = 0;
}
Note: when you're testing this, you probably don't want to wait for 25 minutes to see if it works. In the video below, I have the intervals set to 5 seconds for green, 2 seconds for blue, and 1 second for yellow. Use a shorter interval to make sure everything's working correctly before you use it to keep track of time!
Once you have everything wired up and the code entered into the IDE, you're ready to go! Upload the sketch and you'll have a working pomodoro timer with a 2-minute delay button. If the warning light goes on and you need more time, just hit the button.
You may notice that the button is wired up directly to the Arduino input pin. By using one of the pullup resistors built into the Arduino, you don't need to run a wire from the 5V port to the button or use a resistor in line with it. You can get more information on the Arduino reference for digital pins.
More Advanced Challenges
If you've made your Pomoduino and you're looking to take on something slightly more advanced, you could try any of the following:
- Add a sequence of LEDs that light up and serve as a counter of the number of completed work sessions
- Make the button add two minutes to the timer for each time you push it
- Add a speaker and play a noise when it's time to get back to work
- Use a 9V battery to make it portable
- Instead of using a warning light, blink the green or blue light for a minutes before switching
- Display a countdown on an LED display
Other Great Beginner Projects
If you're new to Arduino, we have plenty of fun tutorials for you to take on. Try a traffic light controller, a futuristic LED cube, a sunrise alarm, or an alarm system. If you decide to take on one of the more advanced challenges listed above, let us know how it goes!


