Today’s post comes from Shira Z. Carmel, a musician, teacher, and designer from Jerusalem, Israel. I met Shira a couple of weeks ago and was quite impressed with her custom phone cover. When she told me she made it herself, I had to know how. Shira was kind enough to repeat the process, and take a photo of each and every step.
This process works with any phone – in fact, it works with any plastic surface, really. If you want to create your own cell phone case for a completely unique, handmade look, read on.
What You’ll Need

To make this work, you’ll have to get:
- A phone case made of plastic.
- "Napkin glue," which you can easily get at any craft store. I have "Mod Podge," which cost around $4.
- A nice napkin with a pattern or a cool picture on it (fancy patterned tissues could work as well).
- A pair of scissors.
- Optional: a paintbrush.

This is the cover I bought (it was just $7). It has two parts – we'll use the hard plastic (pink) part.
The Process
The first step is to separate the top layer (out of three) of the napkin, so you’re left with a very thin piece of patterned tissue:

Next, we need find a pattern that we like on the napkin, one that fits the size of the surface we want to cover:

Actually – I like this one better! Do bear in mind that white napkins become transparent in this process.

Now, cut the napkin down to size so it's easier to handle:

Next, coat the surface with a nice, even layer of glue. You can use your fingers (fun!) or a (clean) paintbrush:

Now we come to the most important part of the process. Carefully and quickly stick the napkin onto the adhesive surface. Start with the part that’s most important to you first, and make sure it’s in place:

Don’t stick the napkin into place all at once. The most common issue with this process is getting tiny bubbles or wrinkles on the surface, so be gentle here, sticking just a bit at a time and smoothing things over as you go. If the napkin stats tearing, don’t panic: Just straighten it back into place; it’ll look fine in the end. And here it is – as you can see, there are some bubbles and cracks along the surface, but we’re going for a handmade look so this isn’t a big deal:

Next, apply a nice, even layer of glue over the napkin (a top coat). The first layer doesn’t have to be dry, but you must take care not to tear the napkin up. This is a good time to start using the brush (be sure to wash it well afterwards):

After the first top-coat, your custom case should look like this:

Make sure you glue the sides, too, so the napkin doesn’t fall off or tear out:

Now let everything dry for a while, and then put on another layer of glue.
After the second layer, carefully cut away all of the extra napkin bits so you end up with just what you need:

Now, carefully clear out the hole for the lens, as well as any other holes:

Apply a layer of glue to the sides of the holes you just cleared, so the napkin doesn’t start fraying from there:

At this point, I decided the front end of the case seemed a bit dull, so I cut out a nice flower from the napkin and applied it individually using the same technique (initial layer of glue, then stick it on, then two top coats):

If you apply the pattern to the front of the case, too, you have to get creative with how you leave it to dry:

All that remains now is to let your design completely and fully dry. Give it some time – go have a cup of tea, or even turn in for the night and continue tomorrow.
Finally, it was time to fit the case back together:

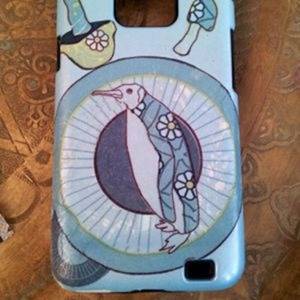
And this is what it looks like:

The edges are slightly frayed, but it’s really a matter of how delicate (and lucky) you are. You can compare with the edges on this other design I made:

With enough practice and patience, you can get to a truly gorgeous level of finish.
Makes a Great Gift
Do you have friends or family that appreciate handmade gifts? This is an inexpensive and fun way to show your love. And if you do create your own cell phone case like this, don’t forget to share some photos in the comment section below!
Once again, I’d like to thank Shira for taking the time to share this technique with exacting detail.