I bet you didn't know that you could write shell scripts in Python: sh.py allows you to call programs, pass parameters and handle outputs.
I bet you didn't know that you could write shell scripts in Python.
For any programmer or systems administrator, shell scripting is a vital skill to master. It allows you to automate tedious tasks, turning them into consistent, repeatable actions. The problem is that it can be a bit daunting, especially when you consider that most shell-scripting dialects lack the syntactical finesse found in the likes of Python and Ruby.
I’ll be even blunter. Most shell scripts are uglier than the average pug.
Furthermore, there’s a variety of shells available for UNIX-like platforms, including Bash, CSH, KSH and (my favorite) FISH. As a result, writing consistent, shell-scripts that work across each platform can be challenging.
There has to be a better way, right?
Introducing sh.py
There is. When I’m not writing for MakeUseOf, I’m writing code in Python for fun and profit. I really like Python due to its flexibility, its inherent beauty and how it mandates the writing of good code by design. If that sounds good to you, but you don't already know this awesome language, why don't you check out these five great websites to learn Python programming?
I came across this really awesome library a few months back called sh.py, which allows you to call programs, pass parameters and handle outputs, all within the confines of a Python program.
So, what does this mean? Simply put, it means that you have the full functionality of shell scripts, but from within a language that is easy to read, is modular in nature and supports object oriented programming. Cool, right?
So, how do we use it?
I’m making a few assumptions about you. The first is that you’re running Linux, OS X or FreeBSD. As it is right now, sh.py doesn’t work on Windows. However, if need be, you can always install a Linux virtual machine. My colleague Justin Pot has written a pretty useful article about this, which you can check out here .
The second assumption I’m making is that you are running a recent version of Python (either 2.7 or 3.2) and you’ve got the PIP package manager installed. If this isn’t the case, have a look at the official Python documentation.
All good? Then we’ll continue.
Let’s Start Coding
In a terminal, install sh.py with the following command.
sudo pip install sh
The reason why we’re using ‘sudo’ here is because we need to elevate our permissions to add new Python packages. If sh.py installs correctly, you’ll see the following lines present in your terminal.
Downloading/unpacking sh

             Downloading sh-1.09.tar.gz

             Running setup.py egg_info for package sh

            Installing collected packages: sh

             Running setup.py install for sh

            Successfully installed sh

            Cleaning up…
If it doesn’t say this, odds are good that your installation failed. Sad. If that’s the case, try checking your permissions and that you actually installed PIP. If it’s still not there, try asking on Stack Overflow (which has previously been discussed by our Internet editor, Saikat Basu) or MakeUseOf Answers.
Now that’s sorted, create a new directory. It is here where we’re going to place all of our code. Open up a text editor and create a file called ‘shtest.py’. Here, we’re going to simply create a new file, and then list the contents of the directory we’re in. Sounds good?
In shtest.py, add the following lines.
#!/usr/bin/env python

            import sh
sh.touch('hello')

            print(sh.ls(‘-l'))
Simple stuff here. Let’s break this down.
#!/usr/bin/env python
This line is called the hash-bang, and instructs your shell to open this file as a Python program. This allows you to open it as you would a shell script (./shtest.py), instead of opening it directly with Python (python shtest.py). Cool, right?
import sh
This line imports the sh library which we installed a few moments ago. We can’t carry on without this, so make sure it’s in your code!
sh.touch('hello')
You might be familiar with the Linux command, ‘touch’. This creates an empty file with filename which you specify. Here, we’re directly calling ‘touch’ from within Python. As you can see, we’ve prefaced this with ‘sh.’, and we’re passing it a parameter of ‘hello’.
print(sh.ls(‘-l'))
You might be familiar with the ‘print’ command, which outputs text to the console. Here, we’re passing it ‘sh.ls’ as a parameter. This calls the Linux ls program, which lists the content of a directory. We’re also passing that a parameter of ‘-l’, which prints more detailed information about the contents of the directory we execute this in.
Does it work? See for yourself.
Those of you with hawk-eyes will notice that there’s another file floating about in that directory called ‘gitsh.py’. What could possibly be in there?
Sub Commands
sh.py has some hooks for popular programs already baked in. These include git, sudo and a significant number of Linux utilities. These make interacting with these services from within Python even easier.
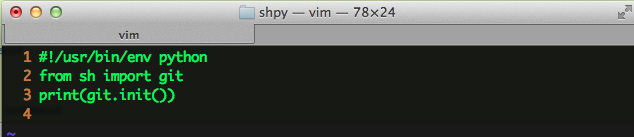
How easy? Well, I’m going to show you how to initialize an empty Git repository in just three lines of code. First, create a file called ‘gitsh.py’ and open it up in your favorite text editor.
Inside, write the following three lines.
            #!/usr/bin/env python

            from sh import git

            print(git.init())
Most of this should be pretty familiar to you. You’ll notice that we imported ‘git’ from ‘sh’. This just means that we’ve imported a specific piece of functionality from a module, whilst ignoring everything else.
After that, we initialize our repository.
print(git.init())
We’ve talked about print. You should notice that we’re calling ‘git’ without ‘.sh’ proceeding it. This is because we specifically imported the git functionality from the ‘sh’ library.
And that’s about it. When we run gitsh.py, we should see the following lines appear in your terminal.
Conclusion
That was a reasonably easy introduction to sh.py. If you’re eager to learn more about it, check out the official documentation here. However, if you get stuck, feel free to drop me a comment below and I'll try and help you out.