As a newbie, photography can be overwhelming. It took me 18 months before I even began to feel comfortable with my shots, let alone feel confident that they were anything but utter rubbish. There's a lot that goes into a good photo, and even skilled photographers can forget from time to time.
Here are the most common and ruinous mistakes that will prevent you from taking photos that you can feel proud about. It doesn't matter whether you're hoping to build a photography career or just doing this as a hobby. You need to excise these mistakes as soon as you can!
1. Ignoring the Exposure Triangle
It's one thing to understand the exposure triangle -- the relationship between ISO, aperture, and shutter speed -- but another thing entirely to know it so well that you can manipulate it to take exactly the kinds of shots that you intend to take.
As a learning photographer, this is the first thing you must master inside and out. You should know that aperture affects depth of field, that shutter speed affects the capturing of motion, that both aperture and shutter speed affect how much light hits the sensor, and that ISO is used to compensate for too little light.
Shutter speed is arguably the most important aspect to master because it allows for the most creativity. Want to freeze a motorcycle in time? Want to make a waterfall appear as smooth and smeared? Or maybe you want your casual shots to feel less stiff? Shutter speed is the answer.
2. Forgetting About White Balance
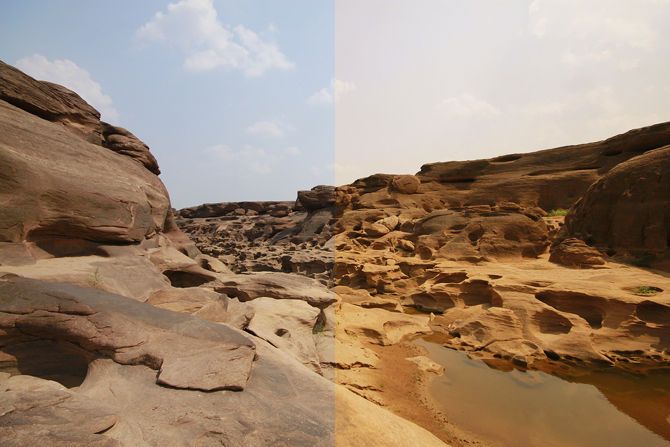
For the first few months of my photography journey, all of my outdoor shots looked fine but all of my indoor shots had an unsightly orange tint. I just chalked it up as a quirk of shooting indoors (I was so green that I didn't know any better) and didn't think anything of it.
Turns out, this is easy to fix: just choose the right white balance setting!
Not all light sources produce white light. Some bulbs do, but most bulbs actually produce orange light or blue light. Changing the white balance setting is how you let your camera know that the "color temperature" of the environment isn't exactly white. Knowing this, the camera adjusts the balance of colors so that white actually appears as white.
Most of the time, you can get away with Auto White Balance. And as long as you're shooting in RAW mode, you can always adjust the white balance in post-production (e.g. Lightroom).
3. Not Having a Subject
If your photos feel boring or empty, it could be due to the lack of a subject.
This was one of the hardest lessons for me to learn when first starting out. I was so excited that I would snap photos of everything: walls, floors, the sky, furniture, etc. I'd play with angles, composition, colors, depth of field, etc. Yet they always felt soulless.
Rule of thumb: a good photo needs a subject. What are you taking a picture of? Instead of shooting a "landscape," think of it as shooting a barn, windmill, or hill. If shooting "wildlife," pick a specific plant or animal to highlight. Not just a "crowd," but make sure someone within that crowd stands out. There should always be one main thing for the viewer to focus on.
4. Centering Your Subject
The concept of point-and-shoot is detrimental because it gives the wrong impression of strong photography. Ask anybody to take a photo of you and they'll instinctively place your head in the center of the shot. That's what everyone does. It's ordinary. Boring!
Composition is the heart of a compelling photo. Even the most interesting subject can appear mundane or dull if you don't care about the positioning of different elements within the photo and how those elements relate to one another. A good photo should be balanced and feel alive.
Unfortunately, there are no hard-and-fast rules for composition... but there are several composition guidelines that can help you to start seeing what makes a well-composed photo. The "Rule of Thirds" is the easiest to learn, but don't stop there!
5. Too Much Bokeh
The first time you move from a lousy kit zoom lens to a prime lens, such as the Canon EF 50mm f/1.8 or Nikon FX 50mm f/1.8, you'll have so much fun shooting with a wide aperture. Your portraits will have that creamy bokeh (blurred background) and you'll finally feel like a "real" photographer.
Unfortunately, bokeh can tend to become a crutch for newbies. Amateurs love to abuse heavy bokeh because it can help cover up all kinds of mistakes, which is why the bokeh effect has lost a lot of its punch in recent years. It's overdone and increasingly uninteresting.
Not that you should never use bokeh. It's still important for certain types of shots, and few things are more satisfying than bokeh done right. But if you always shoot with your aperture wide open, it could be holding you back. There's a fine line between "stylistic intent" and "one-trick pony."
6. Paying No Attention to the Background
Every element in the photo should be there for a reason. A stray table or fire hydrant could turn an otherwise great photo into a mediocre one. It's your job as the eye behind the lens to make sure everything in the shot belongs in the shot before you trigger the shutter.
This isn't as important for "real-time" photos, like street or candid photography, but it still matters and you can't ignore it.
So what should you look for in a good background? A little clutter as possible. If necessary, move your feet or zoom the lens in to exclude undesirable elements. Make sure there aren't any clashing colors unless intentional. Change your angle if it helps. Keep the horizon level, not tilted. And when taking portraits, be mindful that background elements don't "decapitate" your subject, such as the horizon line separating head from body.
The background should be the canvas on which your subject shines. Bokeh can be used to cover up bad backgrounds, but this should be a last resort technique. And even though a lot of errors can be cleaned up and fixed in post editing, it's always preferable to get it right when taking the shot.
7. Poor Lighting
Photography is the capture of light. Good light? Good photo. Bad light? Bad photo. This is so true that everything about your photo could be perfect, but if the lighting sucks then the photo will too. And the worst part is that poor lighting is the hardest to fix in post-production.
What constitutes poor lighting? Too little. Too much. Too harsh or too soft. Too many light sources, or not enough of them. The wrong color. The wrong angle. The wrong size or the wrong distance. There are too many factors that go into lighting -- each one deserving of its own article and beyond the scope of this post.
That being said, you can start learning about it with these master photography courses, these YouTube photography channels, and these amazing Lynda courses for photographers.
8. Using On-Camera Flash
If your only choice is to take a shot in the dark or use on-camera flash, then obviously go for the flash. But you should know that on-camera flash almost never looks good. Not only does it cause the infamous "red eye" effect, but it also results in flat images with weird shadow outlines.
Get a speedlight as soon as you think you need flash. Speedlights are useful because they change the angle of light so that it's not aimed head-on at the subject. They can also be turned and tilted to redirect the light by bouncing it off of other surfaces. Check out these tips for mastering speedlight flash.
9. Using the "Wrong" Lens
Far be it from me to say that a lens can be wrong. Photography is a creative endeavor. If you want to take portraits with a wide lens, don't let me stop you. But you must be aware that different lenses with different focal lengths will result in dramatically different photos.
Figure out the effect that each lens has. Wide-angle portraits often look comical while telephoto lenses have a compressing effect that makes portraits look more flattering. On the other hand, wide lenses are great for exaggerating size. They can make a room seem larger or capture more landscape.
In other words, use the lens that imparts the effect you want.
10. Not Using a Tripod or Remote
There will always be some amount of camera movement when you take handheld shots. The trick is to use a shutter speed that's fast enough to snap a shot without any blurring. So when you're in a situation where fast shutter speeds aren't feasible, handholding goes out the window.
Every photographer needs a tripod. We consider this one of the essential gear items for photographers. If you're on a tight budget, just get a cheap tripod from AmazonBasics (UK). It'll tide you over just fine until you can afford something better. But yeah, you'll need it.
For example, it comes in handy when you want to take portraits in low light scenarios, such as a romantically-lit restaurant. You'll also need a tripod when taking photos of the night sky or shooting incredible light trails. But it's useful during the day too, such as when doing a long exposure of a waterfall or beach waves.
And don't forget the remote shutter release, which triggers the shot without any risk of you bumping the camera while trying to depress the button.
Keep Shooting and the Photos Will Follow
The key behind all of this: practice. You cannot underestimate the value of learning, trying, failing, and repeating until things start to click. Photography is hard and requires a lifetime to master. Don't expect to start taking amazing photos right away. Be patient and shoot every day.
Check out these awesome photography exercises for beginners. Other important tips include avoiding these DSLR battery mistakes and preventing wear and tear on your DSLR. Take care of your gear and it will take care of you.
How is your photography journey coming along? What are you struggling with most? If you're a veteran, got any other common mistakes that newbies often make? Share with us below!
Image Credit: Room 76 via Shutterstock.com

