The Medical ID feature on your iPhone or Apple Watch could save your life. It stores important medical information about you for people to use in an emergency, including a list of your emergency contacts.
But if you never take a few minutes to set up your Medical ID, it's totally useless. Here's everything you need to know to set up your Medical ID with all the information someone might need.
What Is the Medical ID on an iPhone?
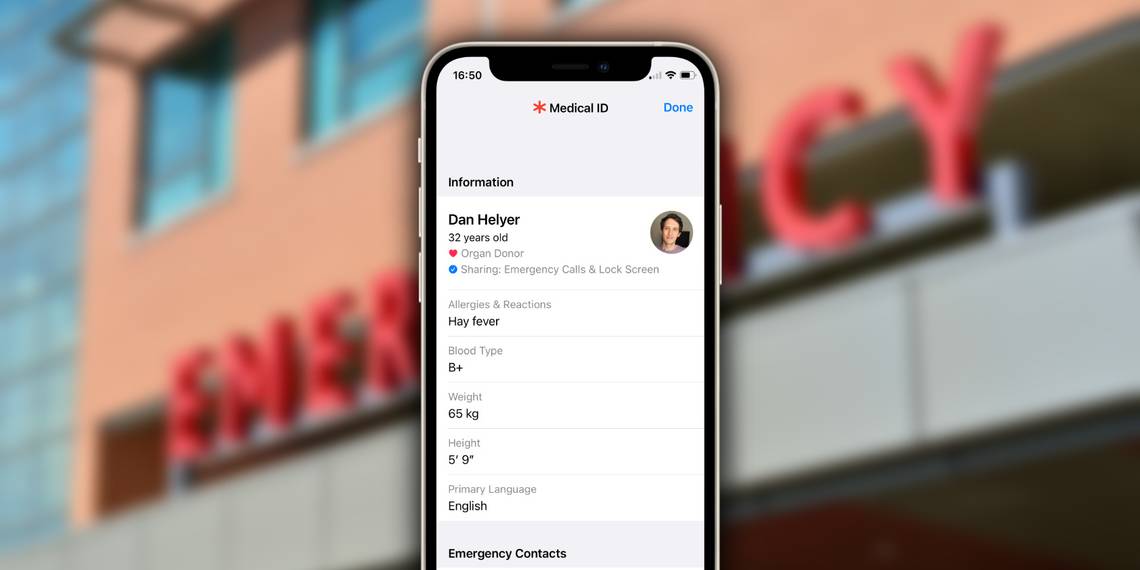
The Medical ID on your iPhone or Apple Watch is a safety feature that tells people important medical information about you in case of an emergency. Anyone can view your iPhone Medical ID in an emergency. You can save the following details to it:
- Name, age, and a photo
- Medical conditions, such as asthma or diabetes
- Medical notes; for example, mentioning that you have a pacemaker
- Allergies and reactions
- Medications you are currently taking
- Blood type and organ donor status
- Weight and height
- Your primary language
- Emergency contacts and their phone numbers
Keep in mind that there's no way of limiting your Medical ID to emergency personnel. If you choose to show your Medical ID while your device is locked, anyone with physical access to your iPhone or Apple Watch can view all the information in it. However, no apps, services, or third-parties can access your Medical ID through the operating system. Even Apple can't access your Medical ID remotely.
Setting up the Medical ID on your iPhone or Apple Watch certainly adds a complication to privacy concerns, but it could be a worthy trade-off if emergency personnel use those details to save your life. And there are always other ways to hide personal details on your iPhone.
How to Set Up the Medical ID on an iPhone
To set up your Medical ID:
- Search for and open the Health app.
- Select the Summary tab at the bottom of the screen.
- Tap the profile icon in the top-right corner and select Medical ID.
- Tap Get Started and work through the list, filling in any information you want to include.
- Be sure to add at least one emergency contact. This person will get a message with your location if you ever use the Emergency SOS feature.
- Finally, scroll to the bottom and enable Show When Locked. This is essential if you want emergency personnel to be able to view your Medical ID without needing to unlock your device. You can also enable Share During Emergency Call if you want to automatically share your Medical ID with emergency services when you call them.


Take care to confirm that all the information you add to your Medical ID is accurate. You should also remember that any data you include is visible to anyone who has your iPhone, so don't include anything extremely private.
How to Set Up Your Medical ID on an Apple Watch

The Medical ID on your Apple Watch links to the details on your iPhone, so be sure to set up your iPhone's Medical ID first. Once you've done that:
- Open the Apple Watch app on your iPhone and go to the My Watch tab.
- Scroll down to tap the Health app, then tap Medical ID.
- Ensure all the details are correct and tap Edit if you need to make any changes, including the Show When Locked and Share During Emergency Call options.


It's important to get this right. Many emergency responders are trained to look for medical bracelets when treating patients, so the Medical ID on your Apple Watch will likely be more valuable in an emergency than the one on your iPhone.
Medical ID Is a Great Feature We Hope You Never Need
Hopefully, most of us will never have any use for Apple's Medical ID, but it's worth taking five minutes to set it up just in case. So long as you're comfortable sharing some potentially life-saving information about yourself, it's a feature that makes sense to start using.