Whether you're making a short film or building a YouTube studio, lighting is one of the most important things to consider.
Lighting is more important than nearly any other piece of equipment, but versatile lighting made for video professionals can be heavy and expensive. Why not make your own DIY ring light and save a bit of cash? Let's get started!
This tutorial is also available in video form here:
What Is a Ring Light?
A ring light is a simple device. It's a series of light sources (usually LEDs) arranged in a circle. They are most commonly used as a catch light -- a way to draw attention to the character's eyes, and to evenly light their face. You can use them for anything you like, but they are particularly suited to fill lighting tasks, as they can fill the dark spots in your scene.
You can see this light reflected in my eyes:

Ring lights are particularly good for YouTube vlogs or makeup tutorials, where the presenter is talking to the camera. YouTuber David Woutersen explains further in his "What is a Ring Light" video:
What You Need
This DIY project requires a few components, but you can easily modify it to use the supplies you have.

You will need:
- 1 x Circular frame
- 1 x 5m RGB LED strip kit
- 1 x Clamp
That's it! The circular frame is what you will attach your LED lights to, and the clamp is needed to secure your light to a stand, tripod, or camera rig. This project can easily be made for under $30, and you'll need some basic tools and supplies such as scissors, paint, a soldering iron, and solder.
Make the Frame
This frame is the most important part of the project. Without it, you won't have any way to attach your LEDs, and you won't be able to attach your light to anything else.
You can use nearly anything for a frame. Cardboard, plastic, or recycled wheel-like objects. I recommend making your own though, as not only can you learn some woodworking skills, but you can earn a sense of accomplishment by building your new light.

This light measures 10 inches in diameter and has a 4.5 inch diameter hole in the middle -- this is for your camera lens to look through. Your light can be any size you like, just remember to purchase enough LEDs to cover it all. You need approximately 5m of LED strip for this light, so make sure you adjust your parts lists accordingly if your light is a different size.

Start with a sheet of 1/4-inch medium-density fiberboard (MDF). Make sure it's large enough to fit the dimensions of your light on. You can purchase small pieces of MDF online or at your local hardware store.
If you want to be really thrifty, you can purchase a large circular plaque, which will save you a lot of time cutting, sawing, and sanding -- but you'll still need to cut the hole in the middle.
Go ahead and draw your light shape on your wood. I used a large dinner plate, as it was the perfect size. Draw a smaller circle inside this larger circle. This inner circle is where your camera will look through. I used a small bowl for this.

Safety first: MDF fibers are hazardous to your health. Always wear appropriate face protection when working with it!
Once drawn, use a jigsaw to cut out the main shape -- making sure to follow the pencil line as close as possible. It's possible to produce this frame without a jigsaw, using hand saws, but it's a lot slower. Your local hackerspace may have a jigsaw, or even better, someone to show you how to use it!

Cut out the interior hole. Your jigsaw needs several small entry holes for this part. Use a hand drill, pillar drill, or sharp object to make a small hole. Again, your local hackerspace may be able to help out here.

Once cut out, use sandpaper to smooth the edges. You can correct any minor mistakes with the jigsaw at this point. An electric sander will help greatly here, but sandpaper and elbow grease work equally as well.

Once finished, use spray paint to finish off the look. Paint in a well ventilated area, preferably outdoors or somewhere like a workshop or shed. The trick to a good finish with spray paint is multiple thin coats. It's ok if you have to sand between coats and try again. This stage may take some time, depending on how fast your paint dries.

Install the LEDs
One your frame is complete, it's time to install the LEDs. We have an ultimate guide to LED strips and Arduino, but you won't need an Arduino today. RGB LED strips are basically tricolor LEDs arranged on a thin strip every inch or so. The beauty of these is that you can produce nearly any color imaginable by combining individual red, green, and blue LEDs.
These LED kits come with a power supply and remote control, so all you (usually) have to do is plug and play! Unfortunately, LED strips cannot bend very well, so you will need to cut them and then solder them back together.

Cut the LED strip into pieces containing about three LEDs. Cut the strip where marked along the copper connection. You can use scissors to do this.
Once separated, stick each piece of LED strip to your frame. The LED strip in this kit comes with sticky tape on the back, so simply remove the protective film.

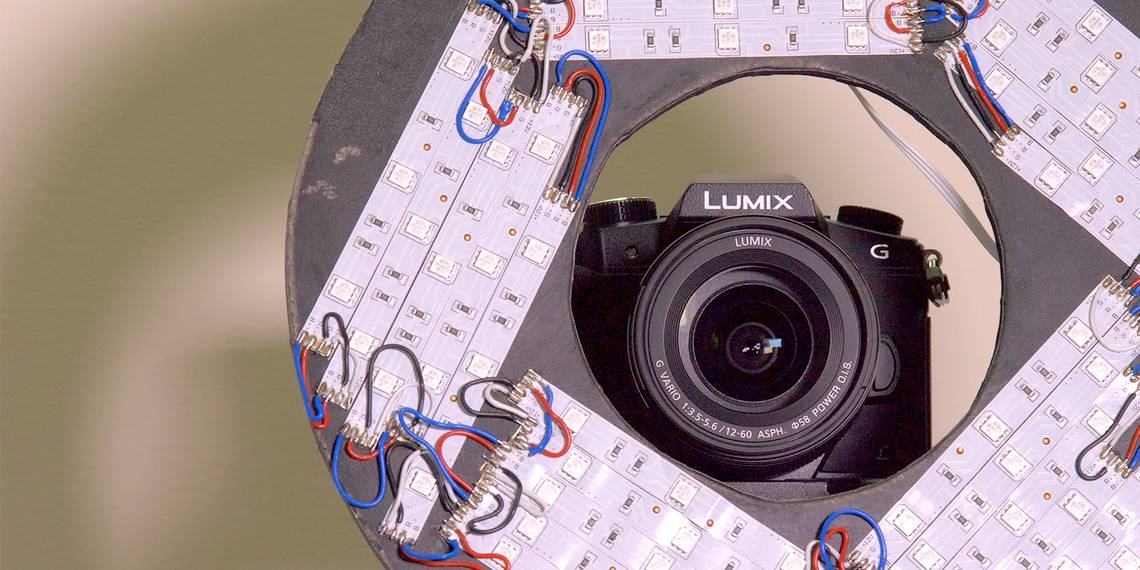
Pay attention to your LED placement and orientation. You will need to solder four wires to each end of the strip, so group LEDs together in groups of 5 strips/15 LEDs. Ensure you leave some room at the edges for your clamp.
One piece of LED strip contains a connector for the power supply and control unit. Make sure you position this piece in an easy to access location near the edge. An infrared remote controls the light, so position the infrared receiver (the small, dangly wire) towards the front of the light.

Solder the LEDs
Now it's time to solder the LED strips back together. Don't worry if you've never soldered anything before -- our handy guide to soldering shows you just how easy it can be.
Each strip contains four wires:
- +12v: Common power connector.
- R: Ground for the red LEDs.
- G: Ground for the green LEDs
- B: Ground for the blue LEDs.

Simply match all the connectors together. Join R to R, G to G, and so on. This stage can be quite slow, but stick at it! After soldering a single LED strip (containing 3 LEDs), connect the power supply and test your progress thus far. It is very difficult to troubleshoot any problems if you only test after soldering everything. Connect the power and test after completing each set of connections.

Finishing Off
Once soldered, attach the control panel to the rear using double-sided tape, glue, or hook and loop fixing. Use the clamp to attach it to a tripod or your camera. Connect the power supply, and then use the remote control to adjust the brightness and color:

These LED strips are capable of displaying a vast array of different colors, but the best results are often achieved with slightly plainer colors, and not the bold reds, blues, and greens.
Here's what the light in use looks like. First, the basic scene with the ring light off:

Next, the light is on, but with only a gentle, soft light:

Finally, here is the light on full power:

As you can see, simple changes to the brightness, color, and distance of the light can have a big impact on the final result. Over time, with a bit of experimenting, you'll learn when these settings work best.

That's it -- you're done! You hopefully learnt some valuable electronics and woodworking skills, and now own an LED ring light at a fraction of the cost of a commercial model. Why not combine it with the best DSLR available, and start producing some epic photos or videos?
Have you built your own LED ring light? What changes did you make to your one? Or maybe you bought one from the shops. Whatever you did, let us know in the comments below, we'd love to see!