Generic Christmas cards are boring—trite messages, clichéd pictures, and cheesy greetings. Who needs any of that in their lives?
The best Christmas cards are created with love. In this tutorial, we're going to be making a Christmas card using Photoshop. This project is really simple, even for beginners. Help Santa out and become a Photoshop elf for the season.
Step 1: Prepare for Printing
If you're going to go through all the trouble of creating a Christmas card in Photoshop, the chances are you'll want to eventually print and send it. If your home printer can't handle nice card stock, you might want to look into third-party printing services. There are many online, but your local Walmart, CVS, Walgreens, or photo store should also have you covered.
Decide on the vision for your Christmas card. Photoshop can create a double-sided postcard, a Christmas flyer, or another product your local printers can print. We're going traditional: a classic fold-out Christmas card.

Once you've decided for yourself, open up Photoshop and create a new 6" by 4" print document. Ensure you choose the CMYK color mode to make it suitable for printing later.
Use Ctrl + R (Windows) or Cmd + R (Mac) to enable your rulers, and pull one vertical guide out from the left. It should snap to the center of your document.

For your convenience, we have labeled the front and the back of the card. We're printing a double-sided document on Mac, and will need another 6" by 4" document for the inside—but we'll get to that in a moment.
Step 2: Place Your Image or Design
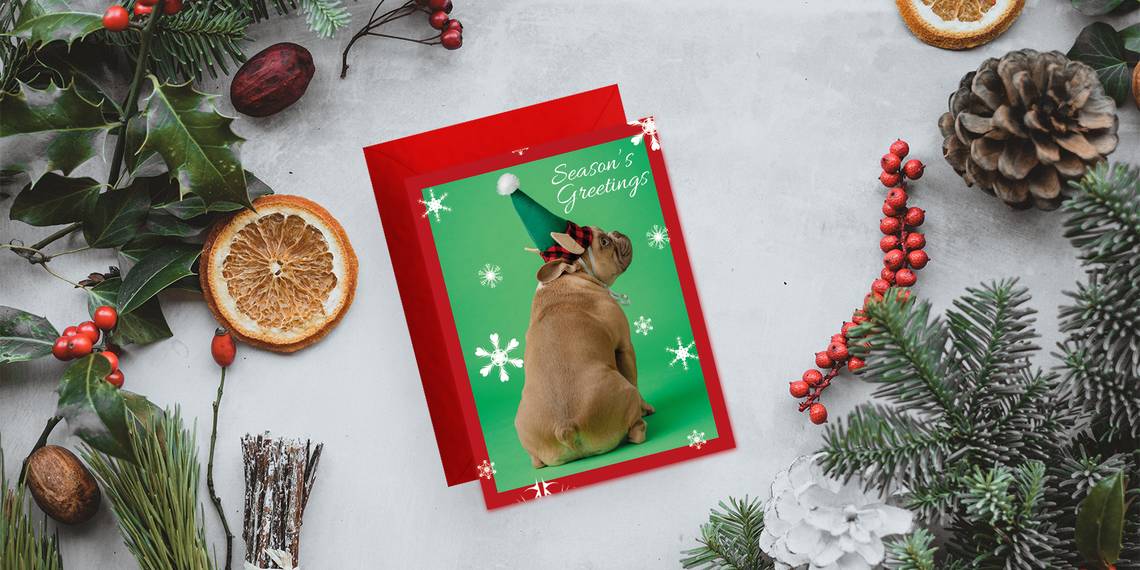
Now, it's time to add the image you want to use for the card. A great image choice would be a DIY family portrait or a homemade Christmas illustration, but it’s up to you how want your Christmas card to look. We’re using a cute photo of a Frenchie dressed as an elf. You can download it for free from Unsplash if you’d like to use it too.
We're going to position it so that you only see the image on the front. You can copy and paste your desired image or drag it in from another Photoshop document or from your file directory.

The image will position itself in the middle of the artboard by default, so we need to drag it to the right half—which will be the front of the card—for the final design.

If your image is smaller than the front side of your card, scale it up using the Selection tool on an anchor point. Hold Alt to scale equally. It doesn't matter if you scale it to be bigger than the front half of the card, as we'll add a border next.
Step 3: Add a Border
With just a plain image on the front, the card doesn’t scream festivities yet. Let's add a nice colored border, perfectly in-tune with this mounting sense of holiday spirit.

Hit M to enable the Rectangular Marquee tool. Using your guide to get a nice, crisp edge, select the front half of the card. Once you’ve made the selection, go to Select > Modify > Contract.

Check Apply effect at canvas bounds. Your border can be as thick or thin as you want; we're going with 50 pixels. Select OK to see the contracted results. Right now, we have the interior of the frame selected—what we actually want to select is the exterior.

Right-click on your selection. From the dropdown, choose Select Inverse. Now the marching ants run along the edge of the entire artboard as well as the inner edge of your frame on the front of the card. While you could leave this whole area white, that’s not very festive. To fill it, we'll need to choose an appropriately Christmassy hue.

Select the Color Picker on the toolbar, and with it, find a nice red, green, or gold—whatever you're feeling. Once you've got a color chosen, select Create a new layer on the Layers panel, then go to Edit > Fill from the top toolbar.

Make sure that Contents is set to Foreground Color. Once everything is in order, press OK.

This will flood the entirety of your selected area with the color that you chose. Hit Cmd + D (Mac) or Ctrl + D (Windows) to deselect the area.
Step 4: Add Text
Now, your Christmas card should start to look a little bit more like a Christmas card. As festive as your matching PJs in front of the Christmas tree family portrait may be, the card is missing a little something: a heartwarming Christmas greeting.
We have a guide for how to add and edit text in Adobe Photoshop, but we’ll go over the simple steps here too.
Bring up your Horizontal Type tool (T). You can also type your message vertically or along a path if you prefer; to choose either of those options, hold down the Type tool in the Toolbar until the list shows, and choose another tool.
Adding the text is where you can inject some more personality. Maybe your family has a punny last name, a seasonal inside joke, or a specific Christmassy catchphrase—write it on your card. Simply type your message in.

Of course, if you’re more traditional, you can go with the classic “Happy Holidays”, “Season’s Greetings”, or “Merry Christmas” instead.
Then, using the upper settings bar, select a festive typeface and font size. Play around with things like font and text weight here. The possibilities are truly endless, and your friends and family deserve nothing but the finest that you have to offer.
By selecting the Move tool with the V key, you can reposition your festive greeting as necessary. Set it to fit with the layout of your photo or design.
Step 5: Add Festive Snowflakes
To really drive home this Christmas theme, we're going to need some third-party assistance. If you've never experimented with importing Photoshop brushes before, now is the time. They make projects like this so much more fun.
Custom Photoshop brushes come in every form imaginable online; we downloaded this set from Brusheezy user hawksmont. In it, you'll find a smörgåsbord of high-quality snowflake brushes. If none of those float your boat, though, we've got plenty of other festive Photoshop effects to share, or you can easily make custom brushes in Photoshop yourself.
To begin with these Photoshop brushes, download the .ZIP file and unzip its contents. Head back into Photoshop to import them through the Brush toolbar. You’ll find this when you select the Brush tool (B) and hit the arrow next to the brush swatch in the upper settings bar, under the Gear dropdown, and choose Import Brushes.

Locate your downloaded brushes and select the ABR file to import them into Photoshop. Scroll down the brush library until you reach the newest folder of your imported brushes at the bottom.

To use the brushes, select one and then hover your cursor over the artboard to see the size of the selected brush. You can use the sliding size scale on the Brush toolbar or hit the [ or ] keys to make your brush bigger or smaller.

Click once with your cursor to stamp the brush. Mix and match between the different snowflake brushes and change up the size for some variation.
Perfect. Now, onto the most important part: what's on the inside.
Step 6: Write the Inside Message

If you're creating a Hallmark-style card, you've probably already got some ideas about what you want the inside of this fold-out to say. Create a second 6" by 4" Photoshop file, marking the middle with another vertical guide the same as before.

Using the Type tool again, add your desired message. Use a dark gray color rather than black, which usually comes across too stark for a neutral greeting. You may want to use the same font from the front of the card to make your entire card flow as one seamless design.
When the card is finally complete, it's time to get it printed. You'll want to get your ducks in a row well in advance in order to give the cards time to reach each destination before the big day arrives. Save your work and send it off to the printers, if delivering your files digitally.
If you're going with Staples, Target, CVS, or Walgreens, you can bring your files in on a thumb drive or something similar. Check out some of the most affordable sites for printing documents online.
Once you've got the physical, printed cards in your arms, stick 'em in their envelopes, lick the stamps, and send them away.
A Design for Santa’s Helper: The Photoshop Wizard
Creating your own Christmas card is a lot of fun; it's an excellent way to connect with friends and family that you might not see very often. Whether you choose a family photo, a picture of your dog, or just a funny message, it'll make a cute keepsake that they'll be able to hang on their fridges or corkboards. If you have kids, this will definitely be a treat that Grandma keeps in her wallet year-round.