Have you always wanted to learn to code but didn't know where to start? Learn how to control Minecraft on the Raspberry Pi using Python and some simple electronics. Here's the end result:
You will need a Pi 2 or newer for this project, and whilst you could complete most of these tasks via command line over Secure Shell (SSH), this tutorial will focus on coding directly on the Pi.
New to Minecraft? Don't worry - here's our Minecraft Beginner's Guide.
Introduction to Minecraft Pi

Minecraft for the Raspberry Pi has been developed for learning and tinkering (and it's free). It comes with an Application Programming Interface (API) which provides a way for code to easily talk to Minecraft. It's brilliant for learning how to code in Python, as well as getting started with electronics.
What is Python?
Python is a programming language. It is interpreted, which means when you run a Python file or program, the computer has to do a tiny bit of work to the file first. The downsides are that it can be considered slow when compared to compiled languages [Broken URL Removed].
The benefits of interpreted languages are the speed of coding and their friendliness. You do not need to tell the computer what data you want to store, just that you want to store something and the computer will figure out what to do. There are exceptions, of course, and this is a somewhat simplified view, however programming should be fun! If you start digging into the complex technical details it can become a bit laborious.
Python is case sensitive. This is important to know, as Python will not recognise objects even if they are spelt correctly if the case is wrong. "Dosomething()" will not work if the method is actually called "DoSomething()". Python also uses indentation. Other programming languages may not care how many indents your code has, whereas Python does care. Indents are used to tell Python where code belongs. Other languages may use "Curly Braces" ({}) to group code -- Python does not use these. Python uses a hash (#) for comments, and comments are used to tell other developers or people looking at the code what a particular part does, or why it is needed. Python ignores anything after a hash.
Finally, there are two main versions of Python -- Python 2.7.x and Python 3.x. There are some differences between the two (what are the differences?). This tutorial will use Python 3.
Initial Setup
Providing your Pi is already setup and running Raspbian, there's not a lot of initial setup needed.
Open Terminal (Menu > Accessories > Terminal) and run this command. It's always good practise to keep the repository list up to date, and this will download the latest list of programs (it will not download the programs themselves, this helps the Pi know what programs are called and where to find them).
sudo apt-get update
Now update the Pi (this may take a while):
sudo apt-get upgrade
Python and Minecraft Pi are installed already, however if Minecraft Pi is not installed for any reason, it's simple to install:
sudo apt-get install minecraft-pi
Navigate to documents and create a new folder called "Minecraft":
        cd Documents/
mkdir Minecraft
You can view the contents of this new folder:
ls
Here's a tip - if you start typing and hit the TAB key, the command line will attempt to autocomplete the statement for you.
You can examine the path to the current directory using pwd, which stands for Print Working Directory:
pwd
Start Minecraft by going to Menu > Games > Minecraft Pi. You will need this running, but will come back to it later.
Open Python 3 from Menu > Programming > Python 3 (IDLE). This program provides a way for you to run Python commands and to write programs.
Now you could type your Python commands here, but that's not very practical. Go to File > New File and then File > Save and save this in the folder you created earlier. (Documents > Minecraft). Let's call it "hello_world.py". You do not have to use the .py extension, this will be added automatically, but it's good practise.
If you switch back to the terminal, and navigate into the Minecraft folder you should see the file you just created:
        cd Minecraft/
ls
You can run this file like this:
python hello_world
Notice how "python" is all lower-case. This has to be before the file name, as it tells the Pi that the following file is Python, so it should be executed as such.
Switch back to the Python editor and type:
print "Hello, World!"
Save this file and run it again - you should now see "Hello, World!" appear in the command line -- neat! The print command simply tells Python to output the following text in double quotes. This is good, but not terribly useful for Minecraft, let's link it up:
        from mcpi.minecraft import Minecraft

mc = Minecraft.create()

mc.postToChat("Hello, World!")
Now if you save and run this file, you should see "Hello, World!" appear in the Minecraft game. Let's breakdown the code:
from mcpi.minecraft import Minecraft
This line tells Python that you want to use code from another file. This mcpi.minecraft file was developed to allow easy control of Minecraft.
mc = Minecraft.create()
This line creates an object called "mc" (Minecraft). You have to create this to allow communication to the Minecraft game -- it is not enough just to include the file.
mc.postToChat("Hello, World!")
Finally, this line tells Minecraft to write some text to the chat. Try changing "Hello, World!" to something else and see what happens, but remember to include both the double-quotes. If you are having software problems, these are some common Python and Minecraft Pi errors:
- AttributeError -- this is a typo, such as pint or prnt instead of print
- NameError: name 'Minecraft' is not defined -- remember to import the modules you need
- NameError: name 'true' is not defined -- Python is case sensitive, change to "True"
- socket.error: [Errno 111] Connection refused -- Make sure Minecraft is running
Projects
Now that you know the basics of Python and Minecraft, let's make some cool projects. All of the codecan be downloaded from Github.
Automated Bridge Builder

This program will effectively build a bridge over water. When the player gets near to a body of water, the program will convert several blocks to stone. As Minecraft uses a coordinate system, it is very easy to get the location of the player, along with the type of blocks around the player. Minecraft Pi is slightly limited, so it's not possible to update multiple different blocks in bulk. You can easily code this behavior yourself, however.
Create a new file (File > New File) and save it as "bridge_builder.py".
        from mcpi.minecraft import Minecraft
mc = Minecraft.create() # create Minecraft Object

while True:
    x, y, z = mc.player.getPos() # store player position

    # store the surrounding blocks
    a = mc.getBlock(x, y - 1, z + 1)
    b = mc.getBlock(x, y - 1, z - 1)
    c = mc.getBlock(x - 1, y - 1, z)
    d = mc.getBlock(x + 1, y - 1, z)

    if a == 8 or a == 9 or b == 8 or b == 9 or c == 8 or c == 9 or d == 8 or d == 9:
        # 8 or 9 is water. Set surrounding blocks on floor to a solid (stone) if water is found
        mc.setBlocks(x, y - 1, z, x + 1, y - 1, z + 1, 1)
        mc.setBlocks(x, y - 1, z, x - 1, y - 1, z - 1, 1)
        mc.setBlocks(x, y - 1, z, x - 1, y - 1, z + 1, 1)
        mc.setBlocks(x, y - 1, z, x + 1, y - 1, z - 1, 1)
Notice how the y value is actually looking at y - 1. This is the floor level. If the value of y was used, the script would look for blocks at about knee level -- it would not work very well! Mc.getBlock() returns the id of a block for the given coordinates. As x, y, and z are the coordinates of the player, you can add or subtract from them to get positions around the player. You do not have to use the x, y, and z values, you could use any number, however you may not know how that particular block relates to the player -- it's better to use values relative to the player. Run this file from the command line and see what happens.
You should see that a small area of ground turns into stone once the player reaches a body of water. It's not great -- you are able to walk fast enough to cause a problem. You could solve this by converting a larger volume of water to land. The final part of the mc.setBlocks() method is the block id. One is the block id for stone. You could change this to wood, grass, or anything. If you wanted to, you could quite easily convert this to a complex design -- maybe a suspension bridge!
Super Mining Button

This example will make short work of mining. It consists of a physical button, that when pressed, will mine 10 blocks cubed. Let's start with the button. Similar to buttons on the Arduino, you will need a small amount of electronics, all of which should be found in a basic starter kit:
- 1 x Breadboard
- 1 x momentary switch
- 1 x 220 ohm resistor
- Female > male jump cables
- Male > Male jump cables
Here's the circuit:
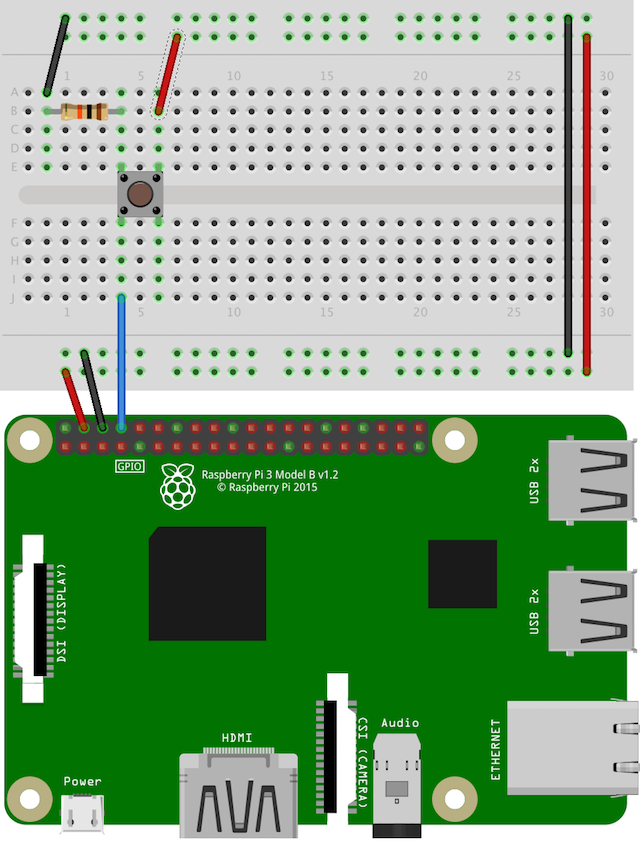
This resistor is called a "pull down" resistor. It helps to ensure that what the Pi thinks is the button being pressed, really is the button being pressed. You do not have to use this, however it is recommended, as you may find lots of noise and false readings without it.
The button is connected to General Purpose Input Output (GPIO) pin 14. You can use any GPIO pin, however look at the pinout first, as they are not all controllable from the Pi, and vary slightly between models.
Now that the button is connected, it's time to test it. Create a new file and save it as "button_test.py". Add this code, save it then run it in Terminal.
        import RPi.GPIO as GPIO
import time

GPIO.setmode(GPIO.BCM) # tell the Pi what headers to use
GPIO.setup(14, GPIO.IN) # tell the Pi this pin is an input

while True:
    if GPIO.input(14) == True: # look for button press
        print "BUTTON WORKS!" # log result
        time.sleep(0.5) # wait 0.5 seconds
Press Control + C to stop the script. If everything is working correctly you should see "BUTTON WORKS!" in the Terminal. Notice how, like the Minecraft module, this test is using the RPi.GPIO and time modules. These allow the Pi to access the hardware pins and provide useful timing functions.
Now lets finish the rest of the code. Create a new filecalled "super_mine.py". Here's the code:
        import RPi.GPIO as GPIO
import time
from mcpi.minecraft import Minecraft

mc = Minecraft.create() # create Minecraft Object

GPIO.setmode(GPIO.BCM) # tell the Pi what headers to use
GPIO.setup(14, GPIO.IN) # tell the Pi this pin is an input

while True:
    if GPIO.input(14) == True: # look for button press
        x, y, z = mc.player.getPos() # read the player position

        mc.setBlocks(x, y, z, x + 10, y + 10, z + 10, 0) # mine 10 blocks
        mc.setBlocks(x, y, z, x - 10, y + 10, z - 10, 0) # mine 10 blocks

        time.sleep(0.5) # wait 0.5 seconds
mc.player.getPos() returns the players current coordinates, which are then stored in x, y, and z. The setBlocks() method tells Minecraft to fill all blocks between the start and end with the following block. Zero is the block-id for air. You could change this to another block-id to solid fill an area. You could also change the coordinates to +100 or even +1000 blocks, however the Pi may start to struggle if you get too crazy. Notice how y + 10 is the same for both lines. You could change this to y - 10 if you wanted to remove blocks underground.
Teleporting

Another simple use for this button could be to "teleport". The Minecraft Pi Api provides a way to set the player position. The following code will "teleport" the player to a preset location:
mc.player.setPos(0, 0, 0)
Note that his method accepts three parameters; x, y, and z – so you could set these to anything to instantly teleport the player to that location.
Create a copy of the super_mine file (File > Save Copy As) and modify it by replacing the if with the following:
        if GPIO.input(14) == True: # look for button press
    mc.player.setPos(0, 0, 0) # teleport player
    time.sleep(0.5) # wait 0.5 seconds
This file should now look like this:
        import RPi.GPIO as GPIO
from mcpi.minecraft import Minecraft
import time

mc = Minecraft.create() # create Minecraft Object

GPIO.setmode(GPIO.BCM) # tell the Pi what headers to use
GPIO.setup(14, GPIO.IN) # tell the Pi this pin is an input

while True:
    if GPIO.input(14) == True: # look for button press
        mc.player.setPos(0, 0, 0) # teleport player
        time.sleep(0.5) # wait 0.5 seconds
Save it as "teleport.py" and run.
You may find the player gets stuck inside some blocks when using this, in which case you'll need to adjust the coordinates to a known open space (the top left of the screen shows your current location).
Build a House

One last task for this button is to build a house. Much like the quick-mining example above, this will simply replace blocks surrounding the player to make a house. Different block-ids will be used for different materials (window, walls etc). To make things easier to code, a solid block will be created, and then the inside removed (set block to air), this will create a hollow shell. You could add extras like a bed or door, however the Minecraft Pi project is a little incomplete, and whilst these objects work when placed by the player, they are not brilliant when using Python.
        from mcpi.minecraft import Minecraft
import RPi.GPIO as GPIO
import time

mc = Minecraft.create() # create Minecraft Object

GPIO.setmode(GPIO.BCM) # tell the Pi what headers to use
GPIO.setup(14, GPIO.IN) # tell the Pi this pin is an input

while True:
    if GPIO.input(14) == True:
        x, y, z = mc.player.getPos()
        mc.setBlocks(x + 2, y - 1, z + 2, x + 7, y + 3, z + 8, 5) # make shell
        mc.setBlocks(x + 3, y, z + 3, x + 6, y + 2, z + 7, 0) # remove inside
        mc.setBlocks(x + 2, y, z + 5, x + 2, y + 1, z + 5, 0) # make doorway
        mc.setBlocks(x + 4, y + 1, z + 8, x + 5, y + 1, z + 8, 102) # make window 1
        mc.setBlocks(x + 4, y + 1, z + 2, x + 5, y + 1, z + 2, 102) # make window 2
        mc.setBlocks(x + 7, y + 1, z + 4, x + 7, y + 1, z + 6, 102) # make window 3
Save this as "house.py" and run. All being well, you should see a small house appear (you may need to turn around to find it). It's very simple, an opening and some windows. In theory, there is no limit to how large or complex a building you could construct.
Make a Mini Game

Next, let's make a mini-game! This will be quite simple, when the player steps on a block of sand, it will turn into lava after a random amount of time. This is a good game to make, as you could design your own levels or modify it to make things harder. You will not need the button for this example.
Create a new file and save it as "mini_game.py". Here's the code:
        from mcpi.minecraft import Minecraft
import random
import time

mc = Minecraft.create() # create Minecraft Object

while True:
    x, y, z = mc.player.getPos()
    block_under_player = mc.getBlock(x, y - 1, z)

    if block_under_player == 12:
        # player standing on sand, start the timer
        random_time = random.uniform(0.1, 2.5) # generate random number
        time.sleep(random_time); # wait
        mc.setBlock(x, y - 1, z, 11) # turn it into lava
This code is a good starter on the random() function: random.uniform(0.1, 2.5) will generate a random number between 0.1 (1/10th second) and 2.5 (2 1/2 seconds). Increasing these numbers will make the game easier.
Try it out! Stand on a block of sand, and it will shortly turn into lava. This could be the basis of a more complex game.
Make a Another Mini Game

The premise for this game is simple - don't be standing on the wooden floor when the time runs out. The player gets teleported into an "arena". They are forced to stand still until the game starts. Once started, the floor will turn to water once the timer runs out. The player must be standing in the safe zone (diamond blocks) to survive. Each level reduces the timer by one second. After each successful level the safe area gets larger. Check out the code below:
        import time
import random
from mcpi.minecraft import Minecraft

mc = Minecraft.create() # create Minecraft Object

# clear area
mc.setBlocks(-10, 1, -10, 25, 5, 25, 0)

# create arena shell
mc.setBlocks(0, 0, 0, 25, 10, 25, 17)

# hollow out arena
mc.setBlocks(1, 1, 1, 24, 10, 24, 0)

# move player to arena
mc.player.setPos(14, 25, 20) # teleport player

# make them stay put
# teleport player to start position every 1/10th second.
# do this for 5 seconds then start the game
time.sleep(2)
total_wait = 0
mc.postToChat("Waiting to Start")
while total_wait < 5:
    mc.player.setPos(14, 1, 20) # teleport player
    time.sleep(0.1)
    total_wait += 0.1

mc.postToChat("BEGIN!")

# 10 levels
for level in range(10):
    x, y, z = mc.player.getPos()
    level_time = 10 - level # reduce time by 1 second for each level
    mc.postToChat("Level - " + str(level + 1) + " start")

    # build floor
    mc.setBlocks(0, 0, 0, 25, 0, 25, 17)

    # make safe area
    safe_area_start = random.uniform(0, 22)
    safe_area_end = random.uniform(0, 22)

    mc.setBlocks(safe_area_start, 0, safe_area_end, safe_area_start + level, 0, safe_area_end + level, 57)

    elapsed_time = 0
    while elapsed_time < 10:
        x, y, z = mc.player.getPos()
        time.sleep(0.25)
        elapsed_time += 0.25
        # check player is still on floor
        if y < 0.75:
            mc.postToChat("Game Over")
            break;
    else:
        # remove floor
        mc.setBlocks(-10, 0, -10, 25, 0, 25, 8)

        # put safe area back
        mc.setBlocks(safe_area_start, 0, safe_area_end, safe_area_start + level, 0, safe_area_end + level, 57)
        time.sleep(2.5)
        continue
    break
Save this as "mini_game_2.py" and give it a run.
The Pi 2 has some performance issues whilst running Minecraft. The Central Processing Unit (CPU) usage graph (top right corner) never shows any heavy load, so this must be down to poor design and optimizations by the developers. These issues are unrelated to running code (as they continue when Python is not running), however they are compounded by this mini game. If your Pi is really struggling you may want to reduce the size of the arena or overclock your Pi.
Diamond Detector

Let's make another circuit. This will use a Light Emitting Diode (LED) to light up when there are diamonds underneath (within 15 blocks). Here's what you need:
- 1 x Breadboard
- 1 x LED
- 1 x 220 ohm resistor
- Female > male jump cables
- Male > Male jump cables
Here's the circuit:

Connect the Anode (long leg) to GPIO Pin 14. This pin acts like +5v. Connect the Cathode (short leg) to ground.
I have used a cheap ore toy and modified it by removing the rear cover and electronics, I then placed an LED underneath it. You could could easily make this permanent with hot glue or something similar.

Save this code as "diamonds.py":
        import RPi.GPIO as GPIO
import time
from mcpi.minecraft import Minecraft

mc = Minecraft.create() # create Minecraft Object

led_pin = 14 # store the GPIO pin number

GPIO.setmode(GPIO.BCM) # tell the Pi what headers to use
GPIO.setup(14, GPIO.OUT) # tell the Pi this pin is an output

while True:
    # repeat indefinitely
    x, y, z = mc.player.getPos()
    for i in range(15):
        # look at every block until block 15
        if mc.getBlock(x, y - i, z) == 56:
            GPIO.output(led_pin, True) # turn LED on
            time.sleep(0.25) # wait
            GPIO.output(led_pin, False) # turn LED off
            time.sleep(0.25) # wait
When there is a diamond ore block underneath the player (within 15 blocks) the light will flash.
Have you made something cool with Minecraft Pi? Let me know in the comments what you made or how far you made it in the games.